Saturday, April 29, 2023

Water You Been Up To Lately?

This week we have a brand new and really fun Just Us Girls Challenge theme: CASE a Design Team Member! (CASE means Copy And Selectively Edit, or Copy And Slightly Edit, and even Copy And Share Everything. It is "proper etiquette" in cardmaking in general that the person CASE-ing a card gives credit to the person he/she CASEd for the original idea.) 

The design team had no parameters on what to make this week for our cards for this challenge, and our participants will choose one of the team's cards to CASE, and in their post explain which card they chose and why/how they came up with their version of that card. I can't wait to see what our followers create!


I decided to add my card to the Time Out Challenge #237: Fashionable. My swimmers are no doubt in the latest swimwear with their equally fashionable sun hats, and on their bright colored floats that show off the colors of their "on trend" swimsuits. LOL!


Products I used:

Simply Graphic: Les Nageuses dies

Ellen Hutson: Just Squidding stamp set

Concord an 9th: Dew Drops

Versafine: Onyx Black ink pad

Various colors of cardstock

I see a lot of cards using the same die cut or stamp repeatedly all over the card front. I thought of this pool float/swimmers die set and the layout last night, so this morning I got out my dies and cardstock to start cutting. I have seen die cut flowers, words, gift boxes, coffee cups, Christmas trees, geometric shapes, etc. repeated on cards, but never a swimmer on a pool float. It was fun to mix and match colors and arrange the ladies in the pool, floating around and enjoying themselves. Making this card was more enjoyment than work, honestly. You can really take just about any die cut shape or stamped image and repeat it to make this style of card! Here are some more ideas that caught my eye:


I hope our Just Us Girls Design Team cards this week made you smile and want to CASE one of us! Be sure to click on the team's names to read how they made their cards. We are really looking forward to seeing you in the gallery!!

-Carol


Monday, April 24, 2023

Happy Birthday Drinks

I have had a really cool Paper Smooches card in my head ever since I saw it several years ago. So when I saw that the Seize the Birthday #259 Alcohol Challenge this week was alcohol, faux alcohol ink patterned paper and/or cocktails came to my mind. Here is my card:


Here is the Paper Smooches website card that I have had in mind for a while!


I recently bought some Pink and Main alcohol ink-looking patterned paper and I am starting to use it here and there because it is so pretty!! I thought it would go well with this challenge and use the word alcohol in both senses of the word. 

I cut out all of my drinks then arranged them on my  3 3/4" x 5" panel. I popped up the die cuts that I left whole, and adhered the ones cut off by the edges flush with the panel for no special reason. Then I found a birthday sentiment that would fit on the panel. Last, I popped up the smaller panel on the A2 cards base. That's it! It really wasn't a difficult card and it was fun positioning the dies on a part of the paper where I could get a good effect from the pattern.

Products I used:

My Favorite Things: Let's Toast dies

Pink and Main: Inked Oasis 6 x 6 paper pad

Stampin' Up!: Party This Way stamp set

Catherine Pooler: Queen for a Day ink pad

Simon Says Stamp: Holographic Rainbow sequin mix

Foam tape

See you back here soon,

-Carol


Saturday, April 22, 2023

Four Basic Food Groups

This stamp and die set from Concord and 9th is so so cute, but I have only used it twice now. Why?!! For our Just Us Girls Challenge #676: CAS with food and/or drink, I decided to use the food dies and an old wooden stamp sentiment (It actually says: Four Basic Food Groups - Cookies, Candies, Cupcakes, Chocolates.) It took me numerous tries to stamp just the first four words and my fingers are now bright red! Here is my CAS card for this week.


Products I used:

Concord and 9th: Love You More Than dies, mini ink pad

Stampabilities: Food Groups stamp

Pink and Main: Banner die

The Love You More Than dies include the scalloped rectangle die as well as a pillow for "I love you more than naps." There is a takeout coffee cup and flower dies, too. I didn't use the matching stamp set today, but the stamps make a perfect impression on the first try and there is a word stamp to match each item you love. I used the french fries once to make red licorice! 


We hope you will join us with your Clean and Simple food/drink cards following our definition above. See you in the gallery!

-Carol


Friday, April 21, 2023

Sparkle

I love the colors of Sunday Stamps' SSC 307 Floral Fragrance Challenge this week and almost forgot to make a card in time for it! Here is what I ended up with using the two pinks and navy.


First, I taped off two sections so that I could ink blend my two shades of pink. Then I inked and stamped the flower a few times to have them be mostly on the left side of the card, leaving room for the sentiment. I knew I would add sequins after I chose this sentiment and spent forever trying to space them in an eye-pleasing way. It isn't natural for me and I agonize over their placement every time I use them. I had some blue ones that added in the lighter of the two blues in the challenge, and my card is a very dark navy, so I ended up using four of the colors from the prompt.

The "completed" card was at first just one layer, and it looked really boring to me...so I stamped two more flowers and fussy cut them in order to raise them up on foam tape for some depth. They are the top left and bottom right flowers. I like it way better with them raised up a bit.

Products I used:

Ellen Hutson: Spread the Sparkle stamp set

Stampin' Up!: Flower stamp

Ranger Distress ink: Kitsch Flamingo, Picked Raspberry

Archival Ink pad: Cobalt

Navy cardstock A2 card base

White card panel

Corner rounder

A variety of sequin brands

Blue paint tape

Foam tape

See you later,


-Carol

Thursday, April 20, 2023

Best Day Ever, Thanks

I sort of CASEd myself for this card today while playing along at the Global Design Project Sketch Challenge #390. I made a Christmas card a while ago like it, and I'll show it to you below.


This is my card from 11/2021.


To make today's card I used two circle dies, one inside the other, held by washi tape. I cut out the 9 colors you see here and another 9 white ones for backing to make them stronger and thicker. I arranged them on a pale pink panel of cardstock, then on a dark grey 5" x 5" one, and mounted them on a 5" x 5" white card base. I cut the "thanks" twice out of the same dark grey cardstock and glued them together. I placed it on the card where the sketch showed theirs, then feeling like the card still needed something, I added the sticker sentiment and a few sequins.

I feel like this is a versatile layout than can be adapted to other shapes and images. I tend to like graphic layouts and grids, so the challenge caught my eye. There are so many ideas over at the challenge to be inspired by too!

Products I used:

Circle dies (source forgotten)
Thanks: My Favorite Things
Sequins: Simon Says Stamp
Sticker sentiment: Tim Holtz


See you back here soon,
 
-Carol


Wednesday, April 19, 2023

Live in the Moment

I saw a similar style of card to the one I made today and decided to look through my dies and stencils for something that would work in the same way. I am sure there is a name for a card that you stamp (in my case, stencil) and then die cut and raise portions of the panel while leaving other parts flush with the card front. Here is what I am talking about:


I am playing along with April Stencil Fun over at Crazy is Our Fame - Stencils are our Game here.  The optional theme of the challenge is patterns, and while my florals aren't exactly in a pattern, my die has such a pretty quilting stitched pattern. First, I stenciled the florals, then die cut with the quilty cover die. When I took the die cut out of my Big Shot machine, the circles stayed put with the outer "frame" so I carefully put adhesive on the circle backs. I turned the whole thing over in one piece and centered it on my card front. I pressed down on the circles to adhere them to the card. Then I lifted off the outer part of the panel and put foam tape all over the back. Then all I had to do is line it back up where it belonged and add a sentiment.

Products I used:

Waffleflower: Quilt Circle Panel die

Pretty Pink Posh: Crocus stencil

Distress inks

Ink blending brushes

Tim Holtz: Small Talk sticker

I am looking at my cover plate/panel dies to see what else I can come up with in this style because it was pretty simple!

See you soon,

-Carol

Monday, April 17, 2023

Relax, part 2

Since I had all the stamps, dies, markers and my tropical patterned paper stash out, I made another card for the As You See It #296: Balance Challenge, using different colors and two gold metallic cardstock sheets. It all started with the multicolored pineapple patterned paper.


Like my card earlier, I made the sketch within the sketch (the whole card and the design on the circle mimics the sketch also). I like this sketch because it keeps the card CAS. I see a 4th of July card in my mind using it soon.

Products I used:

Ellen Hutson: Everything's Beachy stamp set

Versafine: Onyx Black ink pad

Stampin' Up!: markers

Gold cardstock

Gold and mint patterned cardstock

Pineapple patterned paper (Hobby Lobby?)

I am definitely in summer mode now in cardmaking. It's only a month until school is out here and even though I am not teaching anymore, I still feel the "vacation" time of year approaching.

See you soon,

-Carol

Relax

My sunbathers mini slimline card here was inspired by the As You See It Challenge #296 Balance Sketch. I saw my umbrella and towels/floats immediately. Here is what I came up with...


I did "the sketch inside the sketch" (do you see it?) and finally used the swimmers paper I have hoarded for a while. I love this Ellen Huston stamp set and still have so many ways to use it. For the umbrella and towels/floats I stamped on patterned paper. I stamped, fussy cut and colored my swimmers and RELAX on white cardstock with markers. The umbrella and the circle are popped up on foam tape. I love adding dew drops when the topic has to do with water, too.

Products I used:

Ellen Hutson: Everything's Beachy stamp set

Stampin' UP!: Patterned papers

Concord and 9th: Dew drops enamel dots

Versafine: Onyx black ink

Simon Says Stamp: circle die

I may be back soon with another card like this in different colors!

-Carol


Saturday, April 15, 2023

Everything Has Beauty

I'm back with a card for our latest moodboard created by my talented teammate Nancy for Just Us Girls Challenge #675. I think her moodboard is phenomenal, having just the right amount of colors and elements...things I just love! I have CASEd a gorgeous card by Broni Holcombe here


Products I used:

Memory Box: Enchanting Poppy Stems die

Simon Says Stamp: Etched Laurel Leaves dies

Sizzix: Hexagon Frenzy embossing folder

Tim Holtz: Small Talk sticker

Concord and 9th: Dew Drops

Distress Inks

Ink Blending brushes

I borrowed the embossing folder the other day when I had friends over to stamp. I embossed the honeycomb on white linen cardstock, but the next day I ink blended pinks onto it and liked the result. I die cut and ink blended the flower and leaves, then arranged them on the embossed panel. I mounted it all onto a white A2 card base and added the sentiment and some dew drops. Spring is here!!!

We hope you will join us this week with Nancy's beautiful moodboard. I have been looking forward to using it to make a card or two.

-Carol


Thursday, April 13, 2023

Life's A Beach

As I continue into my beachy card time of the year, I got out my favorite beach goer dies for my card today. The Paper Players Challenge PP635 is all about pastel colors and I was making a card kit to share at a stamp gathering at a friend's house this week when I realized that this fits the PP35 challenge. I already submitted a card there this week, but here is number 2!


Products I used:

Spellbinders: Day at the Beach die set

The Greetery: Destination Summer stamp set (birds)

My Favorite Things: Life's a Beach stamp set (sentiment)

Various patterned paper

Pinkfresh Studio: Diagonal Stitched Rectangle dies

Distress oxide inks

Ink blending brushes

Versafine: Onyx Black ink pad

There are lots of little pieces to die cut and put together but it is actually a relaxing and fun process because they are so cute as they materialize! I ink blended the sand and sky first, then built the scene. It is fun to look for patterned papers (not that you have to use them at all) for the bathing suit, hat, towel, bag and flip flops. I also got to use my Target dollar spot beach hut/lifeguard stand prop for the first time. Lol!

See ya soon,

-Carol


Wednesday, April 12, 2023

Stay Cool

I happened to see that the Inspired By Challenge #IB232 Dessert Photo and #IB232 Sketch were right up my alley with fun pinks, aqua, green, and a sketch that jumped out at me for a clean card style I have made before. I really like the dessert idea too, so I got started!


The diagonal opening card fit the sketch and the dessert became ice cream in a cup. Each flavor is depicted in the patterned paper I chose. Fun colors + ice cream flavors = yum!! Easy die cutting and piecing together.

Products I used:

Reverse Confetti: ice cream dies

Poppystamps: Life is Sweet stamp set

The Greetery: Spoon die

Various patterned papers and cardstock (including silver for the spoons!)

If you have seen my recent posts, summer is speeding toward us quickly and all the fun that comes with it!

See you back here soon!

-Carol

North Pole Express Delivery

First, I want to say Happy 3rd Birthday to Christmas Craft Creations!!! Our birthday comes in the month of April Fools Day and for this reason, our April 2023 Challenge is Humour. We hope you will have fun looking at our creations and that you will want to join us! There will be extra prizes this month in honor of our birthday celebration...so make a humorous Christmas creation and enter it in our gallery! 

Here is a tag I made showing poor Santa after all of the hard work he did circling the globe quickly to reach every good little girl and boy.


Products I used:

Santa: Vintage red rubber unmounted stamp, source unknown (perhaps Rubber Baby Buggy Bumpers circa 1989?)

A2 Nested Domes Dies: Waffle Flower 

Sentiment: Spellbinders Sunday Drive All-Occasion Sentiments

Patterned Paper: Joann Fabrics or Hobby Lobby

Real Red Classic Ink pad: Stampin' Up!

Colored pencils: Prismacolor

Red and black glitter cardstock: source unknown

Tag eyelet decoration die: Reverse Confetti

Various ribbons

I looked all through my stamps and dies for something humorous and settled on exhausted Santa. I cut my own tag, stamped and colored Santa with pencils. I rounded the top of the tag (and the red glitter cardstock piece as well) with a dome die and adhered them to each other. Next I punched a hole with my Crop-o-dile at the top of the tag. I die cut the scalloped hole reinforcer because it adds a little something to the opening. I cut some ribbon to match the colors on the patterned paper and tied them with black gingham ribbon.

It is never too early to make tags for Christmas! We always need new ones and my family likes that I make them for us to use. Be sure to check out all the team's creations and join in the fun!

-Carol


Tuesday, April 11, 2023

Enjoy the Waves

The Paper Players Challenge #PP635 this week is Any Colors in Pastel Shades...and I thought of some shell dies I have yet to use. Spring break is over and it is only a little over a month until summer break starts, so why not think of the beach?


Products I used:

Papertrey Ink: Summer Shells dies

Distress Oxide inks

Vellum

Concord and 9th: Dew Drop dots

Ink blending brushes

White Acrylic Paint

Aqua pen

Versafine: Onyx Black Ink pad

My Favorite Things: Life's A Beach stamp set

I die cut all of the dies in the set out of white cardstock. After removing each shell from the cardstock, I ink blended each one in the colors I wanted. I watered down some white acrylic paint and after dipping my aqua pen in the watery mess, I tried to spatter all over the die cuts. While they dried, I cut them again out of vellum. I ink blended some aqua distress ink across the middle of my card, then arranged the shells over it. I adhered them here and there and added dew drops. Last, I stamped the sentiment and the project was complete!

Are you thinking of the beach these days?

-Carol


Sunday, April 9, 2023

Happy Easter Egg Hunt

This stamp set was my last order from Jane's Doodles as she just closed her rubber stamp business. Now I wish I had ordered more from her over the years! She will have digital stamps in the future so her art will carry on. I tracked this order as it left her hands in Croatia, then accepted the package on Friday from my mail carrier, and had to make a card right away with these cute stamps! I CASEd a card on Jane's Instagram by Claudia Cubas here and tried to (hopefully) color it only half as well as hers.


Products I used:

Jane's Doodles: Happy Easter stamp set

Simon Says Stamp: Wonky stitched rectangle dies, Custom Copic Friendly White Cardstock

My Favorite Things: Grassy Fields die

Ranger: Distress inks

Ink blending brushes

Copic markers

I bought this Copic-friendly cardstock a while ago and decided to try it out with this card. It is MAGICAL! I can't even believe how well it colored and did not bleed AT ALL! The colors blended easily and I just can't get over it! I am no Copic expert, but it made blending colors so much easier for me.

I used the side of a piece of random cardstock to freehand ink blend the sky, moving it over for each color with no real measuring or color planning. (Risky tactic!) It's a rough version of a rainbow, but I just wanted a colorful background if possible. I fussy cut the image carefully before I popped up the Easter egg hunt scene on foam tape and mounted it on a white card base. 

Thanks Jane, for all the heart you put into your business as well as helping with the war in Ukraine. (She has been donating money/her proceeds to help the Ukrainian people.) 

I hope you are having a nice Easter Sunday. 

See you back here soon,

-Carol


Saturday, April 8, 2023

Hello Sunshine

As the hostess for this Just Us Girls Challenge Word Week #674, I chose Sunshine. I'm hoping that where you live you are getting more and more of it with each passing day. I love when we change the clocks and have more sunlight in the evening. As a teacher it used to remind me that summer was on its way! Just wait until you see all the ideas the team has for you! I used a photo frame die that I have had for a while and have used it in a variety of ways.


Products I used:

Simon Says Stamp: Hello Sunshine Frame

Memory Box: Marine Sailboat die

SugarPea Designs: Wave Stencil

Concord and 9th: Dew Drops

Ranger: Distress oxide inks

Ink Blending brushes

I thought of the photo frame as soon as I picked sunshine for the challenge. I ink blended my panel first, using the stencil to add waves with the same colors as the sea base colors. Then I popped up the frame to have the sunset (or sunrise) in the middle. Last,  I arranged the sailboat and dew drops where I wanted them.

Please take a look at all the design team ideas because you will be inspired!!! Join us in the gallery!

-Carol

Saturday, April 1, 2023

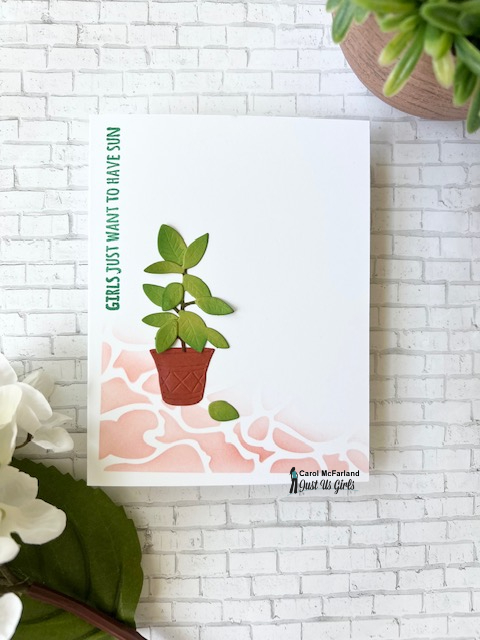
Girls Just Want To Have Sun

Our Just Us Girls Color Week Challenge #673 is Terracotta and Green. I am CASEing Hannelie Bester's fabulous card from not long ago that I just love (here.) The team came up with a great variety of ideas for you this week and we hope you will join us! My plan was for my CAS card to look like a terracotta tile courtyard with plants here and there.


Products I used:

Spellbinders: Shopping Run dies

My Favorite Things: Perfect Pool Water stencil

Poppystamps: Whittle Sealife Sentiments

Concord and 9th: Mini ink pads

Stampin' Up!: Brown marker

Ink blending brushes


This is the first time I am using these plant dies and it was fairly easy. I ink blended the leaves and terracotta pot, then assembled them into one unit. I stenciled the "tiles" on the left bottom corner then tried some arrangements of the plant and the sentiment until I was happy with it. I couldn't resist the pun when I was looking for a sentiment. Hope it made you smile.

Looking forward to seeing your ideas in our gallery this week!

-Carol