Tuesday, June 28, 2022

Make a Splash

The Paper Players PP597 is a sketch challenge and looking at it made me think of a pool from many years ago. (Details below.) I set out to make something with layers and depth, so I popped many of the elements up to achieve that look. I like doing a bird's eye view for some cards and that is what I did for this one. I'm playing along with two more challenges that my card fits...see the details below.


I'm also playing along at The Card Concept #178 By The Sea. The inspiration photo reminds me of a place we used to go in our area called The Colony where there were restaurants, condos, tennis courts and a pool on the side of the Monkey Room bar/restaurant which was on the beach side of the property. You could hop out of the pool and run across the sand into the Gulf of Mexico. Using the colors from this beachy photo, the leaves on my card represent the tropical landscaping at The Colony with the greens and blues also representing the pool and gulf. The tan/brown in the photo are represented by the swimmers tan from the Florida sun. Good food, drinks and memories there! My card is a clean and layered style.


I am also playing along with the Timeout Challenges #216 where the theme is Tropical. The photo in their challenge looks like beach here by the gulf with its palms and white sand!

Products I used:

Simply Graphic: swimmers with float

W Plus 9: sentiments

My Favorite Things:  Inside and Out Stitched rectangle dies

Altenew: 3d Hibiscus dies (leaves)

Distress Inks

Ink blending brushes

White and tan card stock

Sequins

Versafine: Onyx black ink

Patterned paper

It is fun to "dress" the swimmers by cutting them out in different colors and cutting out the parts to make their swimsuits and hats. (I had to wear a rubber cap like the swimmer on the right on swim team in high school... tight and awful to take off without ripping out your own hair! LOL! Flashback!) I ink blended white card stock first, then cut out the leaves in areas where I liked the color(s). My pool has patterned paper in it because it looks more real that way than when I try to stencil it.

Hope this made you feel cool during this hot summer of 2022!

-Carol


Saturday, June 25, 2022

Be a Pineapple

Vicki is our hostess this week forJust Us Girls Challenge #638 and her beachy picture has inspired us all in different ways! Check out all of the team's cards by clicking on their names above their pictures for some summer fun! I'm sharing my beach-inspired card over at Timeout Challenges: Tropical here, as well as The Four Seasons Challenge: Summery here and the Double D Challenge: Beach Time here.


I used an oldie but goodie pineapple stamp and die set that comes with the sunglasses. After I stamped and colored with Copic markers, I die cut the sunglass frames with black glitter card stock, then again with silver for the lenses. I attached the sunglasses to each pineapple, then heat embossed my pineapple sentiment  and matted it with same black glitter card stock. There are so many cute pineapple cards on Pinterest if you feel like you want to make something with them, but you can also make a card with a body of water, flowers, fruit, flip flops, these colors, etc. Hope you enjoy our cards this week and will share your cards with us!

Products I used:

Paper Smooches: Pineapple Crush stamp set

Bossy Joscie: Pineapple sentiment stamp

Copic markers

Black glitter card stock

Silver shiny card stock

Stampin' Up!: Black embossing powder

Versamark ink pad 

-Carol


Thursday, June 23, 2022

You Light Up My World

This week at Tic Tac Toe Challenge #167 Stef has given us some really fun choices on her board! I chose the center column moving down: Bright Colors, Friend, Gems. I've got a whole new addiction for these darling and fun Take a Seat dies from MFT! I stamped with friends this week and had a blast using these products that I wish were mine! 


Products I used:

My Favorite Things: Take a Seat and Fundamental Furnishings die-namics, bricks stencil

Pretty Pink Posh: gems

Versafine black ink

I highly recommend getting or borrowing these dies from a friend. So much fun! My friend called it "being an interior decorator" for a day! I hope to make more cards using these dies soon! Hope it made you smile!

-Carol


Monday, June 20, 2022

Anchor Tag Card

I fell in love with the colors in Sunday Stamps SSC285 this week and had to enter a card! Here is my idea, using the three colors on the right side of their challenge photo (I see that middle color on their graphic as kraft).


Products I used:

The Greetery: Pinwheel Party stencils, Postal dies

Reverse Confetti: Tag circle reinforcement

Stampin' Up!: denim ribbon, woodgrain cover die

Ellen Hutson: twine

Anchor die (not sure where I got it)

I love using the pinwheel stencils...they are easy and fun to play with, trying different color combos to see how they turn out. The pinwheels on the front side of the tag were stenciled onto colored card stock, while the one hiding behind the tag was on white card stock. You can use one color to do two shades on the same pinwheel as well! Just have a light hand for one row of the pinwheel, then go back heavy handed for the other row. I didn't add bling because I might use this for Father's Day tomorrow. I'll probably change the twine to be knotted instead of a bow. Shhh!

See you back here soon I hope!

-Carol


Sunday, June 19, 2022

Happy Father's Day Dad

In honor of Father's Day I made a card for my daughter to give her dad. Simple. Masculine. Colorful. That's all I hoped for. It was quick and I made it without thinking it through ahead of time, aka: agonizing over the details. I think that should be my new approach! (I will make him a funny one from me.) I am also playing along at Timeout Challenges 216 here, Four Seasons Challenge Anything Goes Summer here, and Double D Challenge here.


Products I used:

Memory Box: Marina Sailboats dies

Pinkfresh Studios: Diagonal stitched Rectangles

Simon Say Stamp: Love You Like stamp set by Cathy Zielske

Stampin' Up!: Teeny Tiny Wishes stamp set, classic ink pads

Lawn Fawn: Oliver's Stitched ABCs

I inked blended the front white panel after die cutting it with a "rope-y" looking die. Rope adds a nautical touch, right? Then I die cut the stitched letters to spell DAD. I die cut the sailboats three times to get all the colors I wanted, and arranged all the elements on the card where I thought they should go. I decided to die cut an inside white panel to be the same as what I did on the card front. Finally, I stamped my sentiments inside and out, adhered all of the die cuts, and called it done!

Hope you are having a nice Father's Day, or a pleasant Sunday at least!

-Carol


Saturday, June 18, 2022

Make a Splash!

This week at Just Us Girls Challenge #637 Elizabeth is our hostess and it is Color Week: Blue, Red, Yellow + a color of your choice! I wanted to ink up the flamingo from my new Pink and Main Sunny Smiles stamp set, so my extra color choice is pink!


Products I used:

Pink and Main: Sunny Smiles stamp set

Concord and 9th: tag die

Prismacolor: colored pencils

The Twinery: baker's twine

Ranger Archival Ink: Cobalt

Glossy Accents

Sequins

I was going for a sort of CAS (Clean and Simple) style card and wanted the colors to take center stage. After coloring the flamingo with colored pencils, I added Glossy Accents to the inner tube and swim mask for shine like the real items. It is HOT here and summer has begun its heat all over the country. This flamingo isn't having it and is heading for the water!

Check out the team's takes on this color combo and share your own projects with us! We'd love to see them!

Catch you later!

-Carol


Thursday, June 16, 2022

4th of July

I have been playing with my new Pinwheel Party stencils from The Greetery and have really wanted to make a red, white and blue card with them. The Paper Players Color Challenge #PP595 uses Real Red, Pacific Point and White this week. I happen to have those exact colors, so here is what I came up with for the challenge!


Products I used:

The Greetery: Pinwheel Party stencils

PinkFresh Studio: Braided circles dies

Stampin' Up!: Real Red, Pacific Point and Brilliant Blue Classic ink pads, Pacific Point card stock, Memorable Moments stamp set

A small circle die

Lawn Fawn: Oliver's Stitched ABC's dies

Red card base

Ink blending brushes

Wink of Stella Pen

Sequins, red and clear

Foam tape

I stenciled the pinwheels both lightly and more heavily with the three colors of ink only, then fussy cut the edges because I didn't buy the dies.... BUY THE DIES! I die cut the letters for JULY and die cut and stamped the "4th of" sentiment (three different stamps!). Next I arranged all the elements until I was happy with their placement, then adhered them with some being popped up on foam tape. I added sequins and Wink of Stella on the JULY and some of the pinwheels for a fun shimmer. Done!

The 4th will be here before we know it! Glad I got a card made!

See you soon,

-Carol


Monday, June 13, 2022

Work of Art

The Color Hues Color Challenge #42 here is Yellow and Black. I had this idea in my head and when I coincidentally stopped by my local Ace Hardware store, passed the paint aisle, and luckily remembered to grab yellow and black paint cards. I've also been wanting to use my Artful Tulips paintbrush dies again, so this was the result! I decided to join Happy Little Stampers Anything Goes with Dies as well with my card!


Products I used:

Stampin' Up!: Work of Art stamp set (swoosh of paint, sentiment) and Daffodil Delight Classic ink pad)

Stazon Jet Black ink

Aqua painter (to paint the yellow ink onto the bristles)

Iridescent silver card stock

Yellow sequins

Black and white card stock

5 x 7 white card base

In retrospect, I would have rearranged my card elements a little, but it turned out okay like this. The way I took my picture it looks like the paint brush is hanging off the card, but in real life it isn't! Be sure to go check out all the really fun yellow and black cards over at Color Hues!!

-Carol


Saturday, June 11, 2022

Smile

The Global Design Project #346 Sketch Challenge really caught my eye today, so I got busy creating a mini slimline card with a diagonal design.  Since I have leftover flowers, I may make another one!


Products I used:

Spellbinders: Spring Together Dies

Stampin' Up!: hearts vellum

Papertrey Ink: Smile die

Gold card stock

I cut a mini slimline sized card base, then a white panel slightly smaller. I lined up the corner of my vellum sheet with the corner of the panel, then marked where to cut it at a diagonal and fit the panel. I attached the vellum to the panel with glue dots behind each heart. After I cut out and assembled all the flowers and stems, I arranged and glued them down the diagonal edge of the vellum. I die cut the Smile die, then popped up the panel on the card with foam tape.

Hope this card made you smile!

-Carol


Make a Splash!

Hello friends! This week for the Just Us Girls Challenge #636 it is Trend Week! We are adding a moving element to our cards. The design team has come up with many creative ways to make a card move. Check them all out! Here is my card that I learned to make from a video by Lisa Curcio here. My little critters are wading into the water with their swimmies and inner tube on.


Products I used:

Jane's Doodles: Surf's Up stamp set (swimming animals)

WPlus9: Summer Time stamp set (sentiment)

Glossy Accents (for the swim masks and pool tube/float)

Stampin' Up!: patterned paper

Prismacolor: colored pencils

Foam tape

Stazon: Jet Black ink

My A2 size panel/card lies flat in an envelope and when you take it out, it folds forward to stand and show the layers of pop-ups. A personal message can be written on the back of it. You could put more characters or elements on the front pop-up, too! It is a pretty easy card actually. These little animals are SO cute with their little pool items, aren't they? I really like Jane's Doodles stamps. I also love adding Glossy Accents to elements on my cards for shine and dimension, and the pool accessories look more real having that shine.  It was hard to photograph the shiny parts unfortunately. I fussy cut my animals after coloring them to coordinate with the patterned paper. I made the alligator kind of "textured" as they are in real life. Lisa's post here will give you a written tutorial to print out and the video that I gave you above. She really gives some good hints and why she does them when she makes a card.

We hope you will join us and share your cards with parts that move. Pinterest and YouTube are full of ideas and tutorials!

See you soon,

-Carol


Thursday, June 9, 2022

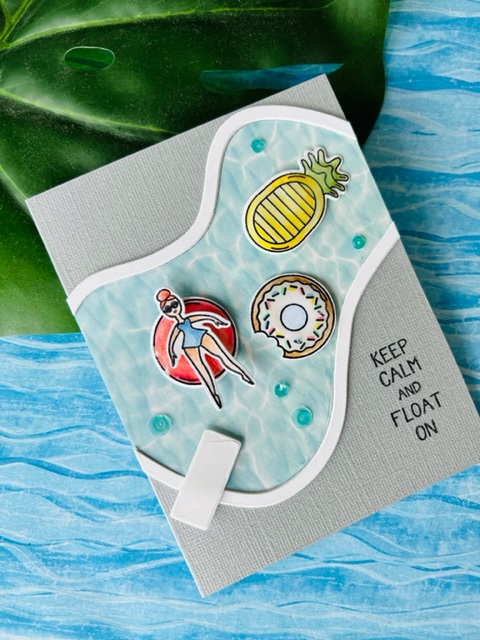
Keep Calm and Float On

Claire is our board designer this week for the Tic Tac Toe Challenge #165 here and there are so many fun choices! I chose the diagonal line from top left to bottom right: Swimming/Pool, Embellishment, Circle. As you can see, I have a pool, circular rafts and round sequins for the sparkle in the water!


Products used:

Avery Elle: Splash stamps and die sets

Patterned paper

StazOn: Jet Black ink

Buttons Galore: Lilac Lane Seaside Holiday sequins

Glossy Accents

Foam tape

Prismacolor pencils

It's a pretty simple card. I had the most fun deciding which floats/swimmers to stamp and color, then adding Glossy Accents to make them shine. 

Join us for some summer fun!

-Carol 

Wednesday, June 8, 2022

'Tis the Season

We are back at Christmas Craft Creations this month with a new theme: Trees! Ever since I was a child Christmas has seemed magical.  I have read that many of us have that feeling because it is how our parents treated the season when we were children and made it that way for us, which is definitely true in my case. This little deer in the woods seems like it is feeling the special season. I am also sharing my card over at Happy Little Stampers Christmas Challenge here.


I love birch trees whether they are bare or with leaves, and the cards I have seen using them bare like this are especially pretty! So I inked up a panel with a variety of blues, purple and white, then watered down some white acrylic paint and spattered it over the panel to look like light snowfall. Then I ran the panel through my Big Shot to get the stitching around the edge. 

I die cut the trees and remembered, after adhering them flat to the panel that I had originally wanted to pop them up on foam tape. (Luckily I had already put my moon behind the trees on the left!) I painstakingly added three more trees on foam tape (skinny little pieces due to the narrow trees and branches). I stamped the deer, then added the snow bank in front of him, again on foam tape. I didn't want to disrupt the scene with an added sentiment on a separate piece of card stock, so I stamped it right on the card. 

I hope you will join us this month and make a Christmas card where trees are in the spotlight! I know that with every card I make each month for this challenge I am adding to my stash of cards to give out come December!!

Products I used:

MFT: birch trees dies

SugarPea Designs: Card Front Element Builder die (front panel)

Stampin' Up!: deer stamp

Stazon: Jet Black Ink

Ellent Hutson: sentiment

Simon Says Stamp: Drifting Stitches Borders die (snow)

A variety of inks, including distress oxides

Delta white acrylic paint

Foam tape

Tacky Glue


See you soon,

-Carol

Sunday, June 5, 2022

Hi Friend

When I saw the Festive Friday National Best Friends Day (June 8th) #FF0110 Challenge here I had to join. I recently caved and got these two stitched letter dies from Spellbinders. I just got the Pinwheel Party Stencils from The Greetery and had to try them out right away! 


From the list above I integrated feminine, pink, sparkle, and friendship statement onto my card. I used Distress Oxide inks, DMC silver embroidery floss, rhinestones, glue dots, ink blending brushes and a "friend" stamp from Tim Holtz. I used just 4 strands of floss so it wouldn't be too thick going through the center dot several times. Silver floss is fussy and hard to work with, but I took my time and it all worked out! I added tiny rhinestones to every other embroidered "asterisk" so it wouldn't be overly blingy. The embroidered letters are attached to the shadow letter with glue dots. 

Hope you like it! I am trying to resist buying more of these letter dies yet but scheming how I can make words without buying tons of letters. The Spellbinders website has ideas for words with them. I'm warning you...their samples and the samples on Yana Smakula's blog are very tempting!!

-Carol

Saturday, June 4, 2022

National Iced Tea Month: June!

I am participating again in the National Wacky Holiday Hop over on Instagram. (Please be sure to go see my account https://www.instagram.com/sawithadtomakeit/ for the links to all the cardmakers in the hop!) For June, I chose National Iced Tea Month! As I type this I am sipping on a cool glass of Arizona Iced tea (Arnold Palmer: iced tea/lemonade) ! Here is a little history on this refreshing drink from the National Day Calendar website.


I used an older (1991) wooden stamp by Stamp It! for my drink as well as Prismacolor pencils to color it! (I didn't realize how many colors/shades are in a glass of iced tea! It is very orangey with a variety of browns and a little yellow! Look at the picture below that I used when coloring my images) I had to use this patterned paper that I adore...it just screams SUMMER! I added a little grey colored pencil beneath each glass for shadows, and created the sentiments on my computer to finish the card!! We hope you will join us over on Instagram today, June 4, to see all the fun and wacky holidays our card designers chose to celebrate!


 Make you thirsty? Me too! See you soon,

-Carol


Awesome Day

We are back with Just Us Girls #635 Word Week and Lisa E. has chosen "Paintbrush" as our word! I just got the Spellbinders Artful Tulip die set so I couldn't wait to use it!! Check out Lisa's card with the same die I used...AMAZING! I told her to frame hers!


Products I used:

Spellbinders: Artful Tulip

Ellen Hutson: Good Day to Sparkle 

Stampin' Up!: Reinkers in Pink Passion, Pool Party and Orchid Opulence, Rich Razzleberry ink pad

Watercolor paper

Silver card stock

Wood grain card stock

Sequins

Foam tape

I watched You Tube videos and looked at lots and lots of cards made with this die set on Pinterest. I decided to use a watercolor technique on watercolor paper that I saw Lisa Curcio use on her blog here. I was excited to try it because I don't own alcohol inks, which is how I usually see this technique done. 

Next I die cut the bristles and flowers from the card stock that I watercolored after I dried it with my heat gun. I did her technique again on the diagonal of a panel of watercolor paper about the size of an A2 card. I added a little spatter of ink colors to the panel next. 

After everything was dry I die cut and assembled the paintbrush and tulips, then played with where I wanted them on my panel. (It was kind of fun to decide how to make the handle and parts of the brush. I went with woodgrain card and silver card stocks.) I used foam tape and Tacky Glue to adhere everything to the panel. Since I used silver card stock for some of the tulips and leaves, I chose and stamped my "sparkle" sentiment, then cut the two pieces out by hand and attached them to the panel with foam tape. For more sparkle I added some sequins! Last, I matted the panel with fuchsia card stock, then attached it to an A2 white card base.

That's it! I have another paint brush card coming very soon, if it turns out like I envision it. Check back this weekend for that card! Check out our design team's fun ideas for "paintbrush" this week and join us!

-Carol