Saturday, July 29, 2023

You Are Berry Special

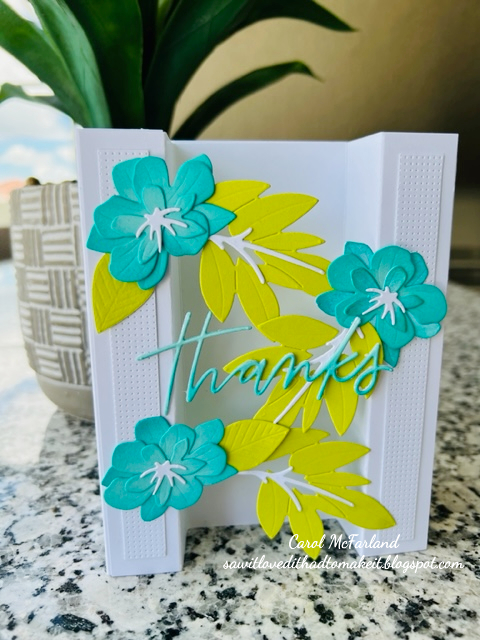
Just as I have been enjoying eating summer fruit these past two months, I have been playing with them in the form of stamps and dies, too. I wanted to try out this Pretty Pink Posh strawberry dipped in white chocolate and sanding sugar. Yum! For this week's Just Us Girls Challenge #690 we are asking you to CASE a design team member. Choose a card and make it your own or take inspiration from the colors, elements, etc. Tell us whose card you CASEd and why/how you CASEd it. Here is my Double Decker Pop-Out card:


Products I used:

Pretty Pink Posh: Valentine Mug Additions, Simple Sayings: Life stamp set

Avery Elle: wonky Scalloped Frames dies

Sugar Pea Designs: Card Front Element Builder dies

My Favorite Things: In and Out Stitched Rectangle STAX

Paper Smooches: Fruitastic stamp set

Stampin' Up: Dotted embossing folder

Concord and 9th: Mini ink pads

Pink and Main: White glitter cardstock

I found this card tutorial on You Tube here by Susan Campfield. I used dies to cut my pop out rectangles though because I like stitching and scalloped edges. 

I used an embossing folder for my front panel instead of patterned paper. *It is important to attach all patterned/embossed papers before adding the pop out mechanism. Ask me how I know...

I ink blended the cardstock for the strawberries with green and red inks, then die cut and assembled them.

*I attached the strawberry patterned paper to the card base right side, then added the embossed mat on the left, then the pop out mechanism. (There should also be a strawberry patterned paper in the middle card base section but I put my pop out mechanism in too soon) Then I stamped, decorated and completed the assembly of the card.  It really is simple. I like how there is kind of a surprise when you open the card. It stands easily by itself.
 
I sure hope you will join us this week...it is as easy to CASE one of us by using the colors alone, or use the same style of card or a card's theme. Looking forward to seeing what you make!

-Carol 

Thursday, July 27, 2023

Go to Your Happy Place

In this season of relaxation, we try to do the things we love most. Whether that be at home with a bbq or picnic or going to the places we dream of all year, this week's Inkspirational Challenge #294 Moodboard is all about travel and being "chill" however we see that. Here is my card inspired by their photo. 


Products I used:

Paper Smooches: Get Out of Town stamp set

Copic and Stampin' Up! markers

Patterned paper

I stamped and colored my images, then fussy cut them. I knew I wanted to use this new-to-me patterned paper, so I cut a strip, then added the travel images and a plane taking off to show going to my happy place. I stamped the sentiment and added some sparkle with rhinestones. Inside I added another sentiment that pairs with the one on the outside along with a flower from the set.

Where is your happy place?

-Carol


Saturday, July 22, 2023

Thanks a Hole Bunch

For our Just Us Girls CAS Week Challenge #689 - Use Three of something, I went for frosted, yummy donuts. Who can resist one?  Wait until you see the variety of "threes" that the team and our special guest Kristin made for your inspiration this week!


Products I used:

The Stamp Market: Donuts stamp and die sets

Versafine Onyx Black ink pad

Variety of embossing powders

Concord and 9th: Wheat mini ink pad

Stampin' Up!: Bermuda Bay ink pad

Small ink blending brush

Variety of embossing powders

Versamark watermark ink pad


All I did was die cut, stamp, heat emboss, ink blend the donut edges, assemble, and stamp the sentiment. The choosing of embossing powders and cardstock colors took the most time! We hope you will join us with another fun and easy challenge! Can't wait to see all the creative ideas in our gallery!

-Carol

Saturday, July 15, 2023

Hey Cutie Pie

For our Just Us Girls Challenge #688 Moodboard this week Lisa E. has given us a yummy variety of things to inspire us. I went for a fruity dessert card: I adore cherry pie, tarts, turnovers, pastries. The team has all sorts of good ideas that you should check out! We hope your taste buds will make you want to create something sweet as well!


Products I used:

Spellbinders: Sky View Pies and Dish It Up die sets

Poppy Stamps: Life is Sweet stamp set

Concord and 9th: Mini ink pads

Pink and Main: Large Sentiment Strip Dies

Sugar Pea Designs: Card Front Element Builder dies

Red Twine

Silver cardstock

Acetate

I built the box (don't own the die, so freehanded it) and die cut the pie. I ink blended the pie crust to make it look cooked.  Next, I "sneaked" the pie, acetate window and box bottom into the already completed box...should have put it all together in a different order. I die cut the silverware and tied twine around the box. The fork and knife are attached to the box top with glue dots.

I die cut a scalloped cherry paper rectangle (hoarded this paper for YEARS down to a half sheet because I love it). I adhered it to the card base, then stamped and die cut the sentiment banner. I attached the sentiment and pie box to the front of the card. That's it!

Take a minute to join us and our guest Kristin for this sweet treat challenge. We love seeing your creations!

-Carol


Wednesday, July 12, 2023

Warm Christmas Wishes

Christmas in July is being advertised and begun by crafters already...and the theme for July 2023 at Christmas Craft Creations is Anything Goes! So, I decided to get Santa out on his boat as he might be in a warm climate in December. I CASEd myself from a while back, but this time there are holiday touches. I love a rocker card and the waves and sun lend themselves well to this style.

Also, this month we are having a design team call for new people to add to our team. If you love making Christmas cards year round to have a stash made for yourself by December, this is your place! Each team member makes one card a month on either the launch or reminder team. You will most likely get a choice of which team you want to join. We also get a chance to vote for the monthly themes each year. It's a nice challenge to be a part of in my opinion. Be sure to read up on it on the Christmas Craft Creations July launch post!


Products I used:

Sunny Studio: Surfing Santa stamp and die sets

My Favorite Things: Wave dies,  A2 Circle STAX dies

Stampin' Up!: (I think) Sailboat die, Sun designer series paper

Sizzix: Tim Holtz Christmas Minis dies (bow on package)

Punch: square used as a package

Silver cardstock

Versafine Onyx Black Ink

A rocker card is a circle folded in half as the base, then decorated on one side. The card stands on its rounded edges and that is how the card rocks. You can go simple or elaborate with how you decorate it. I kept die cutting circles, then die cutting the top edges for waves and a smaller circle for the sun. I tucked my little sailboat into the waves and popped up the sails. 

We hope you will join us this month with a Christmas themed card of any kind. Pretty easy, right?

-Carol

Sunday, July 9, 2023

Thanks

These Papertrey Ink flowers from the Into the Blooms II die set can take on all kinds of looks depending on the color and arrangement. I saw an example on Pinterest here and took off from there for my Double Bridge card. I am playing along at Freshly Made Sketches #593.


Products I used:

Papertrey Ink: Into the Blooms II dies

Ellen Hutson: A2 Piercing Plate 2

My Favorite Things: Thanks die

Distress ink

I die cut the flowers and ink blended the edges, then assembled them. I die cut the leaves and assembled them as well. Next, I created my card base with heavy white cardstock, then cut a panel from the Piercing plate die. I cut down the panel to mat the front and sides of the bridge "towers," then started arranging the flowers and leaves.  I glued them on one by one making them "bridge the two front sides of the "towers." Next, I die cut the "thanks" and ink blended the bottom edge to sort of match the flowers. Then I cut two more "thanks" to strengthen the word and glued it to the front of the flowers to mimic the sketch. The tutorial for the double bridge is here by Debbie Mageed. It's pretty easy!!

So now I'm off to clean up my desk and jump in the pool since the "feels like" temp is 104 degrees. Hoping for rain for our poor grass an other vegetation!

-Carol


Hope Your Birthday is a Splash!

Still in summer mode, I created a tropical waterfall/water slide card today with Santa on his inner tube. I have a friend with a December birthday and she will laugh out loud at this. I am playing along at the As You See It Challenge #302 with their Build with the Basics sketch.


Products I used:

Sizzix: 3D Embossing folder

Sunny Studio: Surfing Santa stamp and die set, wave stencil

Simon Says Stamp: Drifting Stitches Border dies

Ranger: Distress inks

Concord and 9th: Mini ink pad, Dew drops

Markers

Versafine Onyx black ink pad

I recently made a horizontal lazy river card and today I had the idea to do a vertical waterfall/water slide on a top folding A2 card base. I embossed, then ink blended the tropical leaves on a 5 1/2" X 4 1/4" panel of cardstock. This embossing folder has great detail and texture, but as hard as I tried, I couldn't capture the depth of the leaves like it is in real life. Hence, the two photos.

I already had a Santa die cut and colored, so next I cut two circles inside each other for the inner tube, one out of patterned paper and a white cardstock one, then glued the patterned one on top of the cardstock one. 

Using my wave stencil, I lightly inked up a strip of white cardstock with a couple of blue/aqua distress inks, then removed the stencil and lightly ink blended over it again. I cut the sides with the Drifting Stitches Border die on both edges and had my "cascading" waterfall/water slide!

I assembled the card and popped up the inner tube on foam tape. Last, I stamped the sentiment and added a "splash" with dew drops. I can't wait to send it to my friend in December!

I know my time is short with the summer themed cards, but I hope you do not tire of them. I appreciate your visits here. Fall will be here soon enough!

-Carol


Saturday, July 8, 2023

Sending a Summer Hello

Do you collect seashells when you go to a beach? I look for unusual ones that are not broken and that have good color. Here is another summery card I made for our Just Us Girls Challenge #687 Word Week: Seashells. Lots of fussy cutting and coloring, but it really came together easily. I am sharing my card over at Inspired By Challenge Sea Decor IB245 with my wreath made of seashells. I was inspired by their challenge photo's blues, and the round frame...in addition to the sea theme. And finally, I am sharing my card over at Less is More, B is for Beach.


Products I used:

Ellen Hutson, I think: (seashells and sea plants stamp set...no longer have the packaging)

Simon Says Stamp: Sea You Soon stamp set, Holographic Rainbows Sequins

Versafine Onyx Black ink pad

Prismacolor pencils


I stamped the shells on scraps of white cardstock, then colored them with my pencils. I fussy cut them and arranged them around a circle I die cut recently. I glued the shells along the edge, then stamped my sentiment in the center. I glued the circle of shells to the front of an A2 card base, added a few sequins, and I was finished! As you can see in the pictures, the sequins sparkle differently with varying light.

Please join us this week for our seashell challenge! We love seeing your creations! And you can possibly be a future guest designer for a month with us!

-Carol


Tuesday, July 4, 2023

4th of July Card

Happy 4th of July!! It sure arrived quickly, didn't it? I wanted to make at least one 4th of July card this year and today I had just enough time to break out this Concord and 9th set after seeing Shirley Sipe Ropelotto's  beach version (Recently saw her cool card in a Facebook group we are both a part of) with this set. I have been saving the stars and stripes patterned paper for months just for this holiday! I am playing along over at The Paper Players Challenge PP647 At the Beach! I'm also sharing this card at Simon Says Stamp Monday Challenge Summer Moodboard!


Simon Says Stamp Summer Moodboard


Products I used:

Concord and 9th: Weekend Market Dies

Simon Says Stamp: Sentiment strip, Drifting Stitches Border dies

Spellbinders: flip flop dies from Day at the Beach die set

Star sprinkles

The Weekend Market die set is pretty straight forward but I changed the long sleeved shirt to sleeveless and the pants to shorts by fussy cutting the sleeve into an arm and pants into shorts. There is an anklet because the foot and leg dies are two pieces and I wanted to cover that line...but I also love those tiny stars! I popped up the shirt and the foot on the bent leg with foam squares for dimension.

Hope your holiday is a good one!

-Carol


Monday, July 3, 2023

Fall Sweater Cards

Here are a few more gate fold sweater cards I have just made using fall patterned papers that were recently gifted to me. They are a lot of fun to make using any papers, jewels or buttons! I also covered the backs of the cards with the patterned papers shown on the front. The Halloween card has glitter cardstock for the neck and placket. The holly card has sparkly berries. See my post here for the details and a link for making them. They are A2 size. I am entering them at NBUS (Never Before Used Shtuff) here.


(Quick cheat sheet: Cut cardstock 9" x 5 1/2" and score at 2 1/2" and 6 3/4" for the card base. There will be overlap just like a real sweater that you will probably trim a little to center the front placket and buttons.)

See you back here soon with something new!

-Carol

Saturday, July 1, 2023

Pastel Flamingos

I'm back with a card style I CASEd from Kathya Kalinine whose sweater cards are SO cute!!!!!! This week lovely Elizabeth is our hostess and she created our Just Us Girls Challenge #686 Color Week using only pastels. This is what I came up with for it.


Products I used:

Simon Says Stamp: Circle dies 

My Favorite Things: Single Stitch Circle Frame dies

Hero Arts: Color Layering Waves stamp set

Random pastel buttons, cardstock and patterned paper

If you have ever lived in a warm/hot climate you know that indoor public places are over-air conditioned and you need to bring a light sweater along. That is how this pastel sweater fits in...and imagine the card possibilities using patterned papers with a variety of designs year round on them? I made this for my local friend Nancy who, like me, loves all things coastal.  Watch the video linked above for the tutorial by Kathya. She gives great tips throughout that save you from mistakes and give you more ideas. (It is basically a gate fold card, cut at the top with a circle die.)

We hope you will join us for this pastel week of card design...it's an easy one and we love seeing your ideas in our gallery!

See you soon,

-Carol