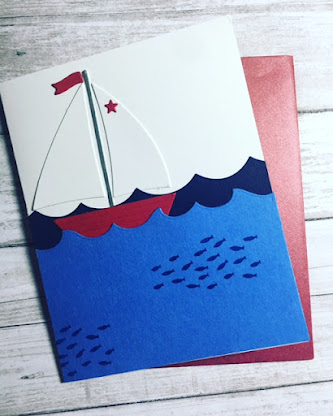

Products I used:
MFT: the sailboat dies
Stamping Up!: the school of fish
When I need a card quickly for a gift, I die cut because even the simplest design can be fun.
-Carol
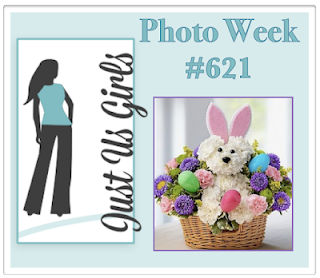
Well, almost spring! This week at Just Us Girls Challenge #621 Photo Week it is my turn to choose a picture for inspiration. I saw this cute little guy and thought that there were many jumping off points from this scene. I changed my card several times while making it, and here is what I ended up with:

Just Us Girls is back with a Color Week Challenge #620: Teal, orange and dark brown! Warm colors if you are in a cold winter location!! I recently bought this coffee set and was anxious to use it.
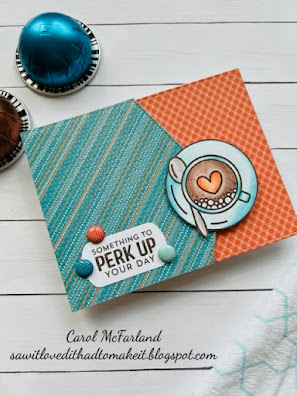
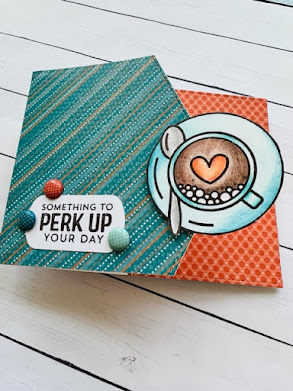
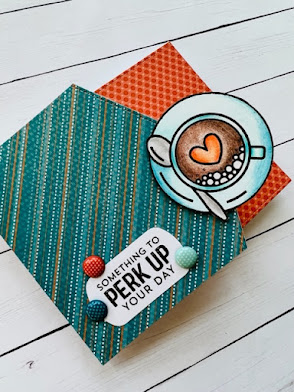
Honey Bee Stamps: Coffee Break
My Favorite Things: Perk Up
Stampin' Up!: patterned paper, brads, and punch
Gina K: Charcoal Brown premium dye ink
Prismacolor pencils
foam tape
SugarPea Designs: SugarCut Card Front Element Builder dies
I decided to make a side fold horizontal card and a different shaped opening so I used my card front dies to cut both the front of the card as well as the patterned paper inside. Next I stamped and colored my image, then cut it out by hand. I chose a sentiment from my stash and used a Stampin' Up! punch that I affectionately call the bandaid punch for its shape. I found some colored brads in the perfect colors and added them to finish off the card.
We hope you will join us this week with our color challenge...it makes it easy to use any stamps or dies you own! See you back here soon!
-Carol
For this week's Tic Tac Toe Challenge I was the creator of Board #149. I decided to make the middle row going from left to right: Green, Friendship Sentiment, Flowers. This was a labor of love. I had this idea in my head for a long time and finally sat down to make it materialize.


For the inside of the card, I made a bouquet with the flowers dies from the Shopping Spree set by cutting out a LOT of flowers (2 pieces per flower plus the center) in three colors of pink and coral. I punched a circle and started adding the completed flowers to it, then die cut leaves, folded them a little along their score line, and adhered them around the bouquet. I added Glossy Accents to the center of each flower. I made the body with the rest of the Shopping Spree dies and put them together. I meant to ink blend before adhering her to the card but forgot, so I carefully stenciled around her after she was already permanently on the card.
I ink blended a strip of white cardstock in pink, coral and green inks that matched the same colors already on my card. I die cut the letters and adhered them to the side of the card. I added one more flower in between the words and added some more Glossy Accents to the center. Whew! The card measures 4 1/2" x 6 1/2" closed.


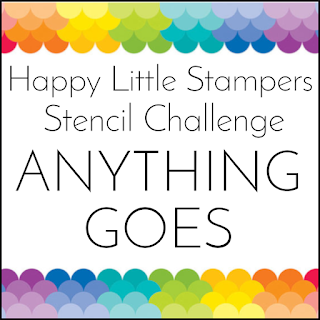
I am playing along at Happy Little Stampers Anything Goes with Dies here since I used a lot of dies to make this card! And I want to share my card with the Double D Challenge Shades of Pink here.
Products I used:
Stampin' Up!: Hearth and Home Framelits (window die)
Spellbinders: Shopping Spree dies
Hero Arts: Graphic Patterns Stencil Pairs
Lawn Fawn: Oliver's Stitched ABCs
Oxide inks
Blender brushes
Vellum
Glossy Accents
Thanks for sticking around for that long explanation!
-Carol
On this Valentine's day I have a special post. A cardmaker that I follow on Instagram makes cards for sick children in the hospital. I have been wanting to volunteer somehow/somewhere now that I am retired, but during the pandemic I don't want to be exposed to Covid. When I saw the website that she provided, it inspired me to ask a couple of local cardmaker friends to join me in making cards to send to Cards for Hospitalized Kids. Here is a link to their website with all the details. We will put our cards together and send them very soon. I made the heart speech bubble ones today (inspired by Amy Gwinn on Instagram) and I am adding more cards to mail as I make them. I tried to make a variety of cards for different age groups, including eye-catching ones for little children who don't read yet. No envelopes necessary when you send your cards.


This week at Just Us Girls #619 the challenge is to make your own stencil! I used one I made and another one I bought, and I had to use them both at the same time for part of this process!


I got out my only heart shaped dies which are Simon Says Stamp Wonky Hearts to make a stencil, but neither heart was the right size for this card...so I got a sheet of acetate and hand cut a wonky shaped heart of my own. I used my new stencil to ink blend pinks and red inside the heart. Next I put a My Favorite Things stencil called Full of Heart over the hand cut heart to stencil darker red and coral hearts over the ink blended background. I then took out my Picket Fence Distress ink and moved the MFT hearts stencil over just a hair to stencil again and make a shadow effect on the hearts that were already there.
I let that panel dry and cut out the Paper Smooches Linked Hearts die in gold as well as my Lawn Fawn Oliver's Stitched ABCs L, O, V, and E dies. Then I punched three little gold hearts with my old Stampin' Up! Owl die that has accessories such as this heart. I popped up the LOVE letters and glued the other die cuts flush to the card. I decided to mat the white panel with gold to dress up the card a bit, and it was done!
I hope you will join us this week and make a stencil with your dies!
-Carol
The February theme at Christmas Craft Creations is Blue and Silver and I chose a simple, pastel layout. We hope you will join us with this pretty color combination!


Products I used:
Joyful Noel Dies (letters and wreath) - Concord and 9th
Deer die - Ellen Hutson
Snowflake and Silver sequins - Stampin' Up!
Tumbled Glass Distress Oxide ink - Tim Holtz for Ranger
Ink blending brushes
Silver cardstock - Stampin' Up!
I die cut the letters three times out of textured white cardstock and glued them on top of each other to make them look thicker. I ink blended the blue ink in the center of my top fold A2 card base. I adhered all the parts and pieces to the card and I was done!
This was a relaxing and simple card to put together. Won't you join us?
-Carol
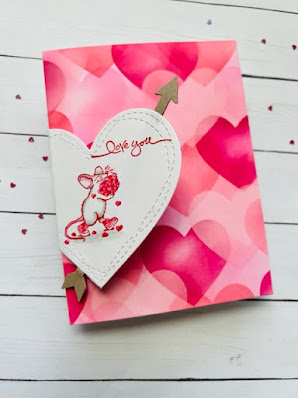
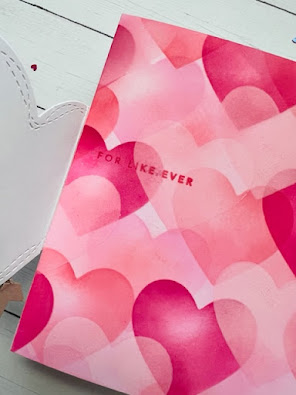
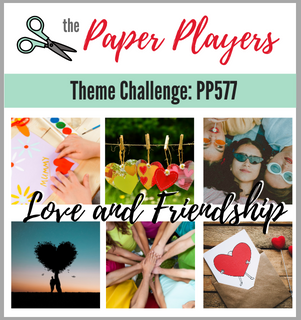
I couldn't resist making another bokeh heart card, so here is my latest Valentine card using this fun technique! I am entering it at The Color Throwdown #678, The Paper Players PP577 Love and Friendship and Happy Little Stampers February Anything Goes With Stencils. Who doesn't like (all the way back to childhood) making and receiving Valentines? It was my favorite holiday in elementary school...signing all the cards and putting them my classmates' decorated boxes/bags. Then opening the ones I received!


Products I used:
The Greetery: Cozy Cup Coaster die
Simon Says Stamp: Wonky Hearts die
Honey Bee stamps: Coffee Break Stamp set
Hero Arts: sentiment
Ranger: Distress Oxide Inks in pinks and red
Prismacolor: colored pencils, reds, pinks and browns
Stampin' Up!: chalks, ink
Wink Of Stella: brush tip pen: clear glitter
I cut my own stencil by taking a heart die and cutting it in the middle of a piece of acetate. To make the background, I first ink blending three pink inks randomly in different parts of a white card stock panel. Next, I stenciled the hearts using the several distress oxide inks. Then I had a half coaster die cut from a long time ago and used it for the napkin/tablecloth look under the cup and saucer that I colored with Copics and colored pencils. I cut it out by hand so no white edges would be present. I popped up the cup and saucer on foam tape and added a white glitter cardstock heart that I cut with a punch. I ended with some Wink of Stella on the bubbles and the spoon.
Hope you are having a good week and will treat yourself or your Valentine on Monday!
-Carol
I haven't entered a challenge in 2022 yet and I was looking for something that suddenly gave me an idea...so here is my card for the Color Throwdown #678 using pink, red, cranberry and kraft. I am also entering it in The Paper Players PP577 and Happy Little Stampers Stencil Challenge.
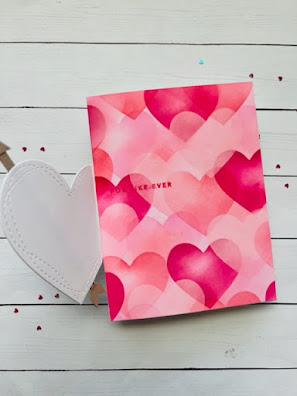
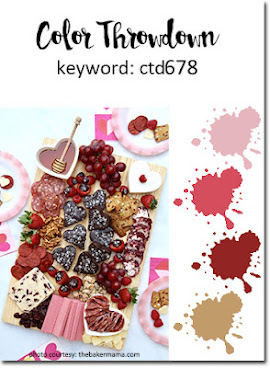
I love bokeh technique and have done circles and squares, so it was time to use a new shape. Since I need a Valentine card, I thought I would go with hearts. I randomly ink blended some distress oxide inks (Spun Sugar, Kitsch Flamingo, Candied Apple) on the front of a side fold A2 card base. Next I made a stencil with a Simon Says Stamp Wonky Hearts die. I used blender brushes to stencil my hearts (using the same distress oxide colors plus SU Cherry Cobbler) and softened the look with white in my last step . I loved the pinks and reds and didn't want a lot of kraft on the card, so I decided to punch an arrow (SU) and put it "through" another SSS wonky heart that I die cut out of white card stock. I stamped my cute little image (Co-Motion stamps) on the heart in red and colored with Prismacolor pencils. I stamped the sentiments (Stampin' Up and SSS CZ Design) with Candied Apple distress ink, cut and attached another heart on the back of the front one, and ended up with an opening heart on top of the card base. I love cards that have movement and surprise.
I hope you have a great week...and be sure to check out all the inspiration at these three challenges!
-Carol
Friends are the topic this week at Just Us Girls #618 and I got to use a brand new stamp and die set for my card for a friend! I had so much fun using this set...so many possibilities!


For our Tic Tac Toe Challenge #147 this week I chose the right column moving down: CAS, word die cut, stencil for my card, which is a Valentine. I often struggle with CAS design, but I did a similar layout a while ago with a beachy card.


I used my favorite Ellen Hutson All Inside Bear and had him hold a sparkly plaid heart cut with one of the dies in the same set. I got out my Stampin' Up! chalks to give her/him blushing cheeks and a grey Copic marker for a little shadow. I borrowed the Simon Says Stamp Love die from a friend and cut it out of the same sparkly pink plaid paper as the heart. I used a Reverse Confetti tag die, cut out of white cardstock and a Stampin' Up! hearts stencil with Catherine Pooler Queen for a Day purple ink to make a heart-covered tag for the bear. I used Distress Oxide Kitsch Flamingo behind him over the stenciled purple hearts. I added some twine to the tag and popped it up with foam tape on an A2 white card base! (My background in this photo is smooth paper, a photo probably of crumpled tissue paper. I keep looking at it thinking people are wondering why I used old tissue paper for a background) LOL!
I hope you will join us and play with our latest board this week!
-Carol