Thursday, February 29, 2024

Chance of Sprinkles

This week at Just Us Girls #716 I am hostess and it is CASE a DT Week. Anyone playing along with us may choose one of our cards to copy and selectively make it her/his own. Take the colors, the layout, the theme or whatever you see in a card and make your own version. Each of us on the team made her own card, however she wanted. Here is my cake pop card.


Products I used:

Pink and Main: Sweet Christmas stamp and die sets, Large Sentiment Strip dies

My Favorite Things: Inside and Out Stitched Circle dies, Scalloped Rectangle die

Poppy Stamps: Life is Sweet stamp set

Prismacolor pencils

All this card took was little bit of die cutting, coloring and searching for a good sentiment. I chose Chance of Sprinkles because I thought it would bring a little chuckle. It is in a stamp set with food puns, so...

I am also playing along with Inskpirational Challenge #310 Moodboard. Look at the gorgeous and yummy photos!! 


Here's to cake pops, other pretty sweets and a nice bouquet of flowers!!
-Carol


Wednesday, February 28, 2024

Breathe

I love cute "real "postage and the cardmaking kind too. Cute stamps at the post office catch my eye, especially at Christmas. With the current postage stamp and die craze I have found that over the years I was already a collector of city postage mark stamps, as well as funny ones and now pretty ones on a theme. I made this card for the Woodblock Wednesday challenge for February.


Products I used:

Judi Kins: face stamp

Postage and Breathe stamps: Concord and 9th

The Greetery: Postage die

Copic markers

Versafine black ink

Random patterned paper

For my card I used a wooden graphic face stamp as my focal point and put it on a postage die cut. I chose to color the face with red, pink and purple, as my mood led me this morning. Elizabeth Taylor, and actress from eons ago, had purple eyes and I thought I would steal the idea from her. I added postmarks and the cost of the stamp with various other stamps I have. To me the postmark on the top right looks at little like she has side swept bangs. I decided to add a saying on the stamp and I liked "breathe" because we need to relax and take deep breaths more often. I sort of cased some cards I found on Pinterest using Penny Black stamps. Here is an example of one.


If you know me, you know that I have gazillions of wooden stamps because I started stamping in the middle ages. I should be playing along with #woodblockwednesday every month with all I have to choose from. Amy Tsuruta makes the BEST cards and I sit and judge every one of mine. She would love to have you join the challenge. Click on the ink in the first paragraph of this post to go to her post.

Here's to cute postage, real or handmade!

-Carol


Friday, February 23, 2024

For a Sweet Friend

Here's a brand new card with a set I have been wanting to use again. Tonight's episode of Mary Gunn's Craft Roulette #203 resulted in these funn (inside joke) parameters:

Project: Flip Fold Card

Colors: Main Street

Element: Walk(s)

Random: Heart


On my card I have a girl walking down Main Street to/past a bakery. Will she resist going in and getting something sweet? She's wearing a heart print top and the card has a flip panel on the front where I tried to depict a brick column separating the bakery from the rest of the building. Most products I used are Concord and 9th except the ink for the stamping which is Versafine. I put some blue vellum in the window for tinted glass. I also used an older Stampin' Up! punch for the front sentiment piece, SU window die, and SU brick patterned paper. 

Now I want a cupcake!

See you back here again soon,

-Carol

Thursday, February 22, 2024

To a Special Friend

I saw on The Paper Players Challenge CAS PP677 blog that the theme is Forever Friends. I recently won a gift card and this Colorado Craft Company set is one that I chose. I sat and colored with Prismacolor pencils and thought about all the things I needed to be doing around the house. Coloring is an escape and I have been wanting to send a friend some cheer.


I made my sky to loosely look like the sunsets lately that we see from the back windows of our house. The photos never look as brilliant as the real thing. And I did not set out to make the perfect ombré, but uneven like the one below.


That's it for today. My little fox says "I miss you" on the inside of the card.

See you back here soon,

-Carol

You put the cute in...

Charcuterie! Have you had or seen a dessert charcuterie board like this one? There are breakfast ones too...as well as many other versions. Can you name all the treats on this one? I could not resist these Avery Elle Char-cute-rie stamps and dies. So fun! 

The Just Us Girls Challenge #715 is Anything Goes with a Stencil. This stencil set that I used for the background is from Honey Bee Stamps called Hearts in Bloom. There are four stencils, but I only used two. I love the shape of the hearts so much!


I made my charcuterie board first. On a random white panel of cardstock, I ink blended the colors I knew I was going to use for the die cuts. Then I placed my dies where I needed them to be color-wise and cut them out. I stamped and die cut the board with GinaK brown ink then ink blended the board here and there to look like wood. 

I adhered the sweets to the board and set it aside. Can you guess what those white dots are supposed to be on the dark chocolate hearts in the upper left corner of the board? The cookies at the bottom look just like some that the grocery store sells!

I stenciled another panel of white cardstock and cut it down to be smaller than an A2 card base. I adhered it to my card base, then grabbed a"napkin" die cut (The Greetery - Coaster die) and adhered that in the middle of the stenciled panel. Then I popped up the charcuterie board on foam tape.

I stamped the charcuterie sentiment and matted it with red to match the hearts. I cut the sentiment in half and put it on the panel as you see in the photo. I ended up, last minute, adding a tiny brown flower stamp in a few places to tie the background into the chocolate on the board.

We are saying thank you for guesting with us this month to Denise Morgans, who contributed such wonderful cards. Would you like to be our guest for a month? We hope you will join us for this stencil challenge. You can even make your own with dies! Looking forward to seeing your cards in our gallery this week!

-Carol

Sunday, February 18, 2024

Warm Quilty Hugs

The Craft Roulette #202 challenge seemed like it was really going to be a tricky one until I finally stumbled upon an idea using my Concord and 9th Poinsettia Quilt dies. Friday night's Episode (which I missed live, but watched back yesterday) helped a lot to see what ideas the ladies brainstormed for each parameter.

Project: 5" x 7" card

Colors: Formal and Informal

Element: Warm(s)

Random: Crisscross


I am also playing along over at the Inspired by Challenge #IB276 with my quilty card. I purposely used pinks and greens as seen in their graphic.


So I chose to make a flat 5" x 7" card held up by an easel (a die I just got and love) with a quilt-shaped card that opens on top of the flat card. My "formal" is the sparkly white Hugs die cut that looks like an elegant formal gown. The "informal" is the cotton-looking prints of the quilt pattern. A quilt is "warm" and so are hugs. Finally, the "crisscross" comes from the cross-stitch and knit patterned papers.

Products I used:

Concord and 9th: Poinsettia Quilt dies

Pink and Main: Hugs die

Impression Obsession: Easel die

White glitter cardstock

Random patterned papers

I cut a 5" by 7" panel and the easel from heavy white cardstock. I made an A2 card base using lighter weight white cardstock to cut the quilt card because the dies had to cut through the double layer of the closed card base. I cut the hugs die three times, the last being out of the glitter cardstock. Last, I cut the quilt pieces out of some patterned papers I had on hand.

I stacked and glued the three hugs die cuts together to be thicker and more prominent over the patterned papers. I adhered the pink cross-stitch patterned paper to the large white panel. I added the quilt pieces to the quilt card and the hugs on top. Then I adhered the quilt card to the left side of the large white panel. All I had to do was glue the easel onto the back of the white panel to finish up my project!

This card was actually pretty quick easy to make. It took a while in planning to get all of the parameters met. 

Stay warm!

-Carol


Thursday, February 15, 2024

Ombré Sea

For our Just Us Girls Challenge #714, Ina has chosen a moodboard by the sea with absolutely gorgeous colors! For your card you can take just the colors, the watercolor effect, the sea-inspired elements, or the feathery textures. Whatever you take from it, tell us about what inspired you. Here is my seaside card using the colors and shells.


Products I used:

Stampin' Up!: By the Seashore stamp set

Ranger: Distress ink pads

Versafine: Onyx black ink pad

Simon Says Stamp: Sequins

I stamped the shells first, then taped off the edges of my panel with Post-it tape. I ink blended an ombré mix of Wilted Violet,  Chipped Sapphire and Peacock Feathers distress inks. I cut a mat with a piece of lavender cardstock and mounted it on my mini slimline card base. Last, I adhered the stamped panel and sequins. Done!

Please join us with the beautiful moodboard!

-Carol

Wednesday, February 14, 2024

Happy Valentine's Day

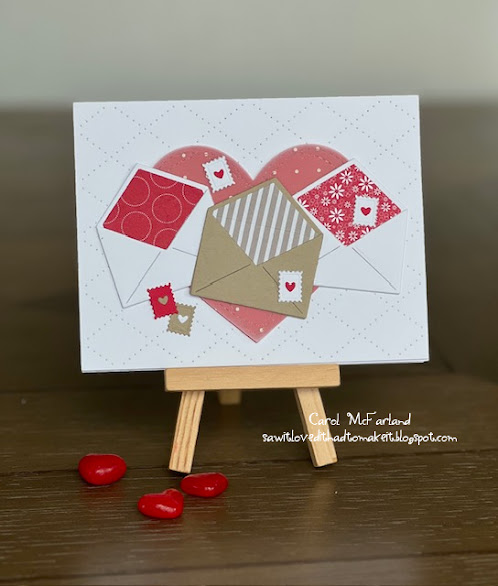
So it was about time (today) to make a little bit more masculine Valentine for my husband, and I had one more idea I hadn't yet tried...so here it is. I am sharing it over at The Color Throwdown #780. They are using red, kraft and white.


I cut an A2 white card base and a 5 1/2" x 4 1/4" white panel. I ran the panel through my Big Shot with the Picket Fence Pierced Blanket Cover Plate Die to get the diamond pattern. Then I die cut a Simon Says Stamp Wonky heart out of both red cardstock and white swiss dot vellum. Next, I die cut the My Favorite Things Paper Goods envelope, liners and stamp dies. I assembled the card as you see it. He sees every single card I make and surely will appreciate that I made him one. (I gave it to him before I posted this. I told him about making masculine cards and that the patterned papers were men's tie fabric patterns)

Hope you treat yourself along with others today.

-Carol

Love, Santa

Happy Valentines Day! I know this is a Christmas card on February 14th, but it just happened to fall on this day. This month at Christmas Craft Creations our fun theme is Stenciling or Embossing Folders. I came across this adorable card by Leanne West for Hello Bluebird that I CASEd with what I have on hand. I love all of her details, especially the postage dies! For our challenge, I stenciled the background of my "postage stamps" and I happened to use embossed cardstock. (It came that way but we are wanting participants to use an embossing folder. None of my folders fit this envelope die.) Here is what I made.


Products I used:

Waffle Flower: Postage Collage dies and stencils

Mama Elephant: Holiday Bitties stamp set (images on postage)

Honeybee Stamps: Country Christmas Wreath dies (greenery)

Spellbinders: Envelope of Wonder etched dies (envelope and tag)

The Greetery: Destination North Pole stamp set (Love, Santa stamp)

Prismacolor pencils

Wink of Stella pen

Concord and 9th: Mini ink pads

Versafine: Onyx black ink pad

Bearly Arts liquid glue

Blending brushes

Patterned paper

Red glitter cardstock (red berries on greenery)

Rhinestones

To start, I die cut the postage collage. Next, I stamped the images in the individual "postage stamps" and then stamped them again on Post-It notes. I fussy cut each image...the little gift and crossed candy canes being the hardest to cut. I placed these masks on top of the stamped images in the postage. Then I used my postage stencils to lightly ink blend the background behind each image.

I removed the masks and used my colored pencils to color in the images. I added Wink of Stella sparkle to the snow, whipped cream, candy canes and the snowman's hat.

I cut apart the postage into three sets of two, then I die cut the greenery.

I die cut the envelope and assembled it. (First time using it. Had to watch a You Tube video.)

I played with placement, then tucked the greenery and postage inside the envelope with glue. I made a 5" x 7" card base, cut some patterned paper to fit the front and adhered it. I die cut and stamped the tag, then tied some silver sparkly embroidery thread around the envelope.

Then I adhered the completed envelope to the card front. I added just a few rhinestones and was finished!

We can't wait to see your cards using stencils and/or embossing folders! See you in the gallery!

-Carol


Sunday, February 11, 2024

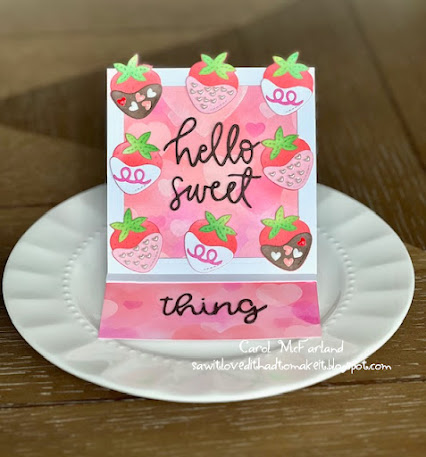
Hello Sweet Thing

For my third week watching and participating in Craft Roulette it was Episode #201. The parameters were:

Project: Easel Card

Element: Sweets

Colors: Quiet

Random: Bokeh

While I got a little carried away with my colors (they are SO forgiving on what you use), I was able to hit all the requirements. Here is my easel card that I CASEd from the Pretty Pink Posh website. I'm also sharing it over at the Inkspirational Challenge #309: Hearts.


Products I used: 

Pretty Pink Posh: Valentine Mug Additions die set

Concord and 9th: Orange You Sweet dies, Enamel hearts

Park Lane: Tiny Pearl Hearts

Stencil: Handmade with a variety of dies

Sunny Studio: Loopy Letters Lower die set

Distress inks

Blending brushes

An easel card is simple to make. Cut a top-folding A2 card (4 1/4" X 5 1/2"), then score the front panel again half way down from the top at 2 3/4" for the easel. Attach your decorated shape or panel to the bottom half only of the card front. (I created a heart stencil for my bokeh background.) Then create something that will hold it in place to keep it from closing/collapsing. I used three 1/4" strips of heavy cardstock as a "ledge" for the card front/easel to rest when standing. Sometimes people use a button or other thick-ish embellishment.

You should check out Mary Gunn's Craft Roulette. It is really detailed and has so many followers from all around the world. It airs Friday Night 7:30 pm EST here.

Right now you can go look at the cards shared this week on her Facebook page. Last week 407 cards were shared!

See you back here soon,

-Carol


Friday, February 9, 2024

Love You

I love the photos that the Inspired By Challenge shares each week. This week Challenge #275 is Pink Hot Chocolate. Isn't the graphic pretty and fun? This Valentine was fun to make...choosing colors to stay with the holiday and their graphic, but make the hot chocolate pink. Here is my take on their challenge. 


I am also linking up at Coffee Loving Cardmakers who are teaming up this week with Inspired By and using the same graphic. This card is also shared over at Simon Says Stamp Wednesday Challenge where the theme is Love is in the Air.


Products I used:

Pretty Pink Posh: Layered Coffee Cups stencils

Simon Says Stamp: Love you stamp and die sets

Pink Fresh Studio: Diagonal Stitched rectangle die

Concord and 9th: Mini Ink pads

Ranger: Distress inks

Vellum


The choices are endless with the three stencils in this set. My pink hot chocolate is made with different pinks depending on how dark the cup or mug is. Don't you wish you could design your own cups, bowls and dishes in real life? I would love to do that! I could have moved over the mug handles to touch the actual mugs...next time!

See you back here soon

-Carol


Thursday, February 8, 2024

A Little Bit of Love

Hello! Can you believe this is the second week of February? At Just Us Girls #713 it is Word Week: Love. You can go with the obvious Valentine's Day or make a card with things you love such as cupcakes, a beach, flowers, a season, etc. Check out what the design team has come up with for you! Here is my card.


Products I used:

Concord and 9th: Sweet Sayings Dies, mini ink pad

Sentiment: Unknown set of four wooden mini stamps

Silver stretchy cord

Hand cut mini tag

All it took to make this card is die cutting and lining the postage die cuts up in rows. I contemplated putting a silver heart inside each opening but opted to keep it simple. On the inside, I did add pink behind the openings of Hugs + Kisses. I made the little "love" tag in about a minute and tied it on with a silver stretchy cord.

We hope you will join us this week...with whatever creative idea you come up with for Love!

See you back here soon,

Carol


Sunday, February 4, 2024

Ready, Set, Snow!

For the 200th episode of Craft Roulette last Friday night, GinaK was the guest. The "funn" parameters selected by spin of the wheel were:

Project: Kid's card

Element: Comic or Cartoon

Colors: Brrr

Random: Button(s)


I knew I had a couple of Snoopy stamps from waaaaaay back, so I started hunting. I actually found four!!! I adore the one I used here with the cliché originally from the first phrase of the opening sentence of the 1830 novel Paul Clifford by English novelist Edward Bulwer-Lytton. Cartoonist Charles Schultz's character Snoopy sometimes felt he was a world-famous author and often started his novels with "It was a dark and stormy night." As a child, I read every Peanuts book that Charles Schultz wrote. I had pillows on my bed with the characters on them, and a wastebasket with Peanuts characters. I'm a big Peanuts fan from way back.

I used blues for the Brrr feeling with lighter dots as snowfall. I added more snowfall with colorful enamel dots in the colors from each cartoon and a handmade snowflake button tied with silver cord (inspired by Gina herself who made one). I colored with Prismacolor pencils.  The red was added due to Snoopy's doghouse roof and yellow because of his little bird friend Woodstock. I stamped snowflakes to show the stormy night and added Wink of Stella for sparkle.

Since the novel he is writing begins with the famous cliché, I thought that the way to teach a child not to fret about an actual dark and stormy night is to be positive and embrace the snowfall, like Snoopy in these images. As a child, it is fun to play in the snow, right? Children don't have to shovel it or drive in it! I think a child would like this card for the Snoopy character, the enamel dots, and the colors.

If my pictures appear in my inbox soon, I will make the deadline and enter my card at Craft Roulette. At high internet traffic times it takes forever for a photo to go from my phone to my computer. (Airdrop takes a while as well for some reason.)

I can't wait to see all the versions of the parameters for this challenge! And congrats to Mary Gunn Funn for achieving 10,000 followers during the 200th episode! Two great milestones!

See you soon,

-Carol


Pandastic Birthday

I was invited to make cards at my friend Nancy's house and she has made several adorable cards with this Spellbinders Dancin' Birthday Panda die set, so I asked if I could make one. I love cards that move, and his legs dance left and right...so cute! I am playing along with this card at The Color Throwdown Challenge #778 where they are using green, blue and kraft this week.


I cut a white banner from white card stock after printing my sentiment on my computer. I die cut the patterned paper rectangle using a Simon Says Stamp Wonky Rectangle die. The pattern in this paper made me think of a place where pandas might live. Using a circle die, I created a stencil for the background on the banner. I stenciled over the circle stencil with one Hero Arts and then another Pink and Main stencil to "separate" the mostly white panda from the banner. I assembled the panda and adhered him to the banner so that his legs would move back and forth. This card is for my punny husband, so I added a bow tie to make it more masculine. I will enclose more panda puns inside the card (not attached) for the Punmeister to get a taste of his own sense of humor.

See you back here soon as I have another challenge card to make by today!

-Carol


Thursday, February 1, 2024

Collecting Art Supplies

Are we cardmakers or are we art supply collectors? I'd like to say the former, but lately I have embodied the latter. Hard to keep up with all the products and ideas online that catch my eye. I mean, look at the name of my blog! I am so excited to be Guest Designer for Time Out Challenges #256, which is a photo inspiration CASE the Designer theme. Here is my card and the challenge graphic. Read below for all the challenge details and prize sponsor Sarah Gray of Funky Fossil Designs. With this card I am also playing along with the Simon Says Stamp Wednesday Challenge: Anything Goes.


Sarah thought that the people who play along for this challenge might want to CASE the theme, the layout, or the color combo. I ran with the theme. This challenge is sponsored by Funky Fossil Designs. The challenge winner will win a store credit of £25.00! In addition, the winner of this challenge will be offered the chance to Guest Design with Time Out for a future challenge.


Products I used:

Waffle Flower: Favorite Hobby stamp set

Stampin' Up: Tote-ally Tess stamp set (from years ago), patterned paper

The Greetery: Curio frame die

Prismacolor pencils

Distress inks

Ink blending brushes

Versafine Onyx Black ink

My card has a lot of masking so that I could ink blend color behind the craft supplies. The "I (heart) Stamping" rectangle was made by cutting a Post It down to cover the sentiment and stamp the brushes "behind" it.

Check out all of the great Time Out DT cards for this fun challenge! It is right up our card making alley and made me think I need to make cards on this theme more often for my fellow crafters!

-Carol

Love you

This is Color Week at Just Us Girls Challenge #712. I have been waiting for a holiday or fun theme for the Waffle Flower postage products I have, and now Valentine's Day is on its way soon. Here is what I came up with for the maiden voyage of my WF sets. I am also playing along with Simon Says Stamp Wednesday Challenge: Anything Goes.


Products I used:

Waffle Flower: Postage Collage Dies, Postage Collage Everyday Stencil, Postage Collage Coloring Stencil

Concord and 9th: Seaside Postage Stamp Set, Dove Grey ink pad

Tin Can Mail: Paris Postmark wood stamp

Stampin' Up!: Love you sentiment die

Ranger: Distress Ink pads


The stencils do all the work. They coordinate perfectly with each other and provide the ability to fill in the background. I have never had a better use for my Paris postmark than now. That stamp is reeeeeeeeally old!  I love the postal stripes along the edge. They are made with two stencils that line up so easily. Warning! This won't be my last time using these products!

We hope you will join us with red and pink this week...a fun pairing!
-Carol