Saturday, May 28, 2022

Thanks So Much

Hi there friends! It's my turn to host the Just Us Girls Photo Challenge #634 this week! I chose this photo because a) it is almost summer and b) I love all the elements in it that you can take to make a card, tag or other project! A bike, flowers, a basket, the colors, or a combo of some/all of those things! Here is what I came up with, followed by the challenge photo. I am also entering it over at Happy Little Stampers Anything Goes with Dies here, Simon Says Stamp Anything Goes here and Time Out Challenges #214 here.


Products I used:

HoneyBee Stamps: Riding By Stamp set

My Favorite Things: Palm Tree dies

The Greetery: Postal dies

Hero Arts: tropical flower

Handmade cloud stencil

Flora and Fauna: Shell stamps

Distress Oxide inks

Ink blender brushes

I started by taking the color of the VW van in the photo and converting it into the idea of an ocean and beach...so then I knew I would have to add palm trees! Since it was becoming a beach scene, I had to give it a postcard look with my postal dies. I cut a cloud stencil by hand and ink blended the sky, then masked off the water and sand portions, ink blending each separately. I die cut the bike, basket and its contents, and put it all together. Then I built the scene. Fun!!!

Hope it made you smile and get that summer feeling going!

-Carol


Thursday, May 26, 2022

You Put the Sun in Sunshine

For our latest Tic Tac Toe Challenge #163 created by Design Team member Silke, I tried out my new, long awaited Gladys die set!!! I've wanted her forEVER and finally decided to make the purchase!! I looked it up and learned that flamingos are wading birds, so I made believe that Gladys and her little ones are walking/wading on the winding shore. From our board I decided to use the first column: Sun, Birds, Thank You. I am also entering my card in some other challenges below where Gladys fits the theme/inspiration this week!


I happened to see this amazing stair step card recently by @itsacardknocklife on Instagram. Isn't it cool?!! I thought it would showcase Gladys well.


I searched for a tutorial and used this 5" x 7" size card by Sam Calcott of Mixed Up Craft here and then got busy decorating the card base. I added a little ink blended shading along the edges of the flamingos. The only "tricky" thing I did was use washi tape to extend the run's rays longer/higher for stenciling in order to fit the card panel.


Products I used: 

Sizzix/ Tim Holtz: Gladys die set

Poppy Stamps: Whittle Flamingo die set

Simon Says Stamp: Drifting Stitches Borders (stitched waves)

Stampin' Up!: Beach Happy Stamp Set (Sentiment)

My Favorite Things: Beach Cutie (sentiment)

Tim Holtz: Sun stencil

Distress Oxide Inks

Blending Brushes

I also decided to enter it at Happy Little Stampers Anything Goes with Dies here,  Time Out Challenges #214 Word Prompt: Sunshine, as well as the Simon Says Stamp Wednesday Challenge here.


We hope you will join us this week with this very original, fun board!

-Carol


Saturday, May 21, 2022

Beach Happy

I am already in summer mode and thinking beachy cards. This week at Just Us Girls Challenge #633 it is Color Week: Coral, Blue, Tan. I went for a water feel with my iris effect card, which I have made a couple of times before here and here. I learned this technique from Debby Hughes here. Hope you like it!


As you can see, I tried patterned paper this time with water prints. I also used some aqua vellum because it seemed "watery" to me too! I enjoy this technique so much...it is a little like putting a puzzle together. I try to use all of my papers more than once but not let the same patterns be right next to each other. I ink blended my already coral fish with distress ink in Abandoned Coral to give some shading. I added the rough twine for the tan element and a rope/beachy texture.

Products I used:

Poppy Stamps: Whittle Fish Trio

Stampin' Up!: Beach Happy stamp set

Archival ink: Cobalt

Ranger Distress Oxide: Abandoned Coral

Patterned papers and vellum

Twine

We hope you will join us this week for this pretty color combo! You are sure to be inspired by the variety of great ideas the team came up with, each completely different.

-Carol

Wednesday, May 18, 2022

Happy Summer

Since I am in summer mode/mood, I decided to play along over at The Card Concept #175  May Flowers Challenge. My card is clean and layered style. I was inspired by the summery soft coral-y pinks, orange, yellow with little pops of green in the photo, including the jar they are in! I bought Mother's Day flowers this year (photo below) because I loved the jar tied with raffia, filled with pink tulips! I also just got this Ellen Hutson Mod Florals die and was excited to use it! 


Products I used:

Ellen Hutson: Mod Floral die

PinkFresh Studio: Braided circles dies

Taylored Expressions: Happy Summer Banner dies

Distress Oxide inks

Pretty Pink Posh: gems

Aqua painter

I played around with the two die cuts I made from the mod floral die and finally decided to cut the three braided circles out of a slimline panel and have the flowers spilling out of them. I watercolored the flowers and leaves with distress oxides and when I finally stopped fussing with them I let them dry over night. I arranged them in and out of the white panel openings and attached them here and there with Tacky glue. Once I decided on the Happy Summer dies, I cut each banner twice and adhered them together for thickness and sturdiness. I used foam tape to pop up the panel on a pink slimline card base and finished with some gems.

The challenge is open until Monday the 23rd, so join me over at The Card Concept!

-Carol


Monday, May 16, 2022

Hello

I saw that Color Hues Color Challenge #41 is red and aqua! I fell in love with the color combo and took inspiration especially from Hannelie and Julie's cards. I had to join in the challenge. I admire geometric designs all the time in cards and clothing, furniture and art, and decided to make a square card in that style. What I like best about the card (besides the colors!) has to be seen in person. Some of the squares are popped up and others aren't. Check out the closeup below.


The "Hello" die is probably Stampin' Up! and the card stock/sequins are from my stash. I cut all the squares on my paper cutter. The aqua squares are 2", the red ones are 1" and the little ones are 1/2"...itty bitty. I don't know about you, but my eyes tell me that those measurements are not true, but they are! The little trick I have for you (or maybe I am the last person to figure this out) is that the card measures 6 1/4 x 6 1/4" (with the red mat) which means I needed 12 1/2" piece of card stock for a card base...and that doesn't exist in my stash or stores! So, I cut a piece of card stock the size of the card front and scored it in on one edge about 3/8". Then I attached it to the back of the card front at the top with Tacky Glue along that little 3/8" edge. (See last picture.)

I wanted to add a sentiment and decided to make it something round and swirly instead of continuing with the straight edges of the rest of the card. I also didn't want the red "hello" to disappear if I put it in the center of the card front over the red little square, so I put it in the corner with a few rhinestones.

Check out the Color Hues design team's cards...they are FABulous!!!!

See you soon,

-Carol


Saturday, May 14, 2022

Hey Gullfriend!


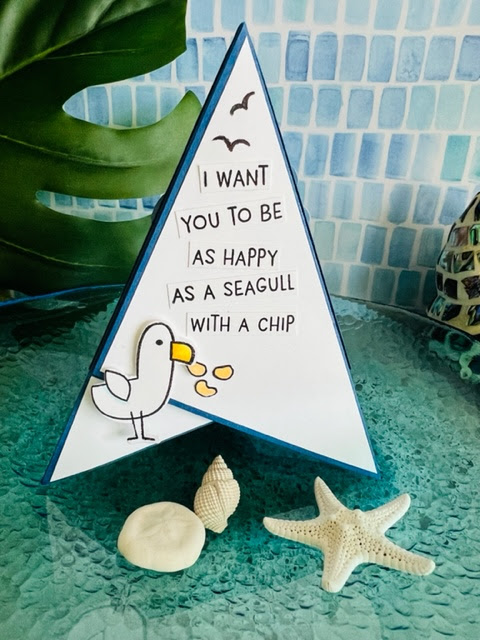
This week at Just Us Girls #632 it is Trend Week: Shaped Cards. That means anything but a square or rectangle. I love making teepee cards and don't do it often enough! It is so easy and mostly about embellishing the card base. Check it out on Pinterest, there are so many ideas! I don't know what made me grab my seagulls this week, but they are so expressive and funny! Living near the beaches of the Gulf of Mexico, we know all about them and how they will steal your food if you are not careful! Never feed the seagulls!!! (Also, they are famous for something else: I have a personal seagull story below if you want a little chuckle...starts out sounding bad but is funny now! Stay tuned to the bottom of this post.)


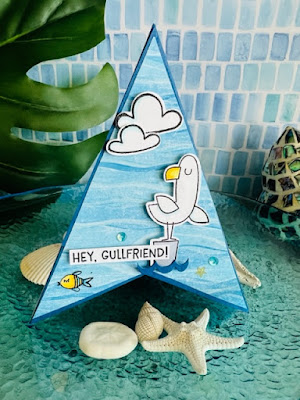
To make the base of the teepee card, I used three 4" squares of card stock, scored on the diagonal to make my base. Look on Pinterest or You Tube for other sizes and complete instructions, depending on the size you are wanting. I stamped the sentiments on white card stock and cut closely around them so they would fit on the card, and the longest one I decided to cut into short segments to fit on the white mat side of the teepee. I was originally going to have just the sentiment on the white panel side of the teepee and leave room for a handwritten message, but I wanted to add another cute and quirky bird!! You can write a personal message on the other side of the card (which becomes the inside). 

My last three pictures look weirdly shaped but it is just the angle of the photo. I wanted to show the transition from one side of the card to the next, as well as opened up fully. My teepee card folds in half and fits into an A2 envelope! The last step was to cut a small piece of Velcro to hold the teepee together to stand. One more thing, I drew my own potato chips, lol! 

Products I used:

Ellen Hutson: Seaside Seagulls stamps and dies (birds and sentiments)

Flora and Fauna: small fish

Simon Says Stamp: tiny flying seagull stamps

Stazon Ink: Jet Black

Copic markers

Patterned paper

Lilac Lane: Seaside Holiday sequins

Velcro

So my story(ies) about seagulls: I have a penchant for being pooped on by seagulls. Here are just three of them! My mother told me that when she pushed me in my stroller as a little girl they got me a few times...then in high school a few of us went to the beach one time and while lying in the sand by two other people, I was the only one who got nailed by them! And the best story yet, on my wedding day I was walking into church to go down the aisle and guess what?!! Yep! All over my dress and veil! Several people at the entrance to the church whipped out tissues and started blotting the splotches while watching me for tears, but I was laughing. My mother had always said it was good luck (to make the best of the situation) and not to fret. At the reception, people who had already been seated in church and missed all the action upon my arrival, asked what was all over my dress and it made for a few laughs! (I made my dress too! Many long hours to make it just right!)

Back to the challenge this week, a teepee is always an easy, fun shaped card to make. And you've also got to love the variety of fun shaped cards the design team came up with...each one unique! We really hope you will join us for this challenge!

-Carol


Thursday, May 12, 2022

With Love

I am back with our latest Tic Tac Toe Challenge Board #161 (here) created by Jeanne. I recently bought the new Spellbinders Artful Tulip die set that comes with a paint brush die. When I was considering getting the set I knew I could make bouquets with my favorite flower in addition to the paint brush cards I have seen. My bouquet card style is one you have probably seen for a while online, but this is my first time making one and it was not only fun, but fairly easy! From this new board I chose the left column moving down: Layers, Bow, Floral. I am joining the challenge at Four Seasons May Spring Challenge here since my card is full of spring flowers and would be a great Mother's Day card as well as Happy Little Stampers Anything Goes with Dies here!


Products I used:

Spellbinders: Artful Tulip die set

My Favorite Things: Scalloped rectangle dies (small white one)

Sugar Pea Designs: Card Front Element Builder dies (large scalloped rectangle)

Hand cut bouquet wrap

Studio Katia: Slider Tag dies (mini tag)

Mama Elephant: Holiday Bitties (tiny sentiment)

Stampin' Up!: Patterned paper

Ranger Distress Oxide Inks

Blender brushes

Wink of Stella pen

Twine

Foam tape


I ink blended blue and green inks on white card stock, then cut my flowers and leaves where I liked the lighter and darker shades in my blended inks. I don't know if there is such a thing as blue tulips but I just felt like blue was the color of the day. There is Wink of Stella pen here and there on the flowers for shine that is better seen in person. I popped up the bouquet on the card with foam tape. That's it!

We hope you will join us this week with Jeanne's board...so many new original choices to inspire you!

-Carol


Wednesday, May 11, 2022

Joy

Our May challenge at Christmas Craft Creations is Two Colors. I chose pink and white sparkle for my ornaments theme. We would love for you to join us for this round!


Products I used:

Pinkfresh Studio: Diagonal Stitched Rectangles

Stampin' Up!: Delicate Ornament Thinlits Dies

The Stamp Market: Joyful die (cut down to Joy)

White glitter card stock

Pink textured card stock

Sequins

Distress Oxide ink in Kitsch Flamingo

Blender brushes

I cut the top panel with the stitched rectangle die first. Then I ink blended from the bottom up for an ombré look with Kitsch Flamingo distress oxide ink. Next I die cut the ornaments from the white sparkle card stock and layered them onto pink card stock. I ink blended on the ornament hangers using Kitsch Flamingo again and cut the sentiment from the white sparkle card stock. I adhered the long ornament to the front panel with Tacky Glue and popped up the round second ornament with foam tape. Joy was adhered with Tacky Glue as were the sequins. I popped up the completed front panel on foam tape onto an A2 white card base and my card was done!

Take a look at all the design team inspiration and play along!!

-Carol

Saturday, May 7, 2022

National Paper Clip Day

Welcome back to the (our second month!) Wacky Holidays Hop for May on Instagram. You know all those obscure things that earned themselves national/international days of recognition? We're here to celebrate them! Who says only major holidays get cards?!

You may remember we did this for April and it was so much fun we decided to make it a monthly event! Please message @claires_card_on (on Instagram) if you'd like to join the June holidays hop! Go to Nationaltoday.com to see all the wacky holidays throughout the year...you can even apply to add one!

I chose National Paper Clip Day which is celebrated this year on May 29, 2022! After looking through this month's holidays, I thought this would be one that a) I had stamps for and b) no one else might choose it for their card. I also thought that I would make something sort of symmetrical (but wacky) because paper clips do organize things, right? I will let you look up all the historical data on how paper clips came to be...but there is a story or two behind them!


Excerpt from NationalDay.com:

The Paper Clip as an item of stationery has literally been designed to hold things together. This office staple has some pretty clever uses! Here is an excerpt full of info on this wacky holiday from https://nationaltoday.com/national-paperclip-day/#why-we-love

  1. Makeshift zipper
    If you have a broken zipper, simply thread a paperclip through the metal loop of your zipper, and voila!
  2. No-fuss ornament hook
    Broken ornament hooks get old really fast, so use paperclips to hang them with instead.
  3. DIY cellphone stand
    Follow that YouTube recipe on your phone by bending a large paperclip into a phone stand to prop it up.
  4. Screwdriver for your glasses
    When you find the frame of your glasses is getting a little loose, use a paperclip wire to tighten those tiny screws.
  5. Snack bag seal
    Why waste money on plastic clips (not to mention the environmental implications) when a couple of paperclips can seal your snack baggies, keeping the contents fresh?

Check out my Instagram (@sawithadtomakeit) for the the accounts that are participating in this fun hop! Live links are there for you! Our hashtag is #obscureholidaycards Happy hopping!

-Carol


You Make Me Smile

This week at Just Us Girls Challenge #631 it is Word Week: Flowers! It was time to use my new My Favorite Things Harmonious Hibiscus background stamp. I was a bit intimidated knowing I could not miss any spots when inking up such a big stamp.


I held my breath and stamped the floral background on the front of a white, A2 card base by inking up the stamp and pressing the card against it, rubbing it carefully so the whole stamp came into contact with the paper. It is possible to move the card or miss a spot and have to start all over, but neither of those fears materialized! I stamped one flower again on another piece of white card stock and first ink blended some purple on it, then finished it with colored pencils. I fussy cut it, then stamped my sentiment and cut out the banner by hand in both white and black. I popped up both the sentiment and the flower on foam tape.

Products I used:

My Favorite Things: Harmonious Hibiscus

Simon Says Stamp: Intense Black Ink

Pretty Pink Posh: sentiment

Catherine Pooler: Queen for a Day ink pad

Prismacolor: colored pencils

Foam tape

We hope you will get out your flower stamps and join us this week. Check out all the great ideas that the design team came up with by clicking on their names under their pictures. I learn new techniques every week by reading their blog posts!

See you soon, 

-Carol