For our Just Us Girls CAS Challenge #694 this week we are making baby cards. My neighbor commissioned this one for a shower she was attending and she knew the baby's name and nursery colors (pink and gold). It took a lot of guesswork out of making the card!
Saturday, August 26, 2023
Baby Card
Friday, August 25, 2023
Stripes n' Flowers
I just made this CAS card today for The Flower Challenge #83 where they are asking cardmakers to add spots or stripes. It was easy to put together and now I want to make a matching tag with the leftover scraps! My card design was inspired by a card on the Spellbinders website where their "stripes" were almost triangular with one edge wider than the other.
Edit: My card didn't send from my phone ALL DAY to my email so I couldn't post this and enter my card. Grrrr!!!
I cut 1/2" strips and adhered them to the left side of an A2 card base. Then I punched two different flowers three times each using older Stampin' Up! punches. I curled the edges of the flowers on the edge of my desk and adhered them together. After adding a Pretty Pink Posh gem in the middle of each, all I had to do was stamp the Paint Your World by Spellbinders sentiment. They remind me of water lilies.
Thanks for stopping by and see you back here soon,
-Carol
Wednesday, August 23, 2023
Sending You Sunshine
I'm still hanging on to summer and making beachy cards. When I saw that Time Out Challenges #245 is Colorful, I knew what I was going to make. I was definitely inspired by the bright, fun colors in their photo!
Most of this card was made using a stamp and die set from Concord and 9th from a class they gave early last spring. I added the Sending You Sunshine sentiment from SugarPea Designs and a postal die from The Greetery.
I had to create a postage stamp to fit the sentiment and space on my card, so I cut one of my smallish postal dies, then cut that one down more by placing the same die at the width I wanted my postage stamp to be.
I used washi tape to mask off things and make stripes as I don't have the stencils that go with the C & 9th sets. I popped up all of the postage stamps on foam tape for dimension except the large one used as a mat. I ink blended all of the postage stamps, again using washi tape to mask off the edges of each stamp to keep them white like a real stamp.
It was fun to make because I love all things nautical. I think it fits the "colorful" description for the challenge as well.
See you soon,
-Carol
Monday, August 21, 2023
Sending You Sunshine
I found a new-to-me challenge called Colorful Options and the yellow-green color of their August 2023 theme got my attention. I still have the Beach Bag die set on my desk and decided to try to make a card with their theme. I am also adding it to As You See It Challenge #305 Recipe for Summer Sunshine.
Products I used:
Papertrey Ink: Beach Bag dies
My Favorite Things: Life's a Beach stamp set, black and white patterned paper
Simon Says Stamp: Drifting Stitches Borders dies
Distress Inks: Twisted Citron ( a yellow-green hue) and Mustard Seed
Blending brushes
Stampin' Up!: Chalks, yellow patterned paper
Pink and Main: Enamel dots
Holographic rainbow silver cardstock
I started by doing a bokeh technique on a white A2 panel of cardstock. I randomly ink blended my yellow and green inks until there was no white showing. I die cut three sizes of squares on a scrap of white cardstock for a stencil.
My beach bag covered more of the background than I wanted, but I think it still gives a colorful setting for the card. I did all of my die cutting, assembling and arranging, including die cutting some sand for the bottom of the scene. My "straw" hat was blending into the background so I chalked the edges with a "brown mustard" color to make it stand out from the bokeh background. If you look closely you can see the circular fringe on the flip flops and the irridescent look of the glasses and bag straps. I love the circle/scalloped sunglasses shape...so cute! This die set has so much detail like stitching and things like tassels, bows and items like a phone, beach ball, shells, a book, etc. I added a shell inside the card to carry the beachy theme there, too.
This won't be my last use of this set. Pinterest has many ideas using it that are just fabulous. If you look back two posts, I made my first card with this set a couple of days ago.
See you back here soon,
-Carol
Saturday, August 19, 2023
Keep on Swimming!!
I am not ready to let go of summer stamping and when I saw that the Global Design Project GDP407 theme is Water Creatures, I was excited to have a real reason to make another beachy card!
Seaside Moodboard
I just love this seaside-themed moodboard that Bobby came up with for our Just Us Girls Challenge #693 this week! Wait until you see all the cards the team made too! Be sure to click on their names above the photos to get all the details on their projects! This week we are delighted to have our August guest Greta, too. Here is my take on the moodboard, starting with inspiration from the tortoise shell glasses, tassels, sunhat, seashells, "sandals" and different textures/patterns.
Sunday, August 13, 2023
Thanks a Melon
I don't know how I don't own a watermelon stamp, but I don't. When I saw the Color Throwdown CTD755: Red, Yellow, Green and White, I decided that a watermelon would use three of the four colors and I would figure out a way to add yellow. So I took out my circle dies and got started.
For my CAS card I cut the largest circle out of patterned paper, and two more out of white cardstock. I got out my distress ink pads and ink blended a yellowy-green (Twisted Citron) on the middle-sized one and Candied Apple on the smallest. I adhered the circles to each other, sprayed them with a little water, and cut the layered circles in half. Next, I die cut small hearts (MFT Love Speech Bubbles) out of black cardstock and adhered them to the watermelon slice. I used a post it note to mask off a section toward the bottom of my card, then ink blended with Fossilized Amber to add a yellow ground my scene. I stamped my sentiment from a fruity set (Orange You Sweet?) by Concord and 9th and was done! If I stare at the slice of watermelon a bit with my head turned to the side, I convince myself that the stripes make it 2D. (I meant to cut it with vertical stripes.)
That's it for today. See you back here soon!
-Carol
Saturday, August 12, 2023
Happy B-day
A little play on words for my card today...Our Just Us Girls Challenge #694 Word Week is Bee, and I just bought these towels for a friend as part of a gift. The towel on the left gave me the idea for my bee card.
Products I used:
Spellbinders: Mini Blooms and Sprigs die set
SugarPea Designs: Card Front Element Builder die set
Pink and Main: Banner dies
Stampin Up!: Crazy Mixed-Up Love stamp set (bee), Party This Way stamp set (sentiment), Chalks
Concord and 9th: Mini ink pads
Ink blending brushes
Vellum
Patterned paper
I started by sketching out my layout, then stamping and fussy cutting the bees. I stamped a fussy cut an extra wing for each bee with an extended thin strip below the wing to be able to adhere one behind each whole bee.
Next, I ink blended some white cardstock in yellows and oranges for die cutting my flowers. I added a bit of dark brown chalk to the center of each flower with a pointed Q-tip. I die cut the flower centers and adhered the flower parts together.
I die cut a scalloped rectangle from a piece of bee hive patterned paper, and adhered it to a white A2 card base.
Next, I cut a piece of vellum a little bit smaller than the patterned paper. I lined up my flowers and bees where I wanted them on the vellum, then added a glue dot behind each. I bent the wings and petals for a more "real" look. I added more glue dots on the back of the vellum behind each flower and bee, then placed it on top of the scalloped rectangle.
I took a "happy birthday" stamp and covered up part of it to get "Happy B," then stamped just the "day" and added a dash with a marker. I die cut a banner around it and popped it up on foam tape below my grid of flowers and bees.
We hope you will "Bee" able to join us for this fun challenge. Check out all of the team's cards as well as one by our talented guest Greta.
See you back here soon,
-Carol
Wednesday, August 9, 2023
CAS Christmas
For the August theme at Christmas Craft Creations we are making CAS (Clean and Simple) cards. This means lots of "white space" with few layers or embellishments as well as something you could reproduce quickly. The white space can be a color, just no pattern on it. I looked around Pinterest and found some ideas and my MFT Santa came up so much that I had to make something with him!
Products I used:
We hope you will join our CAS challenge which can be a simple as stamping an image in one corner of the card and coloring it. Check out all of the other design team members' cards for ideas! Best part, you have a month to get it done. Our reminder team will have more inspiration for you on August 23rd!
-Carol
Saturday, August 5, 2023
Friends
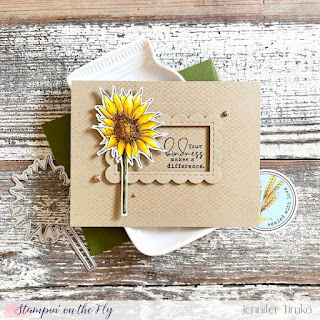
For our Just Us Girls Color Week #691 we are using blue, green and yellow. I was taken by a card by Jen Timko (see kraft card below) and decided that I could make it in our colors this week!
Products I used:
Thursday, August 3, 2023
Thanks
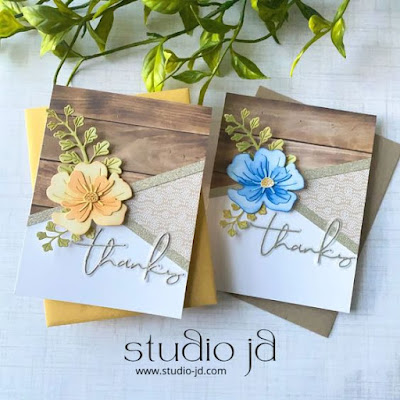
I was browsing Pinterest again, saw a cool graphic style card, and wanted to try to make it. (Hence, the name of my blog) Mine turned out a bit different from the original because of the lines in my wood patterned paper. I saw that my card had the colors in cards I was seeing on my insta feed and decided to share it with the Color Hues Challenge #69 using Teal and Orange.
Products I used:
PaperTrey Ink: Into the Blooms II dies
My Favorite Things: Thanks die
Patterned papers
Gold glitter washi tape
Concord and 9th: Dew Drops, mini ink pads
Simon Says Stamp: Sequin, Etched Laurel Leaves dies
Ink blending brushes
I did my die cutting first, then ink blended the flower petals and sentiment. It took me forever to cut those patterned papers at the angle I wanted them, then I arranged them on my white card base. Not quite as simple as it looks! Hoping my papers are neutral enough for the challenge!
I plan to make another card like this with other woodgrain papers. The patterned papers used could give it all different sorts of looks, don't you think?
See you here soon,
-Carol


.jpg)


.jpg)


