Saturday, April 30, 2022

Happy Mother's Day

Is it ever too early to start creating for the next holiday? Here's a card I decided was for Mother's day for the Just Us Girls #630: Make a Trifold card. Like Patty asks in her post of this gorgeous card here, is it called a trifold, z-fold? (My card was from different directions. I like hers better!)


Some details on my card: I used an older Stampin' Up! sentiment from the Teeny Tiny Wishes set and that leaf/flower stamp is from their Summer Silhouettes set. The pink patterned paper on the left is also SU! as are the heart brad and ribbon! The floral paper is from American Crafts, I think. The ink I used to stamp is Archival Ink in Cobalt.

Check out all the design team's versions of the trifold card by clicking on their names and reading their blog posts!

See you back here soon,

-Carol

Thursday, April 28, 2022

For Mom

Hello friends, glad you are here for this special week! For TicTac Toe Challenge #159, I designed the board and I decided to use the diagonal row going from top left to bottom right: Anything but a card, Free, Mother's Day. I made a gift box and a "matching" tag. The box is a nice size: roughly 6" x 8" and 2" tall. (I just noticed that my project also fits the third/right column moving down: Ribbon/twine, Bright colors, Mother's Day!)


I recently bought just one sheet of this gorgeous pink and silver card stock and now I want more! The base of the box is glitter card stock and I tried to get a photo of it but I'm not sure you can tell. The tutorial for the box is from Sam at Pootles.co.uk here and listen to the video carefully because she has a trick for the box lid. I embossed my flowers (they aren't the same type of flowers as those on the lid) with silver embossing powder to be like the patterned paper ones, then ink blended them and fussy cut them out. The word mom is an alphabet by Sunny Studios and you join the letters you want when forming a word.

Products I used:

Sunny Studios: Loopy Letters Lower dies

Pretty Pink Posh: Crocus Flowers

Patterned Paper: JoAnn Fabrics

Glitter card stock: JoAnn Fabrics (I think it is Bazzill)

Stampin' Up!: Ribbon and silver twine, silver embossing powder

Reverse Confetti: tag die

Red Line tape (for box and lid)

We hope you will join us this week for this end of school year/spring board!


-Carol

Saturday, April 23, 2022

Graduation card

This week at Just Us Girls Challenge #629 it is Photo Week! (The graphic for this challenge was accidentally created to say Word Week.) The cool photo that Cécile chose of the painted rocks with positive thoughts on them made me run to look through my stash for something similar in concept. I imagined a graduation card for a young girl or guy going off to college or from college to career.


(This should say Photo Week.)


In my stash I found a spiral bound pad of little cardboard phrase stickers by Tim Holtz Idea-ology and decided to go with them. I tried to watercolor a panel, but it didn't turn out like what I had pictured, so I went with an older Stampin' Up! stamp set called Work of Art. I used a few of their inks to stamp the "swipes of paint" images, added the sticker phrases, then some rhinestones and twine, and Voilá! I had a card!

I also used My Pinkfresh Studio Diagonal Stitched rectangle die to frame the main panel. The rhinestones are from Martha Stewart and the twine is from the Twinery. 

We hope you will join us this week! Maybe you need a card for someone for a graduation coming up or just for sending inspirational thoughts!

-Carol


Saturday, April 16, 2022

CAS Little Bird

While CAS isn't my forté necessarily, I do try once in a while to make something clean and simple. For the Just Us Girls Challenge #628 we are using red, black and white. Here is what I came up with for it. I decided not to have a sentiment on this card.


Products I used:

Hero Arts: Bird in Cage stamp

Reverse Confetti: Scallop Tag

StazOn: Jet Black ink

Ribbons

Foam tape


I am also playing along at The Card Concept 173 this week because their black birdcage (and bird) and mine look and feel similar, along with some red in there! Their vintage feel matches my older wooden stamp too! LOL! My card fits the Clean and Simple (and maybe clean and layered) definition of being able to duplicate easily, few layers or embellishments, lots of white space. I could make a set of these pretty quickly. Check out the other takes on these colors by the Just Us Girls team...they are awesome!

-Carol


Thursday, April 14, 2022

Hello Spring

I made a card today for this month's Happy Little Stampers April Anything Goes with Dies Challenge because I just love this patterned paper that I bought recently and I REALLY love my one-piece bouquet die a lot! It has a lot of versatility including cutting it out in black against a multicolor background. 


Products I used: 

Bouquet die: Concord and 9th

Rhinestones: Martha Stewart

Blender Brushes

Distress Oxide Inks

Spellbinders: Spring Together dies for sentiment


See you back here again soon!

-Carol


Thank You

The Tic Tac Toe ChallengeTic Tac Toe Challenge #157 has a new board and I was inspired to make this ombré textured card by the bottom row across: Background stamp/die, Ombré, Vellum.


My first idea was to cut white card stock with this die and adhere it all white with no missing pieces to the front of the card base. Then as I pulled it off the cutting plate, some of the inner die cuts stuck and I thought I could ink blend some of them to form an overall ombré effect. Then, I figured out, duh, that I needed to ink blend a whole panel, light to dark and put it behind the original white die cut panel with some of the inner die cuts missing. So that's what I did. Next I grabbed some pale aqua vellum and heat embossed my flower with white embossing powder. I fussy cut it and attached it to the card with glue dots that I rolled between my fingers to be narrow little "tubes" instead of leaving them flat and round so they wouldn't show behind the embossed lines of the flower. I didn't like the pattern of the background die cut showing behind the flower, so I made a banner with the sentiment to distract from/cover it. I decided to add sequins to the card and flower center for sparkle and I curled up some of the flower petals with my fingers.

We hope you will join us with this fun board this week! Check out all of the other designs by the team by going to their blogs to read their how-to descriptions.

Products used:

Stampin' Up!: inks and Blended Bloom stamp

Sequins: Buttons Galore Seaside Holiday

Papertrey Ink: Quatrefoil die

JudiKins: Opaque white embossing powder

Stampabilities: Thank You die


Hope to see you back here soon,

-Carol

Wednesday, April 13, 2022

Joyful in Plaid

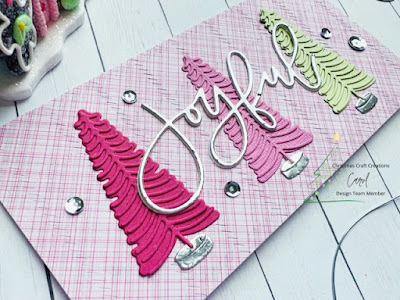
This month at Christmas Craft Creations, it happens to be our 2nd birthday and we are spotlighting Tartan/Plaid. I used plaid patterned paper and I ran it through my Big Shot with my PinkFresh Studio Slim Diagonal Stitched Plaid die for extra texture. This is a mini slimline size card.


Products I used:

PinkFresh Studio: Slim Diagonal Stitched Plaid die

Spellbinders: Bottle Brush Trees dies

Ink to Paper: Christmas dies (Joyful)

Stampin' Up!: Sequins

Silver card stock

The only thing I did that isn't obvious is to cut Joyful out of a thick piece of watercolor card stock, then the silver card stock. I adhered them together for a thicker, more substantial die cut.

We hope you will join us and make some pretty plaid cards too! The design team gallery is really nice and the reminder team will be along with more ideas midway through the challenge!

-Carol


Tuesday, April 12, 2022

Relax

I am crazy about the Everything's Beachy stamp set from Ellen Hutson. As it gets warmer, I plan to play more with it...so many ideas still to try! This week at CAS Colours and Sketches #465 I saw their challenge and immediately thought of the umbrella in this stamp set. Here is what I came up with...


I kept it simple with a white tag on a white card base. Pink ink blending for sand and a popped up, fussy cut umbrella that I stamped onto patterned paper make me think that pink flamingos might be nearby. All the sunbather needs is a pink umbrella drink.

Products I used:
 
Ellen Hutson: Everything's Beachy stamp set (everything stamped on this card is from this set)

Studio Katia: Slider tag die

Prismacolor: Colored pencils

The Twinery: pink and white twine

Stazon: Jet Black Ink

Foam tape: (I popped up the umbrella and tag, then bent the umbrella points down to look like a real one when opened.)

Ranger: Distress Oxide Ink in Spun Sugar

Ink blending brush

Corner rounder (I rounded the top right edge of the card to match the tag)

Summer is almost here, school is almost out...soon it will be time to relax!

-Carol


Saturday, April 9, 2022

Alcohol Inks and Foil

So my friend Nancy and I went out of our comfort zones recently to try to use alcohol inks with foil. It was a new technique for us both. I kind of liked it, but it was one part skill to 10 parts happy accident. We both ended up with one flub in the trash, and a couple of decent panels to use in the future. The Just Us Girls Challenge #627 is to Use Foil on your Alcohol Inked Cards. 


We took glossy cardstock and squeezed drops of ink of several colors on it, then added drops of alcohol ink blending solution and started pushing the liquids around quickly with an ink air blower. (A rubber ball with a straw coming out of it is my best description.) Ranger makes one. The inks dry quickly so we had to work fast! I found that the less colors the better, and not colors that blend and make a muddy color. Then while the ink was still a bit wet/sticky, we added copper colored flakes (because we didn't have foil in a color that looked good with our inks) by tapping them onto the inked panel here and there. Needless to say, our fingertips looked like we had been fingerprinted and then stuck in foil. I would like to try it again because I see the cards that people make with them and they are amazing!

I cut some copper sticker paper with PinkFresh Studios Kelly Alpha Lower Case dies to spell Hi and added them to the card panel I liked best. I cut the panel into a square and mounted it onto a card base that is 5 3/4" x 5 3/4" and the card was complete!

If you have done this process, I would love to hear your tips! It was fun and a learning process at the same time! See you back here soon!

-Carol

Tuesday, April 5, 2022

10 Minute Card Challenge

The As You See It Challenge #271: Staying Dry has a 10 minute card challenge going on. I was intrigued, wanted to try it, and even watched a few videos on You Tube for ideas. I gathered all of my materials, made a step by step list for my process and started the timer. It was going so well and I wasn't even nervous!


Then I looked at my timer again and it was over the 9 minute mark and I knew I wasn't going to make it. From 5 something to 9 something was, what I thought, a quick cutting of papers and adhering them, but I finished WITHOUT sequins in a little over 11 minutes! UGH! I didn't fuss about my Copic coloring, which I am going back to fix now, but the sequins would have added 2 more minutes because I timed how long it took me after the fact to put them on!!! Ahhhh! But, to put it into perspective, I never take under 12 minutes to make a card! Fun challenge anyway!!! I had to post it even though I didn't make the deadline because I like the card and wanted to show them that I tried! LOL!

Products I used: 

Ellen Hutson: All Inside sentiments
Hero Arts: Stamp and Cut set
Copics
Stampin up!: Classic Inks
Pretty Pink Posh: sequins
JoAnn Fabrics: Patterned papers and cardstock
Pink and Main: banner dies

Have you ever done a 10 minute challenge?

-Carol


Saturday, April 2, 2022

Wacky April Holidays IG Hop

Welcome to the Wacky April Holidays IG Hop! You all know those bizarre, random things that earned themselves permanent days of national recognition? Today we're going to celebrate them! Who says only major holidays get cards! Be sure to scroll down for links to all the other carmakers participating in the hop. You don't want to miss out on any of the fun! Claire organized this hop and we were all happy to join.

I have two cards for you for this hop. Here goes, in no particular order!

My first card is for National Licorice Day on April 12! I love red licorice but I also like Good and Plenty candy and those black fruity wedge slices covered in sugar. NO black licorice vines for me though! 


Products used:

Ellen Hutson: All Inside bear and die

Concord and 9th: Love You More Than stamps and dies (I used the french fries dies)

My Favorite Things: hearts stencil

Computer generated text and sentiments


And next up...did you know that April 7 is National No Housework Day?  I thought this was a good one that just about anyone would want to celebrate!


Who doesn't want an excuse not to clean or tidy for a day? There are so many days to choose from, but this one hit home (pun intended) for me! I wanted to showcase this paper that I have hoarded for years so I made a card that takes three pictures to show the whole card...sorry! I computer generated the explanation on the inside and the tag on the front of the card when tied shut. I am including how to make this fun fold card in case you are interested.

The outside card base is cut from a piece of card stock that is 8 1/2" x 5 1/2" and scored at 2 1/8" in from both edges on the 8 1/2" edge.

The patterned paper is cut for the narrow front panels to "about" 2 x 5 3/8" to be smaller than the front panels by about 1/8"or whatever size you like.

The top folding card inside is cut to 4 x 10 1/2" and scored at 5 1/4" along the 10 1/2" edge and adhered in the center inside section of the outer card base.

I cut a piece of patterned paper to match the outer patterned paper to go on the outside of this inner card so it is just a little smaller that this card front by 1/8" both in width and height.

The inside of this inner card has a card stock panel cut just smaller than the width and height of the inner card to have a place to stamp/write a message. You don't need this piece if you can see what is written on the color of card stock you choose.

Products I used:

Stampin' Up!: patterned paper (older), ribbon

Studio 112: Best Friends clear mini stamp set 60-30437, probably from Michael's, JoAnn's or Hobby Lobby. (It's a little one like you find in the dollar spot at these stores.)

My Favorite Things: Inside and Out Stitched Circle dies

Prismacolor: colored pencils

*********************************************************************

We've got a great hop lineup today. Please check out each of these IG accounts to see the holidays we're celebrating! Go see my account: @sawithadtomakeit where you can click on all the other accounts playing along.

@clares_card_on

@deezinesbyd

@kpkreatives

@made.by.michi

@magymakes

@colourandsparkle

@craftwithme101

@mindmypaper

@puffinsnpaper

@handmadebykanicky

@tinytreasureworkshop

@sawithadtomakeit (me)

@love.builds_up.crafts

@joyinthemakingco

@vr_handmadelove

I hope you enjoy all the special April days in our hop! 

-Carol


Hoppy Easter - Hope It's Egg-cellent!

Well, here is another Easter or Spring card! I made this one for Just Us Girls Challenge Word Week #626: Egg. This time I tried the interactive component and it wasn't too difficult! You pull a tab on other lower right side of the card to make the chicks bob to the left and right. Check out all the ways the design team created with "egg" in mind.


This is, again, my Spellbinders Large die of the Month 2021, but this time I made the chicks
and not the bunny or lamb. I took my sentiment from an Ellen Hutson stamp set called  Bear Wear 3 because it actually said "egg" and I couldn't resist. When you pull the tab on the lower right corner they lean to the left, and when you push the tab back in you can make them lean to the right. I used Pretty Pink Posh jewels to add sparkle.

Hope you are hopping into spring and that it is warming up where you are!

-Carol
  

Friday, April 1, 2022

Hello Hibiscus

Happy April Fools Day! No fooling around, I just stumbled upon the Sunday Stamps Challenge SSC279 and loved the colors they are using! So I grabbed some oxide ink and this is what I came up with for their current challenge. 


Products I used:

Altenew: Hibiscus Garden 3D Die set

Vellum (behind the white hello)

Distress Oxide inks

Blender Brushes

Nuvo Crystal Drops


I already had a small watercolored panel scrap with one of the inks I chose for this project, so I made an A2 card base and ink blended the edges with the same color. Next, I ink blended all the colors I wanted for my flower and leaves on a sheet of white card stock and let the ink dry. Then I got my fingers wet with water and flicked little droplets onto the inked panel. I let that dry. Later, I did all my die cutting, piecing and placement. Then I added a few dots of different sizes of Nuvo Crystal Drops to look like water droplets. I have to admit that I CASEd an Altenew layout but made it my own of course...their samples are out of this world!!! I'm really gearing up for summer, can you tell by my latest posts? 

Hope you don't get April Fooled today! I already warned my husband not to try anything...we'll see how that goes!

-Carol


Hello Gorgeous!

I'm really excited to be a guest designer at Color Hues Color Challenge #38 using Pink and Green! I'm getting the summer, tropical "vibe" with my card AND my mood, and it all started with these colors and my patterned paper...


Products I used:

SugarPea Designs: Sugar Cut Card Front Element Builder (stitched lines on the edge of the card)

Reverse Confetti: Circle Rays Duo Confetti Cuts

Hero Arts: Color Layering Flamingo stamp and die sets

StazOn: Jet Black Ink

Altenew: Hibiscus Garden 3D die set

Distress Oxide inks

Blender brushes

Foam Tape

For the circle ray and leaves I ink blended white card stock first, then cut out my shapes. I often like the look of the die cuts when they have been ink blended vs. plain colored card stock. The flamingo is a multi-step stamp set and I added white gel pen afterwards for detail. I popped up the circle and flamingo on foam tape for more texture.

Check out all the inspiration from the Color Hues design team and join the pink and green fun!

-Carol