Saturday, July 31, 2021

Merry

I am playing along with the Waffle Flower Monthly Challenges Inspiration Week 1: Unconventional Christmas Colors Here. I knew when I got this die I would find lots of different uses with it!


After making a watercolor panel with various inks and an aqua painter, I cut out these circles with my Waffle Flower Quilt Circle Panel die. Next, I die cut my sentiment and watercolored it as well, then added some wink of Stella to it. I popped it up on foam tape after adhering the circles in a tree shape on my pink scalloped card front. I watered down some white acrylic paint and spattered my card with my thumb rubbing across a stipple brush. The tree trunk is one section of an extra circle I had from the Quilt Circle die. That's it! 

I have been thinking about starting a stash of Christmas tags and making this card got me even more in the mood! Have you started your December paper crafts yet?

See you back here soon,

-Carol

Wednesday, July 28, 2021

Seas The Day

I love this Hero Arts Seas The Day Seagulls stamp set with all of its cute seagulls, shells, a lighthouse, sentiments and more. After looking on Pinterest for a different card style, I settled on this reverse easel fancy fold and chose my favorite seagulls of the set. I'm playing along with #abnhjulychallenge "repetition" theme on Instagram (A Blog Named Hero) here.


Products used:

Hero Arts Seas The Day Seagulls stamp set

Simon Says Stamp Intense Black ink and Wonky Rectangle dies

My Favorite Things Waves dies (to make a stencil)

Prismacolor colored pencils

Stampin' Up! Classic ink pads

Blender Brushes

Patterned paper

Cardstock

Double Sided sticky foam tape

Hope you get to go to the beach and hang out like these salty guys!

-Carol

Saturday, July 24, 2021

You're Awesome

Over at the Simon Says Stamp Wednesday Challenge (click here) the topic is Out With The Old In With The New. My card features my brand new Jane's Doodles Surf's Up set and my also brand new Pretty Pink Posh Layered Surfboard Stencils. My Simon Says Stamp Intense Black Ink is something that I have had forever and is my "old" for this challenge!


As soon as I saw the previews of this mouse surfing with his swimmies on I knew he was going to be mine! I knew I would use Glossy Accents to shine up his swimmies, goggles and surfboard, and make splashes of water, too! The Pretty Pink Posh layered stencils surfboards are fun and really quick to use with Ranger Distress inks. I used Prismacolor pencils to color my mouse. The aqua vellum waves were cut with My Favorite Things Ocean Waves die set. 


And because these stencils are SO fun, I am entering my card in the Happy Little Stampers Stencil Challenge Anything Goes. Click here to see their challenge!

Hope you are enjoying your summer activities!

-Carol

Friday, July 23, 2021

Bee Mine

The Paper Players PP550 Clean and Simple Challenge requires a bee...and I didn't think I had one. I got up this morning to look one more time and found this cute little guy! 


This card is gift-sized. It is made with two die cut Simon Says Stamp Wonky Hearts adhered at the top, above a score line just a little more than 1/4" down from the top edge of the heart that is behind the card front. I added tying ribbons to the cards. The bee is from the Stampin' Up! Crazy, Mixed-up Love stamp set. I might make a little set of these for Valentine's Day next year!

I'll "bee" back soon,

-Carol

Thursday, July 22, 2021

Orange You So Sweet

This week at the Tic Tac Toe Challenge tttc#123 (click here)we have a fun new board for you! I chose the right column: Orange, Free, Alphabet Stamps. My "free" space stands for masking. I decided to make it kind of a CAS (Clean and Simple) card with lots of white space and pops of the color orange as well as orange slices.


When I saw this board I immediately thought of the Lined Alphabet stamp set from Stampin' Up! because I knew I could put a design inside of each (outline) letter. I used my new Pretty Pink Posh Summer Drinks Stamp set to mask off and stamp the orange slices inside the letters O, M, G, and also used one of the cute drink stamps. I colored them all with Copics and fussy cut them. 

Next, I die cut orange slices for the background from white cardstock with my Concord and 9th Orange You Sweet Dies. I had to glue the inner pieces back into the "frame" for each orange, but I sat and listened to Pandora while I did it, making it fun and relaxing! LOL. (I'm sure there is an easier way to die cut these so that the little inner pieces and frame stay as one after die cutting, but I didn't think of it. Let me know if you think of a way to do it!) 

After I glued the oranges down, I stamped the sentiment from the Concord and 9th companion stamp set also called Orange You Sweet. I played with the placement of the OMG, sentiment and cocktail until I was happy with the layout. It just so happens that I just got the fruit confetti from Pretty Pink Posh and thought the oranges would add color to my CAS card. I need a class on sequin/enamel dot/rhinestone placement! I am never happy with where I end up putting them on projects. Any hints besides an odd number of them? 

I hope you will join us over at Tic Tac Toe Challenge this week. I think it's a really sweet, bright,  summery one!

-Carol


Wednesday, July 21, 2021

A Sailing Thank You

I'm starting a much needed stash of thank you cards to have ready and waiting. I have had these cool sailboat dies for a just a short time and wanted to try more ways to use them in scenes! They are so realistic and simple to die cut and color. I am entering my 6 1/4" x 3 1/4" mini slimline card in the MFT Slimline Challenge Feeling Beachy this month here and The Poppy Stamps PSC#82 Just Add Water here.


Yesterday I was out browsing craft stores and I fell in love with the dainty fonts of this sentiment. It's from Stampabilities. I thought the fonts paired well with the calm water scene. The dies are from Poppy Stamps, by Memory Box, called Marina Sailboats. The sunshine is a Tim Holtz stencil and I used Distress Inks to ink blend all the colors on this card.

"Sea" you soon with more summer cards,

-Carol

Saturday, July 17, 2021

Quilty Watercolors

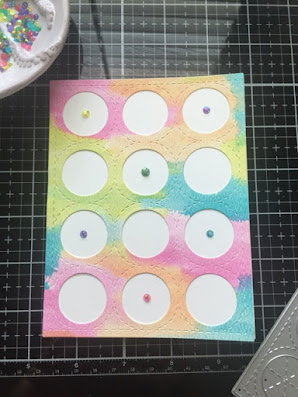
I recently WON (Yay!) a gift voucher and  got this Quilt Circle Panel Die from Waffle Flower Stamps and Dies. I was excited to watercolor with it and play around a little. These cards are for a friend who wants to have a stash of all occasion, no sentiment cards to give to her clients when they bring her gifts or do something nice for her. They are my first sales as a cardmaker! I thought I would take a few pictures of my process.


Using a water brush, I wet a piece of watercolor paper. Next I used the water brush to pick up Distress ink that I had squished onto my glass mat so that I could add some pretty colors to the panel. Then, I dried the paper with my heat gun on both sides. Finally, I ran the die and the watercolored panel through my Big Shot machine.


I  used temporary adhesive to attach the background panel to a card front, then moved the circles around so they were not by the same color in the background. (I wasn't sure if I was going to glue the circles AND the background onto the same card.) Once I liked where the circles were, I permanently adhered the circles to the card front. I removed the background panel which left just the circles on the card front.


I added Pretty Pink Posh gems on some of them.


I glued the background piece to another A2 white card front and added gems to every other opening.


The final products.

Pretty easy cards. Quick, and very versatile for any occasion. The circles could be grouped/randomly placed along one side or, using the negative piece, put little Copic-colored die cuts in each opening. I think I will get a lot of use out of this die!

See you soon,

-Carol

Thursday, July 15, 2021

Sweet

I am really enjoying citrus fruits this summer, on cards, in drinks, on fabric. This card is for The Paper Players PP549 color challenge with Bumblebee, Misty Moonlight, Just Jade. I have another card coming soon with these lemon dies to prove my fascination with them lately!


Products:
Concord and 9th: Orange You Sweet Stamp set and dies
Paper Smooches Fruitastic stamp set
Stampin' Up! Classic ink pads and Ranger Distress Oxide inks 
Glossy Accents
Ink blending brushes
Pretty Pink Posh Fresh Fruit Clay Confetti (Obsessing over these chunky little guys!)
Altenew Hibiscus 3D leaves dies 
White  and "jade" cardstocks

I decided to ink blend on white cardstock with the blue and "jade" inks, spritz some water on it, then blot it off. 

Next, I used white cardstock to die cut the lemons and ink blended the edges and the inner wedges, leaving the white in between wedges. (I had to removed the wedges, ink blend them, then fit them back in their places...like a puzzle.) 

I turned over the Paper Smooches lemon stamp and inked the back, solid side of it for the background cardstock strip. 

The last little thing was making the sentiment ombre with blue and jade inks using a blender brush. I tried to capture it with my pictures but it isn't as pretty as in person.

I think that one of the best things about summer are the flavors and scents in everything! Hope you are enjoying your favorite parts of this season as well!

-Carol


Monday, July 12, 2021

Altered Books, Part 2

Here is the first altered book I made with my stamp club years ago.  You have to read my last post to get the back story, but this one was made month by month by a different friend each time in our club, and I was delightfully surprised each time I got it back! My favorite has to be the one with the pictures of my family in it. My friend Sharron, a colleague, asked me for a picture of each of us and this is what she used them for when it was her turn. Can you see the shaker embedded in a page? I didn't show the whole book, just the highlights. The 4th picture has a lot of black threads...they are attached to tags that fit into a pocket on the bottom corner of the page. So cool! Needless to say, there was a LOT of talent in that group and I always felt like the weakest link. We had a lot of fun and inspired each other with our things we brought to share (could have been something we made or received from another friend somewhere) and what we made each month at the gathering. Here is my game-themed book!


Hope you enjoyed this crazy book of games...I look at it and think of all the work and thought that everyone put into each others' books for a good part of a year! 

Hope to see you back here soon,

-Carol

Altered Book

One way to recycle books when you don't know where to donate or otherwise share them is to repurpose them. I have done a couple of these, and this one is my tropical themed altered book that I have just started. This week's Just Us Girls Challenge is Trend Week #592: Recycle, and I am altering the pages as I get inspired.


I am stamping, using embellishments and ephemera, and ink blending papers as I go. Everything you see here is from my stash that I have "hoarded" for a long time. In my mind it is a "tiki hut" shaped book that I got years ago at a store called Ruban Rouge in Pinellas County, Florida. That store had me drooling every time I went there. It was a gorgeous store inside and had endless products for all sorts of paper crafts. I remember that they had Heidi Swapp coming to do a series of classes. They sold these shaped books and the first one I bought was for a stamp club I was in. In addition to stamping and making a project each month, we traded these books at each meeting and embellished another person's book following their particular theme. My theme was "games" because of the shape of the book. I will post it soon. One friend in the group thought she lost my book and said she was sick about it and was dreading telling me. It turned up and all was well in the world again for us both! My next one is going to be for my daughter and it is in the shape of an S. It will be a challenge!


It's got blank pages, so I can write in it and add pictures and stamping. Fun papercrafting projects! Hope this gives you some inspiration! Go check out the JUGS challenge and do some recycling of your own to play along!

Take a look at my next post where I showed my first altered book of games (chosen because of crown the shape of the book).

See you soon,

-Carol

Friday, July 9, 2021

Paradise

The Paper Players PP548 Challenge is Stars and/or Stripes and I thought that since the 4th of July is now in the past I would do summery stripes on my card. Relaxing right?


Products used:

Dog in pool - Hero Arts "Lounging Pups"
Sentiment: Honey Bee "Sea Breeze"
Dies: My Favorite Things "Beach Scene Builder"
Ink: Simon Says Stamp Intense Black Ink,  Stampin' Up! Coastal Cabana
Patterned Paper: Stampin' Up!
Ink Blending brushes
Glossy Accents
Prismacolor Colored Pencils

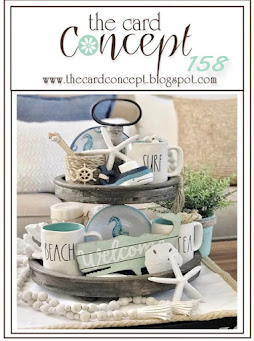
The Card Concept #158 is also a beachy theme and I couldn't resist playing along. My card is clean and layered and uses the colors in the beachy photo for the challenge. I could feel the beach/sea and surf like the mugs in the photo as well as the shades of aqua!


Hope you are enjoying summer  R & R!!!

-Carol


Thursday, July 8, 2021

Scoops of Thanks

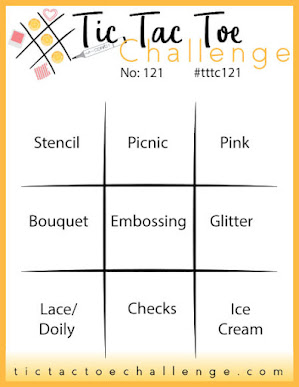
Today is my first day "on the job" as a new Design Team member for the Tic Tac Toe Challenge! I'm so happy to be here! This week is TTTC#121(click here) with a whole new set of fun choices. Check out all the team members' projects and join us this week! I personally fell in love with the column on the right: Pink, Glitter, Ice Cream as soon as I saw it. Here is my card:


I got out my Reverse Confetti Love and Ice Cream stamp set and dies and decided to look for fun, pink patterned paper for the scoops of ice cream.  I embossed the die cut cone with the Stampin' Up! Tiny Triangles embossing folder on a medium brown cardstock.  The sentiment is stamped with Versafine Archival Instant Dry Pigment ink in Onyx Black. Next, I cut the pink and silver glitter cardstock pieces to fit my white mini slimline card base. I popped up those big scoops on foam tape and teetered them left and right due to their "weight" as you know happens with several scoops of ice cream! Pretty simple card today. I hope you will join our challenge with all of the great choices!

See you soon,
-Carol


Thursday, July 1, 2021

I've Got Your Back

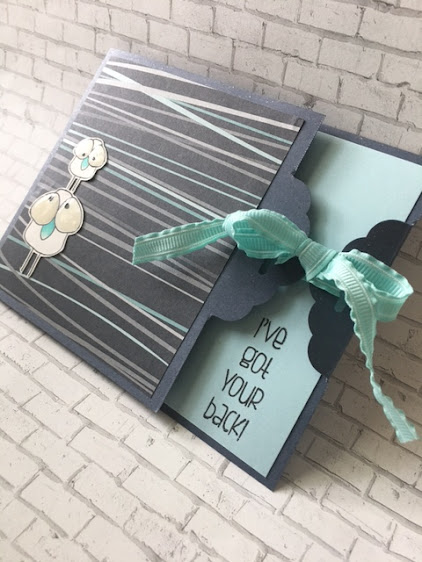
The Card Concept #158 Long Summer Days had my name written all over it. I live near the beautiful aqua colored Gulf of Mexico and I'd like to think that my little sea birds are wading in the surf as night is falling on a long day at the beach, carefully navigating the rows of waves as they roll into the shore. Momma has baby on her back to keep it safe. I call the style of my card Clean and Layered. I was inspired by the challenge photo because of the aqua items and the grey of the tiered tray, but more obviously the beach themed objects were why I grabbed the "sea" bird stamps and this "wavy" patterned paper.

I also noticed that the Simon Says Stamp Wednesday Challenge is Anything Goes. The card actually started first with the patterned paper. Isn't that the tail wagging the dog? I then got out  everything that color-matched the paper and stamped this card with the adorable Simon Says Stamp Stacking Animals stamp set. I also grabbed some random cardstock that is dark grey with glittery speckles in it because the sand on the beach has those same speckles!


I happened to see a video for a card style that I haven't made in a long time. Here is the tutorial: Dawn's Stamping Thoughts. Such a cute card! (Mine is oriented sideways due to the size of the cardstock piece I had left.) I used Simon Says Stamp Intense Black Ink to stamp the birds and Prismacolor pencils to color their beaks. I fussy cut them (because I haven't bought the dies yet!) and decided to stamp the sentiment over to the right with the same black ink. I tied some older (hoarded) "wavy" aqua ribbon from SU! and the card is done!

It's a fairly quick card and it leaves you lots of writing space inside! I hope you try this card style...any tag punch should do!

Hope to see you back here soon,

-Carol

Happy Birthday America!

The 4th of July is almost here and summer is in full swing! And Happy Canada Day to our northern friends! In addition, I am a Guest Designer this week for Color Hues The Color Challenge TCH#21 right here! The colors are red and blue, so here is my kind of "vintage"-shaker-postage tag using those colors. It measures 3 1/4" X 4 1/2".


Patriotic ladies stamp: Carmen's Veranda. 
Stencil, inks, ribbon and Independence Day stamp set (stars): Stampin' Up!
Happy Birthday America stamp: Ann-ticipations.
Coloring: Prismacolor colored pencils.
Postage die: The Greetery. 
Stitched Inside and Out (inner rectangle) die: My Favorite Things. 
Fancy circle eyelet is in a tag die set: Reverse Confetti.
Red and white twine: The Twinery.
Confetti: JoAnn's (Red, white and blue) and Pretty Pink Posh (clear).

Have a great 4th weekend!

-Carol