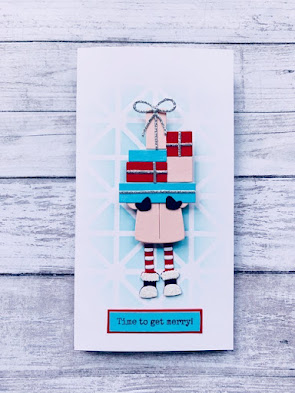
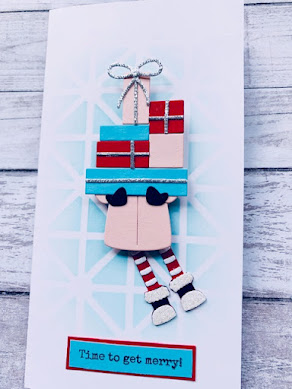
I am so excited to finally use my Spellbinders Shopping Spree dies because this card was fun to make and I love the results! This is a really versatile set that can have different looks based on paper choice and how you stack the presents. And the stencil is new to me as well, just having bought it two days ago! I think my little Gift Giver looks like she is at the door delivering surprises to a friend. I am playing along with the Inspired By Challenge IB193C (here) Tis the Season for Friends.
Sunday, October 31, 2021
Time To Get Merry
Thursday, October 28, 2021
Santa Tag
Tags are a lot of fun to make because there is only a little surface area to use and you get instant gratification because they are done quickly! Size alone makes them cute! Here is my tag for this week's Tic Tac Toe board #137 and I used the first column moving down: Sparkle, Critter, Tag. I'm also playing along over at the Build Your Stash Holiday Cardmakers Falling for the Holidays 2021 challenge here.
I love my Ellen Hutson 'Tis the Season Santa and his comment a lot, so I make a lot of tags with them. I also love to use Glossy Accents to shine up his lenses!! I borrowed the Santa and his sleigh so I don't know who makes it. I used a Stampin' Up! star border punch for the stars, and their Banners Framelits dies for the red tag. The white tag is one of their punches as well. I could not get a better picture of the red tag in our morning in-and-out-sun weather and it bothers me that the top looks like a different red than the bottom of the same tag. I wanted to make the Santa coat/belt and it is so easy! Cut the black piece wider than the tag, cut off the excess and cut that piece into a square so that it is the same height as the belt. Layer the little black square on top of the silver square and it looks like a buckle that has been threaded through the silver piece!
I'll be back with more tags I'm sure in the coming weeks!
-Carol
Sunny Birthday Wishes
Hello again as I continue my guest spot in another challenge for Seize the Birthday! For the new Make a Sunset Scene topping I came up with this cityscape card. Check out this particular challenge because ideas and techniques for sunset cards often vary and are always really cool!
I used my Hero Arts city buildings stamp to start my scene by stamping it with Simon Says Stamp Intense Black ink on the front of a white A2 card base. I opened the card and masked off the front panel from the back so I could ink blend and only have the sunset on the back half. I used Ranger Distress inks in Mustard Seed, Carved Pumpkin, Picked Raspberry and Wilted Violet. I'm not great at ink blending but I hope you get the idea of the early evening sky. Next I fussy cut the card front from above the city. I made my sentiments on my computer and cut them out with Stampin' Up! Bitty Banners Framelits. I grabbed some baker's twine to make the rope that pulls the signage behind a plane and glued it down before popping up the top sentiment next to it. I had to put the second half of the sentiment low so it wouldn't show when the card is closed. I figure you can write a message on the back of the card! Last, I added a panel of black cardstock behind the card to frame it and make the whole card pop a lot more than without it.
Hope you are inspired by all the sunset ideas and join us!
-Carol
Wednesday, October 27, 2021
Sweetie Pie
I created this card because I was chosen as a Color Throwdown Featured Stamper CTD666 this week! I was so surprised and excited to get to do this! I am also entering the challenge over at the Global Design Project #315 where the theme is Hey Pumpkin!!
Are you having pie this Thanksgiving? I am not a pumpkin fan but will be sure to have one for my family while I make mini cherry tarts for me!
See you soon,
-Carol
Saturday, October 23, 2021
Joy!
Here is a new card for the Build Your Stash Holiday Cardmakers: Falling for the Holidays 2021 here. I got this set of dies/embossing folder a while ago and am just now using it for the first time! Fun!!!!! This card was embossed, die cut, chalked and flocked! It was a fun process actually! I am also using it for the NBUS (Never Before Used Sctuff) challenge...a great way to get you to use things from your stash that have not be opened and are begging to be put to work!
The set is made by Mementa and I think I got it at Hobby Lobby about 6 months ago! Everything you see here was all in this one little set! I love pieced Santas and the tree embossing folder is now one of the favorites that I own! I want to make some tags now with it and probably will get on that soon.
I hope to see you back here soon!
-Carol
Wednesday, October 20, 2021
Santa's Watching!
Children for ages have been told that Santa is watching them, year 'round, for their good or bad behavior. I made this tag to show that you never know when he is around! The Inspired By IB191C challenge here has a photo for inspiration and I hope you can see the bear, shades of blue and Christmas theme from it in my gift tag.
I cut the tree twice for sturdiness and the same for the bear because I need him to be hanging out on one side and hiding on the other. I watercolored the tree blue to make the tag seem cool and wintery. I added the silver stars for holiday sparkle, and after die cutting his hat and candy cane, I added Wink of Stella to the brim and pompom of his hat! I popped him up on the front of the tree so he would look like he was just hanging out in front of it and on the back side, hiding behind it. I stamped the To/From and Santa's little message next, then punched a hole for my silver elastic twine. He was so much fun to make!
Products:
Dotted Tree die from The Stamp Market
All Inside Bear stamp and die from Ellen Hutson
Candy Cane die from Tim Holtz Christmas Minis Thinlits dies
Present stamp from Mama Elephant Holiday Bitties stamp set
Stampin' Up! Classic Ink in Brilliant Blue and Ranger Distress Oxide ink in Tumbled Glass
Stars were punched with an older stars border punch from Stampin' Up!
To/From stamp is from Stampin' Up! Celebration Time stamp set
Santa Hat dies are from Lawn Fawn Tiny Gift Box Holiday Hats
Santa's message is from an older Ellen Hutson stamp set.
I am in gift tag mode lately and having a lot of fun with them!
See you soon,
-Carol
Tuesday, October 19, 2021
Advent Calendar
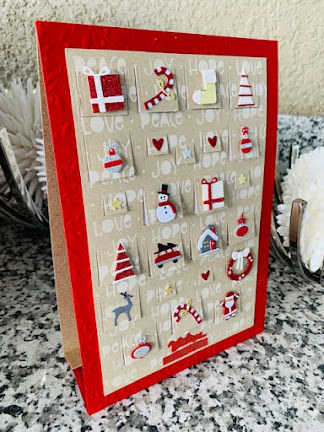
When the Tim Holtz Christmas Minis Thinlits dies hit the stores recently I had to have them. Then, I saw an older and similar set called Tiny Snowglobes Thinlits dies and was hooked again. I have been wanting to make an advent calendar for a long time, and that's what I saw in these little dies. I am playing along with the Simon Says Stamp Wednesday Challenge "Not a Card" (here) where they are showcasing Tim Holtz products. Also, I had to play along with Color Hues The Color Challenge #28 this week because I love kraft and red together and those are their colors this week!
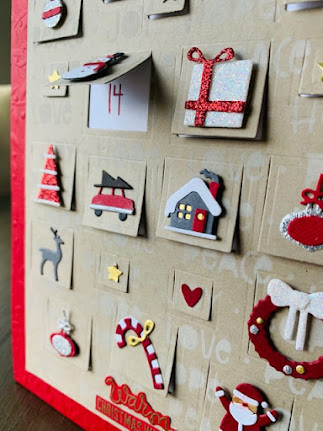
Next I partial-cut two sizes of square dies for doors on a kraft panel.
Then I stenciled the kraft panel using Simon Says Stamp's new Peace Hope Joy Love stencil with Tim Holtz Distress Ink in Picket Fence. I scored the folding/hinge side of each door so they can open and close.
I positioned the little objects where I wanted them and started adhering them to the doors with either Tacky Glue or foam tape to pop some of them up.
I heat embossed the sentiment "Warm Christmas Wishes" on red cardstock using gold embossing powder and the Simon Says Stamp stamp set Warm Christmas Wishes. Then I fussy cut it out.
Next, I cut a white cardstock panel just a little smaller than the kraft panel and held it under the kraft panel. I opened each door and put a small dot with my pencil on the white panel where the center of each door was.
I used my Paper Smooches Alphadot set to stamp numbers 1-24 out of order on the white panel so they would end up being behind each door of the kraft panel. Then I used Tacky glue along the outer edge to adhere the white panel behind the kraft one.
I found some Christmas embossed cardstock and cut it 1/2" larger than my kraft panel all around. I glued the red panel behind the calendar, leaving an extra couple of inches of the red panel on the bottom.
I scored the excess part of the red panel in half to start an easel for my calendar. Then I grabbed some thin cardboard that wouldn't bend easily and cut and scored it at the top and bottom to adhere to my calendar so that it could fold up to be stored away. The finished size is just under 9.5" x 6.5" due to the red background/easel part.
So what is left to make are either decorative envelopes or little pillow boxes with numbers 1-24 on them. Each day the recipient of this advent calendar will open a door, starting with the top left and moving to the right each day. Whichever number is behind the door, is the envelope or box to open and receive a little gift, such as a gift card, candy or other small item.
I think that is it! Hope that made sense! It was fun and kept me busy for a couple of days working off and on on it.
Are you making any fun projects now that we are almost to Halloween?
-Carol
Sunday, October 17, 2021
Season of Friendship
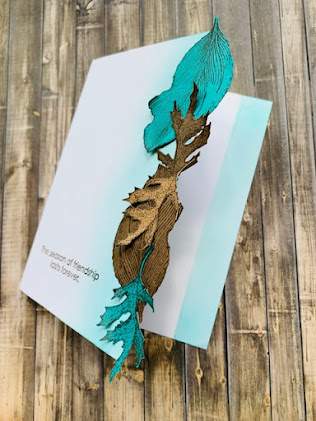
This week the Color Throwdown Challenge CTD664 is turquoise, brown, kraft and white, and right away I imagined fall leaves when I saw the colors. Here is my card for their challenge.
I first chose my cardstock colors then grabbed two of my favorite leaf stamps, the larger one from Magenta and the smaller from Rubber Stamps of America. I stamped them with GinaK Premium Dye Ink in Charcoal Brown, then fussy cut each one. I decided I wanted to make the front of the card narrower and have the leaves sit along that edge...and I planned on sewing them down the middle with my sewing machine, but chickened out on the latter. First, I ink blended Stampin' Up! Bermuda Bay ink lightly along the edge of the card front to give a little background. I played with placement of the leaves and glued them down partially so they looked like they landed there and the edges weren't completely flat. Then the white space on the inside back of the card looked super white, so I decided to lightly ink blend there too with Bermuda Bay. I grabbed the sentiment from an old Stampin' Up! set called Season of Friendship and stamped it in the same GinaK brown ink.
Hope your fall is treating you well...it is still 90 degrees here in Florida! But our humidity and temps will become mild in the coming weeks and it will be sooooooo nice until late spring!
See you back here soon,
-Carol
Saturday, October 16, 2021
Día de los Muertos
I just made a fall/cultural themed card for my Spanish teacher friend. El Día de los Muertos (Day of the Dead) is a fall holiday in Mexico and when we taught culture, we used to teach the high school students about it and how it is not at all a Mexican version of Halloween. It falls on November 1st and 2nd, near Halloween. It is a celebration of dear ones who have passed on but will not be forgotten. Here is a link to an explanation of this celebration. I am entering this card in the Simon Says Stamp Fall Mood Board Inspiration (here) challenge. The photo provided for the challenge includes candles, fall leaves and flowers which remind me of some of the symbols of Día de los Muertos.
First I made a faux-iris technique card base. I used Simon Says Stamp Intense Black ink to stamp my Stampin' Up! Spooky Bits cute skeleton stamp because it is another symbol of Día de los Muertos. I masked the skeleton and ink blended lightly behind him, then added googly eyes. The colors of this holiday are cheery and bright, and can even reflect the favorite colors of the family member being celebrated. I tried to use some fall colors from the inspiration photo from Simon Says Stamp for this challenge. I used a Reverse Confetti banner die after I ink blended a piece of white cardstock to mimic the papel picado (cut paper- linked here) hung in the homes and streets of Mexico for celebrations. I made my own sentiment and punched it out with a scallop circle punch from Stampin' Up!
Hope you enjoyed this little culture lesson and my card for a friend.
-Carol
Thursday, October 14, 2021
Eat, Drink and Be Scary
This week's Tic Tac Toe Challenge #135 board here is up and waiting for people to play along with us! I decided to make a tag by going diagonally from the bottom left square up to the top right square on the tic tac toe board: black, orange, purple. I figured I could make some Halloween cookies and deliver them to a friend with this tag attached.
Come join us this week!
P.S. I made the Halloween table runner several years ago with a fun fabric charm pack from Sweetwater called The Boo Crew. Here's the tutorial for this quick project! I love getting it out every year!
-Carol
Coastal Birthday Wishes
Guess what?!! I am a Surprise Party Guest for October and November at Seize the Birthday...and I couldn't be happier to be asked! Use a Stencil is the current topping so I immediately grabbed a favorite shells stencil for my card.
The stencil is made by The CraftersWorkshop (TCW) and it is 12" x 12" with several different shells included. On the front of my A2 card base I ink blended with Ranger Distress Oxide inks in Dried Marigold, Spun Sugar and Abandoned Coral. Then I die cut my sentiment four times, ink blended one of them, and stacked them so they would stand above the card. I added some sparkle like you see in the sand at the beach by using sequins...and it was complete!
I hope you will join us for some stencil fun and see all the creative ideas using this topping!
See you soon!
-Carol
Thursday, October 7, 2021
Wonky Witch Tag
Another witchy greeting for Halloween! I couldn't wait to share this wonky tag once it was complete. The story behind it is that I recently saw the concept (the witch's comment) and knew I could make some kind of stamped item using it. I am sure that I am dating myself by referring to driving a stick (shift), but in high school it was cool to know how to drive a clutch and I made sure that I learned! Hope she makes you laugh! I am playing along with The Paper Players PP561 here and Just Us Girls Word Week Challenge #604: Halloween. Check out these challenges and join the fun!
The stamp is an oldie from All Night Media and the tag is cut with my Simon Says Stamp Drifting Stitches Borders as well as a Reverse Confetti tag die for the bottom scallops and the decorative tag circle for the ribbon at the top (both made with black glitter cardstock). I made my cloud stencil with some My Favorite Things Ocean Waves dies and cut the moon with a My Favorite Things Inside and Out Stitched Circle die. I made my own sentiment on the computer and used Stampin' Up! Word Bubbles Framelits dies for the speech bubble. I colored the witch with Prismacolor pencils and used some Pretty Pink Posh jewels for sparkle in the night sky.
Hope you're enjoying October...before we know it Halloween night will be here!
-Carol
Monday, October 4, 2021
Pure Innocence Halloween
I have loved the Pure Innocence characters forever at My Favorite Things. I own mostly the beachy little girls in my collection, but today I needed to make one into a little witch for Halloween for their Weekly Sketch #561 right here! I'm also entering it at The Paper Players "Spooky" PP561 right here! and the Just Us Girls #604 Challenge: Halloween!
Hope you enjoy this cute little witch, driving a stick(shift). LOL!
-Carol
Better With You
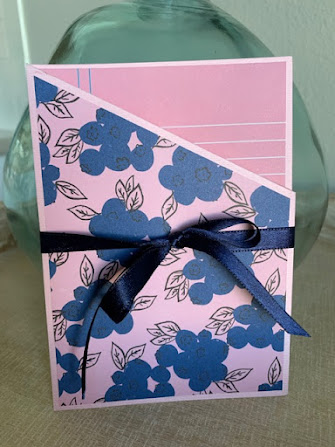
Here is another fun fold like my last post that I made this past weekend during World Card Making Day. I wanted to make one in pretty colors that my daughter likes to surprise her. See my last post for details! I am entering this in NBUS#31-Never Before Used Shtuff here because I have hoarded this pretty blue and pink patterned paper from Crate Paper FOREVER! I am also entering it in the Simon Says Stamp WCMD challenge here as well as their Wednesday Challenge here! Simon Says Stamp, I'm in Florida where it is still hot and I am a papercrafter because I love the relaxation and creativity of making cards and other things with paper, as well as meeting so many people through our mutual hobby.
This fun fold is from @laclaudelscrap on Instagram and I have a link to her tutorial in my last blog post. The sentiment is Pretty Pink Posh Simple Sayings: Life. I love the fonts at Pretty Pink Posh so much!!
See you back here soon!
-Carol
