Saturday, August 19, 2023

Keep on Swimming!!

I am not ready to let go of summer stamping and when I saw that the Global Design Project GDP407 theme is Water Creatures, I was excited to have a real reason to make another beachy card!


Products I used:

Birch Press Design: No One Like You stamp set

Simon Says Stamp: Under the Sea Animals stamp set and dies, gems

Pink and Main: Large Sentiment Strip dies

Distress inks

Gina K: Fine Detail white embossing powder

Versamark ink pad

Versafine Onyx Black ink pad

Copic markers

Using my Misti, I stamped, then heat embossed the fish stamp onto a white panel, then ink blended all over it, wiping off the excess with a rag so the white embossing was bright and shiny. I die cut, stamped and colored the turtle with Copic markers, then popped him up on foam tape on the panel where the light was coming into the water. I trimmed the embossed panel down to be a little smaller than A2, then popped it up on an A2 white card base. I stamped and die cut the sentiment from the same set as the turtle, then popped it up on the front panel. I placed some gems to look like bubbles underwater and the card was complete!

I don't use this fish stamp enough...it came with lots of sentiments that could be used with other stamps and dies. Also, the fish stamp itself is 5 1/2" x 5 1/2"! Hopefully I can make a few more summer cards before fall takes over!

-Carol


Seaside Moodboard

I just love this seaside-themed moodboard that Bobby came up with for our Just Us Girls Challenge #693 this week! Wait until you see all the cards the team made too! Be sure to click on their names above the photos to get all the details on their projects! This week we are delighted to have our August guest Greta, too. Here is my take on the moodboard, starting with inspiration from the tortoise shell glasses, tassels, sunhat, seashells, "sandals" and different textures/patterns.


Products I used:

Papertrey Ink: Beach Bag die set (So many details like faux stitching and fringe)

Adhesive-backed cork sheet

Patterned cardstock (aqua background)
 
Patterned papers (gold embossed shell print, jaguar print, plaid)

3D "beach read book" I created via the internet (The Life & Love of the Sea by Lewis Blackwell)

I used some scrapbook paper with jaguar print on it to make the sunglasses and flip flops first. Then I cut the sole of the flip flops with a piece of adhesive-backed cork. I die cut and assembled the beach bag and hat using patterned papers. The tassels on the beach bag are die cut and added individually, and can be fluffed up to look like real ones. Using foam tape, I popped up almost everything on the card for dimension. My card is 5" x 5" square.

We hope you will jump on the moodboard wagon this week and put together card using anything from colors to patterns, to textures and elements pictured. There is a lot to take inspiration from yet it is all one cohesive theme.

We're waiting to see your creations in our gallery!

-Carol


Sunday, August 13, 2023

Thanks a Melon

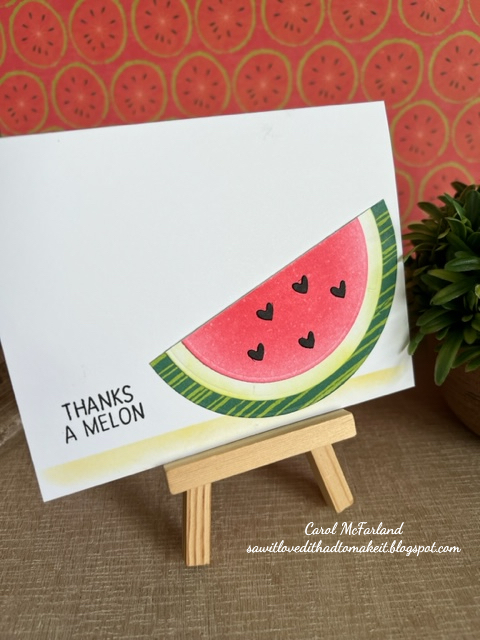
I don't know how I don't own a watermelon stamp, but I don't. When I saw the Color Throwdown CTD755: Red, Yellow, Green and White, I decided that a watermelon would use three of the four colors and I would figure out a way to add yellow. So I took out my circle dies and got started.


For my CAS card I cut the largest circle out of patterned paper, and two more out of white cardstock. I got out my distress ink pads and ink blended a yellowy-green (Twisted Citron) on the middle-sized one and Candied Apple on the smallest. I adhered the circles to each other, sprayed them with a little water, and cut the layered circles in half. Next, I die cut small hearts (MFT Love Speech Bubbles) out of black cardstock and adhered them to the watermelon slice. I used a post it note to mask off a section toward the bottom of my card, then ink blended with Fossilized Amber to add a yellow ground my scene. I stamped my sentiment from a fruity set (Orange You Sweet?) by Concord and 9th and was done! If I stare at the slice of watermelon a bit with my head turned to the side, I convince myself that the stripes make it 2D. (I meant to cut it with vertical stripes.)

That's it for today. See you back here soon!

-Carol 


Saturday, August 12, 2023

Happy B-day

A little play on words for my card today...Our Just Us Girls Challenge #694 Word Week is Bee, and I just bought these towels for a friend as part of a gift. The towel on the left gave me the idea for my bee card.


Products I used:

Spellbinders: Mini Blooms and Sprigs die set

SugarPea Designs: Card Front Element Builder die set

Pink and Main: Banner dies

Stampin Up!: Crazy Mixed-Up Love stamp set (bee), Party This Way stamp set (sentiment), Chalks

Concord and 9th: Mini ink pads

Ink blending brushes

Vellum

Patterned paper

I started by sketching out my layout, then stamping and fussy cutting the bees. I stamped a fussy cut an extra wing for each bee with an extended thin strip below the wing to be able to adhere one behind each whole bee.

Next, I ink blended some white cardstock in yellows and oranges for die cutting my flowers. I added a bit of dark brown chalk to the center of each flower with a pointed Q-tip. I die cut the flower centers and adhered the flower parts together.

I die cut a scalloped rectangle from a piece of bee hive patterned paper, and adhered it to a white A2 card base. 

Next,  I cut a piece of vellum a little bit smaller than the patterned paper. I lined up my flowers and bees where I wanted them on the vellum, then added a glue dot behind each. I bent the wings and petals for a more "real" look. I added more glue dots on the back of the vellum behind each flower and bee, then placed it on top of the scalloped rectangle.

I took a "happy birthday" stamp and covered up part of it to get "Happy B," then stamped just the "day" and added a dash with a marker. I die cut a banner around it and popped it up on foam tape below my grid of flowers and bees.

We hope you will "Bee" able to join us for this fun challenge. Check out all of the team's cards as well as one by our talented guest Greta

See you back here soon,

-Carol


Wednesday, August 9, 2023

CAS Christmas

For the August theme at Christmas Craft Creations we are making CAS (Clean and Simple) cards. This means lots of "white space" with few layers or embellishments as well as something you could reproduce quickly. The white space can be a color, just no pattern on it. I looked around Pinterest and found some ideas and my MFT Santa came up so much that I had to make something with him!


Products I used: 

My Favorite Things: Jingle All the Way stamp set

Copics

Rhinestones

Patterned paper

Wink of Stella pen

Sugar Pea Designs: Card Front Element Builder dies

I Copic-colored my Santa, then fussy cut him. I used a Wink of Stella pen on the brim and pouf ball of his hat. I cut and adhered the notebook paper patterned paper to the corner of my Very Vanilla card base, then stamped my sentiment.  Then I added Santa and some rhinestones. Inside I attached two scalloped die cut rectangles and stamped my sentiment and packages from the same stamp set as Santa. A quick color with Copics and my card was complete!

We hope you will join our CAS challenge which can be a simple as stamping an image in one corner of the card and coloring it. Check out all of the other design team members' cards for ideas! Best part, you have a month to get it done. Our reminder team will have more inspiration for you on August 23rd!

-Carol

Saturday, August 5, 2023

Friends

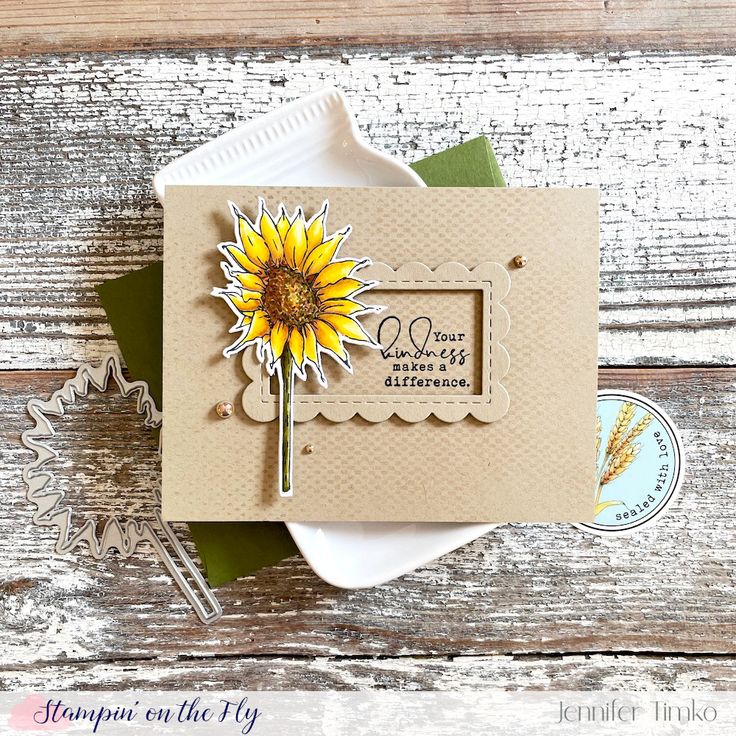
For our Just Us Girls Color Week #691 we are using blue, green and yellow. I was taken by a card by Jen Timko (see kraft card below) and decided that I could make it in our colors this week!


Jen's card from Pinterest


Products I used:

Papertrey Ink: Into the Blooms II die set

My Favorite Things: Scalloped Rectangle die

Ellen Hutson: A2 Piercing Plate 2

Pink and Main: Enamel dots

Inkadinkadoo wooden stamp by Dawn Houser: Sentiment

Archival ink: Cobalt ink pad

Various Inks and Ink blending brushes

Adhesive backed foam sheet


All I did was ink up some scrap white card stock and ink blended my flower and frame colors. Then I die cut the flower parts and assembled them. 

I die cut the inked frame (and a foam one) and stamped my sentiment on the center rectangle that cuts out with the scalloped frame. 

Next, I die cut the piercing plate for a background and cut it down to A2 size. I adhered it to the card base. Then I adhered the stamped rectangle and the frame to the card front. 

Last, I adhered the flower and enamel dots to the frame area and was done!

We hope you will find lots of ideas with all of our cards and leave us some pretty blue, green and yellow cards in our gallery! We enjoy them so much!

-Carol


Thursday, August 3, 2023

Thanks

I was browsing Pinterest again, saw a cool graphic style card, and wanted to try to make it. (Hence, the name of my blog) Mine turned out a bit different from the original because of the lines in my wood patterned paper. I saw that my card had the colors in cards I was seeing on my insta feed and decided to share it with the Color Hues Challenge #69 using Teal and Orange.


Here is the card I CASEd by Jean at Studio-jd.com. Hers is just perfect!


Products I used:

PaperTrey Ink: Into the Blooms II dies

My Favorite Things: Thanks die

Patterned papers

Gold glitter washi tape

Concord and 9th: Dew Drops,  mini ink pads

Simon Says Stamp: Sequin, Etched Laurel Leaves dies

Ink blending brushes

I did my die cutting first, then ink blended the flower petals and sentiment. It took me forever to cut those patterned papers at the angle I wanted them, then I arranged them on my white card base. Not quite as simple as it looks! Hoping my papers are neutral enough for the challenge!

I plan to make another card like this with other woodgrain papers. The patterned papers used could give it all different sorts of looks, don't you think?

See you here soon,

-Carol