Thursday, August 29, 2024

Summer's End Card

Pretty much everyone, especially teachers or students, will say that a summer vacation is the yearly reprieve that helps them reset. That is how I always felt. Whether it is just the break from work, school or the normal life routine, there is something about summer that refreshes us. I will be sending this to a teacher friend who just went back to school. 

This week at Just Us Girls Challenge #742, you are invited to CASE (Copy And Selectively Edit or Copy And Share Everything) a Design Team member's card. You can take the colors, the theme, an element of the card, and then make your own design. Be sure to explain who/what you were inspired by and how you used it for your card. Here is my card.


Products I used:

Waffle Flower - Postage Collage die, Postage Collage Coloring stencil, Postage Collage Beach Days Stencil and stamp sets

My Favorite Things: Sunny Days Ahead stamp set, Seaside Gulls stamp and die sets

Concord and 9th - Seaside Post Dies

Copic markers

Ranger - Distress ink pads

Altenew - Obsidian black ink pad


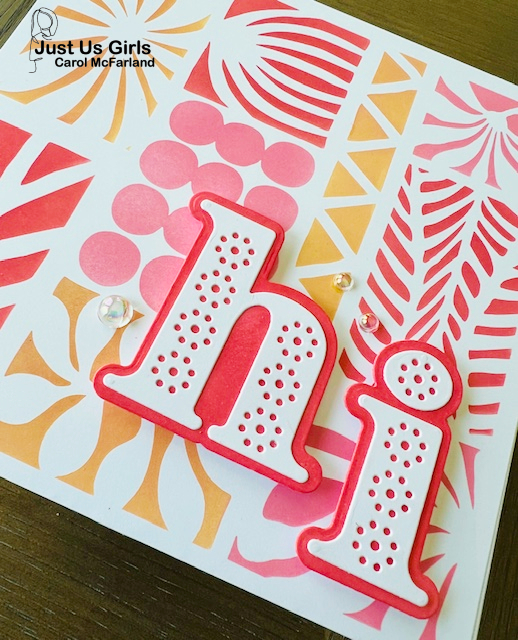
My postage collage was just your normal stamping and die cutting, and the only thing I changed was stenciling the two gulls looking closely into the camera, then fussy cutting them to look like a die cut.  I was going for a little laugh from all the gulls who are such quirky birds. (I also combined two sentiments to come up with the one you see.)

We hope you will join us this week. You have a variety of inspiration from the team!

Can you believe that September is just about here and summer is over in 21 days?

Carol


Thursday, August 22, 2024

Hi

At Just Us Girls this week our challenge #741 is Anything Goes with a Stencil. I got this stencil at the beginning of summer and was waiting for it to fit the right challenge at the right time in my summer cardmaking. It gives off tropical vibes to me. Be sure to check out all of the team's and guest Bonnie's blogs to see how they made their cards! Links to their blogs are above their card photos on the Just Us Girls Challenge blog.


Products I used:

Hero Arts: Floral Trove stencil

Spellbinders: Stitched H and I dies

Ranger: Distrees Oxide ink pads - Abandoned Coral, Worn Lipstick, Dried marigold

Picket Fence: Bubble Blowout Embellishment mix

Ink blending brushes

Foam squares


First I cut a 6" x 6" white panel. I masked off each section of the stencil, one at a time, to be able to change and separate colors throughout the whole stencil. I die cut my letters in white and ink blended the shadow piece with Abandoned Coral ink to match the stenciling. I adhered the white letters to the shadow pieces and popped up the completed letters on my stenciled panel with foam squares. Last, I added the irridescent "bubbles."

We hope you will join our stencil challenge because anything goes if you use a stencil. Be sure we can see the stenciling and that you tell us how you used it. These are quicker cards to make than most! See you in our gallery?

Carol


Wednesday, August 21, 2024

Everything Has Beauty

Fruit is the best food, isn't it? Whether it's a pineapple, strawberries, blackberries, cherries, watermelon, plums, grapes or peaches, it is all so refreshing. Time Out Challenges #270 is a Photo Inspiration that is so colorful with fruit and makes me want to sit down to a bowl of it. I decided to use my pineapple dies because one of my favorite fruits to eat is pineapple with fresh lime squeezed over it. The lime adds so much flavor! I learned this trick many years ago in Mexico. You can also decorate the table with pineapples! 


Products I used:

Spellbinders: Stitched Pineapple dies

The Paper Studio: Botanicals patterned paper

Pretty Pink Posh: Gems

Tim Holtz Idea-ology: Small Talk stickers

DMC embroidery floss

I die cut my pineapple and stitched it first. (I took artistic license to make it the colors I wanted to coordinate with my tropical paper.) Then I assembled the leaves and layers of the pineapple. I cut a strip of patterned paper and a thin strip of cardstock to bring in the pink from the patterned paper.

Last, I adhered everything to the card and added some gems. That's it!

I'm still sitting here thinking about having some fruit! Are you?

Thanks for stopping by,

Carol


Saturday, August 17, 2024

May Your Coffee Be Strong

I had the perfect reason to get out this stamp set today. Last night's Craft Roulette #228 parameters consisted of things I knew I had and could put together easily. The parameters were:

Project: Card with Square(s)

Colors: Bee Garden

Element: Monday

Random: Use a Marker(s)


My 5" x7" card has a squares grid and a scalloped square frame.
My bee garden has black, yellow and pink for bees and flowers.
My sentiment is about Mondays.
I colored my mugs with Copics and Stampin' Up markers.

Products I used:

Catherine Pooler - Mug Shots stamp set
Impression Obsession - Scalloped Nine-patch die
Altenew - Obsidian black ink pad
Copic markers
Stampin' Up! markers
Patterned paper scrap
White gel pen 

I stamped, colored and fussy cut my mugs. I added white highlight on the mugs.
Next, I die cut the grid and scalloped square (all one die).
This bee and flower patterned paper called out to me so I cut a strip of it to put behind the grid and to add interest to the card. The bees are so cute, as are the flowers!
Last, I stamped my sentiment!

You really should check out Craft Roulette on Friday nights at 7:30 EST on You Tube. It helps you use your stash and think outside of the box with alternative uses for things you own.

See you back here soon. Have a great weekend.

Carol


Thursday, August 15, 2024

One in a Buzzillion

I usually fear real bees but these smiley cuties were fun to play with for our Just Us Girls #740 Moodboard Challenge. Wait until you see all the ideas the team has come up with for you.


The moodboard has honey, cornbread, daisies, and a cute little fence with some plants. You don't have to use bees at all. You can even just take the colors from the picture to make a card!

Products I used:

Pixie Dust: Bee Happy die set

Spellbinders: Mini Blooms and Sprigs dies

Ellen Hutson: One in a Buzz-illion stamp set

Vellum

Versafine: Onyx Black ink pad

Distress ink pads

Ink blending brushes

Wink of Stella Pen

Irridescent glitter


Making this card consisted of lots of die cutting, piecing together the bees, hive and flowers plus ink blending. I played with the placement of the die cuts and looked at the Pixie Dust samples using this set on their website. I liked the little bit of ink and glitter on the wings, so I did the same on mine. Their faces make me smile.

Please join us for some moodboard inspiration! See you in the gallery!

Carol


Monday, August 12, 2024

Boo

The Inkspirational Challenge #322 Moodboard has gorgeous colors, and while I thought they would be perfect for something summery, a Halloween card might be cute using them. Lots of fall cards are being posted now and I guess I am jumping on the bandwagon. I also found this cute ghost at Michael's Craft Store and it gave me the idea for the card.


Products I used:

Pretty Pink Posh: Winter Mug dies, gems

WPLUS9: Fabulous die

Spellbinders: Mini Blooms and Sprigs dies

Sugar Pea Designs: Stitched Rectangle die

Taylored Expressions: Spiderweb stencil

Concord and 9th: Mini ink pads


I die cut my cute little ghosts and put black scraps behind their eyes.

I stenciled the spider webs on a white cardstock panel using aqua and green inks.

My "FABULOUS" die letters were the perfect size for my card. I  die cut and only used the letters for BOO in orange and aqua. I adhered the two colors together and slightly offset them to show both colors.

I die cut the flowers and added gems in their centers in the challenge colors, then adhered them to the ghosts.

The stitched rectangle is my most used die lately, and I used it for the A2 panel on the front of my card base.

The ghosts are popped up on foam tape to look like they are floating. They remind me of Casper the Friendly Ghost. I put them in front of the spider web, then spelled BOO below them.

Are you in the fall mood for cardmaking yet?

Thanks for stopping by,

Carol


Saturday, August 10, 2024

Keep Calm and Float On

Well, Craft Roulette was an easy one last night and no one really seemed to be too worried about what they were going to make. The wheel gave us:

Project: 4 x 8

Colors: Mountains

Element: Floats(s) or Floating

Random: Water


I cut a 4" x 8" white card base. My colors include blue and green for mountains and purple, orange and yellow for wildflowers around the mountains. I have my floating ladies and they are on a lazy river!

I CASEd myself from about a year ago when I made another lazy river using stamped pool floats and what look like water ballet swimmers to me. I forgot about these floating ladies on big palm fronds that I got in the dollar spot at JoAnn Fabrics a couple of years ago.

Products I used:

My Favorite Things: Tropical Leaves dies

Sugar Pea Designs: Wave stencil

Place and Time: Floating girls

Avery Elle: Sentiment from Splash stamp set

Copic markers

Altenew: Obsidian Blank ink pad

Distress ink pads

Concord and 9th: Mini ink pads

Bearly Arts: Glue

Picket Fence: Bubble Blowout Embellishment Mix

Foam tape


I ink blended a half sheet of white cardstock with green inks, then cie cut a lot of leaves! I stamped my sentiment and floating ladies, then colored and fussy cut them. 

I ink blended a 4 x 8 piece of white cardstock with green inks on the edges and blue in the center. Then stenciled over the blue with a darker blue ink to add the waves. I arranged the die cut leaves along the two long edges of my lazy river panel and when I was happy with their placement I adhered them with glue. I cut off any leaves that were hanging off the edge of the panel and used some of those leaf pieces to fill in my existing leaves on the edge.

I popped up the floaters and sentiment on foam tape. Last, I added the bubbles.

Have you looked into Craft Roulette? It really helps you use your stash and often find things you have but haven't used in a while.

I hope you are having a nice weekend and that you get to be crafty at some point!

Carol


Friday, August 9, 2024

Happy Fall

I couldn't wait to get out my Pumpkin House die set this year and the Inkspirational Challenges #321 Word Prompt: Woodland called out to me! Here is my little pop-up card with a little woodland theme.


Products I used:

Concord and 9th: Card Stacks Base Dies

Papertrey Ink: Pumpkin House die set

Pretty Pink Posh: Giving Thanks stamp set

My Favorite Things: Grassy Frames die set

Spellbinders: Notched Corner Frames die set

Versamark watermark ink  pad

Sponge dauber

White gel pen

Patterned paper

Cardstock scraps


I die cut all of the pieces I needed for the card base and built the card base. Then I die cut all of the trees, mushrooms, pumpkin house and details, vines and sentiment. I ink blended Versamark ink on the edges of the pieces for shadowing. I added white dots to the mushrooms with my gel pen. Assembly of the elements was next, then adhering them to the card base. I stamped the sentiment on a little die cut frame and added the mushrooms. This card folds down and fits in an A2 envelope!

I guess I have started fall crafting...don't be fooled. I may still do some more summer makes.

Thanks for stopping by!

Carol


Thursday, August 8, 2024

Thinking of You

I got out an older favorite die set for our Just Us Girls Word Challenge #739: Frame. All I did was ink blend some Distress Oxide inks on a panel of white cardstock, then die cut the frame and sentiment from it. You have to check out all the ideas our team had for this clever challenge from our teammate Carol.


Products I used:

Concord and 9th: Thinking of You Perfect Pairings dies

Distress  Oxide inks

Trinity Stamps: Bubble Blow Out Embellishment Mix

Sugar Pea: Stitched Recatangle die

Soft blue-grey cardstock

We hope you will join us this week with a frame of your choice! See you back here soon!

Carol

Tuesday, August 6, 2024

Life is Better at the Beach

Is there any Colorado Craft Company stamp that is not as cute as can be? I almost forgot that I had this set, then a few challenges came out asking for vacation or beach cards. Don't these critters look like they are having a blast at the beach? The cat isn't even mad that he was chosen to be buried. I think he probably volunteered!

I am playing along with The Paper Players PP701 Beach Time, Time Out Challenges #269: It's Always Summer Somewhere, and Simon Says Stamp Wednesday Challenge: Anything Goes.


Products I used:

Colorado Craft Company: Beach Life stamp set

Altenew: Obsidian Black ink pad

Ranger: Distress Oxide ink pads

Prismacolor: Colored pencils


First I ink blended a panel of white cardstock with the sand, water and sky colors. Then I stamped my images on it using black ink. I stamped the row of animals again on another scrap of white cardstock and colored them with my pencils. I fussy cut the colored row of animals, the buried cat, the bucket and shovel. I adhered all the fussy cut elements to the scene and it gave some dimension to them from the background. I shaded parts of the sand with a brown pencil, then stamped my sentiment. I cut down the scene and made a blue card base for it. It's roughly a mini slimline size. And that's it!

Have you been to the beach this summer? 

Thanks for stopping by,

Carol


Saturday, August 3, 2024

Peeking Santa

I love this stamp set from Ellen Hutson and have more than gotten my money out of it. The peeking Santa cracks me up how he teaches kids (and adults?) to behave all year. I made this card for Craft Roulette #226 where the parameters were not terribly tricky.

Project: See-Through

Colors: Jungle

Element: Teach(es)/Teacher(s)

Random: Tangle


I made a see-though window for Santa to peek at the behavior going on, the sky, vegetation and toucan colors of red, blue, green and yellow, Santa teaching people to behave because he is watching, and the ever-tangling Christmas lights.

Products I used:

Ellen Hutson: Tis the Season stamp set

Altenew: Obsidian blank ink pad, Artist Markers

Copic markers

Square die

Prismacolor pencils


I die cut the square in the card front, then stamped the lights on both sides, masking where needed.

I stamped and colored Santa, then fussy cut him.

I created a mask on the inside of the card with Post-it notes, then ink blended blue sky around the inside edges.

I adhered Santa to the inside of the card in the ink blended square.

I stamped my sentiments inside and out.


Quick little card for the challenge! See you back here soon!

Carol


Friday, August 2, 2024

Riding by

I have the honor of being a guest designer for As You See It Challenge #329, where the Recipe Challenge theme is Forest Bathing. Forest Bathing has its origins in Japan and is tied to the belief that immersing one's self in nature is good for us. I went back to personal experiences in Costa Rica, hiking amongst the palm trees (my favorite tree) to get to a deserted beach. That beach is forever etched in my mind because other than our group, no one was around. I could have ridden a hybrid or mountain bike through those trees and that is how I came up with this card.


Our secluded beach in Costa Rica.


Products I used:

Ellen Hutson: Good Day stamp and die sets

Honeybee Stamps: Happy Birthday sentiment stamp

Sugar Pea Studios: Stitched rectangle die

Stampin Up!: Embossing folder, Crumb Cake ink pad (for sand)

Copic markers

Prismacolor pencils

Altenew: Obsidian Pigment Ink

Twine

Foam tape

First, I stamped and colored three trees on a stitched, white, die cut panel. I stamped, die cut and colored more trees and my bike rider. I popped up two trees and the bike rider on foam tape for depth. I created the "Riding by" on my computer so it would fit in the space I had for the sentiment. I stamped the Happy Birthday under "Riding by" and cut a rectangle around the completed sentiment. I matted it with the same green as the embossed mat I made using a woven basket texture folder. I assembled my card front along with some twine that looked outdoorsy. My card is 5" x 7" so that I could have the frame of the embossed mat around the scene.

I am anxious to see all the ideas people have for this challenge! Thanks to the team again for choosing my card and offering me the chance to guest with them.

Thanks for stopping by!

Carol


Thursday, August 1, 2024

Sea You Later

I'm back again as hostess for our latest Just Us Girls Color Challenge #738: Orange and Hot Pink. I figured that in the midst of summer these colors could encompass popsicles, fruits, bathing suits, pool floats, beach balls, cocktails, flowers and many more staples of the season. The team and our new guest, Bonnie Klass, have made a variety of fun cards for you.


I am also playing along at Time Out Challenges, Inspired by Words Challenge: It's Always Summer Somewhere....like where I live and like these ladies who spend many days of every month at the beach!


I am also playing along at the Simon Says Stamp Wednesday Challenge Anything Goes and Simon Says Stamp IG Challenge. #SSSIGChallenge


Products I used:

Simply Graphic: Swimmers dies

Ellen Hutson: Everything's Beachy stamp set

Simon Says Stamp: Under the Sea Animals (sentiment)

Pink and Main: Large Sentiment Strip dies

The Greetery: Coaster die

Stampin' Up!: Melon Mambo embossing powder

Versamark ink pad

Kraft A2 card base

I love die cutting and playing paper dolls with this swimmer die. My swimmers have different suntans but you can't see it in the photo. They are all going to burn if they don't get under those umbrellas! 

I hand cut the umbrellas after stamping them with Versamark ink to give me a guide. I popped them up on foam tape to look more realistic over the girls.

We all hope you will play along with us this week. See you in the gallery!

-Carol