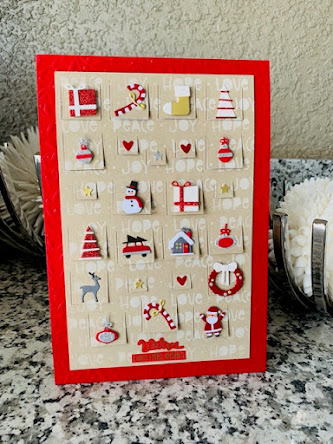
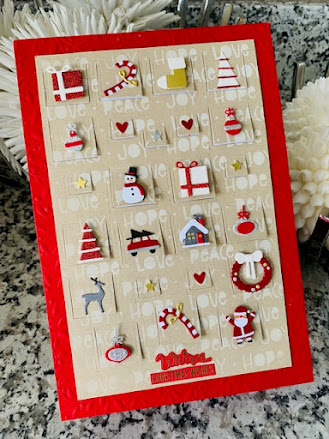
When the Tim Holtz Christmas Minis Thinlits dies hit the stores recently I had to have them. Then, I saw an older and similar set called Tiny Snowglobes Thinlits dies and was hooked again. I have been wanting to make an advent calendar for a long time, and that's what I saw in these little dies. I am playing along with the Simon Says Stamp Wednesday Challenge "Not a Card" (here) where they are showcasing Tim Holtz products. Also, I had to play along with Color Hues The Color Challenge #28 this week because I love kraft and red together and those are their colors this week!
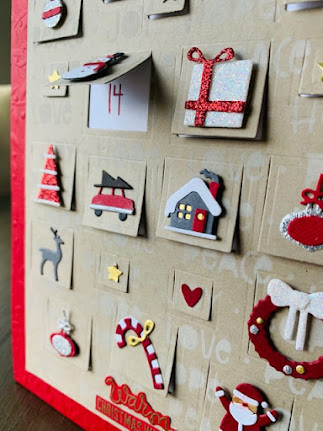
Next I partial-cut two sizes of square dies for doors on a kraft panel.
Then I stenciled the kraft panel using Simon Says Stamp's new Peace Hope Joy Love stencil with Tim Holtz Distress Ink in Picket Fence. I scored the folding/hinge side of each door so they can open and close.
I positioned the little objects where I wanted them and started adhering them to the doors with either Tacky Glue or foam tape to pop some of them up.
I heat embossed the sentiment "Warm Christmas Wishes" on red cardstock using gold embossing powder and the Simon Says Stamp stamp set Warm Christmas Wishes. Then I fussy cut it out.
Next, I cut a white cardstock panel just a little smaller than the kraft panel and held it under the kraft panel. I opened each door and put a small dot with my pencil on the white panel where the center of each door was.
I used my Paper Smooches Alphadot set to stamp numbers 1-24 out of order on the white panel so they would end up being behind each door of the kraft panel. Then I used Tacky glue along the outer edge to adhere the white panel behind the kraft one.
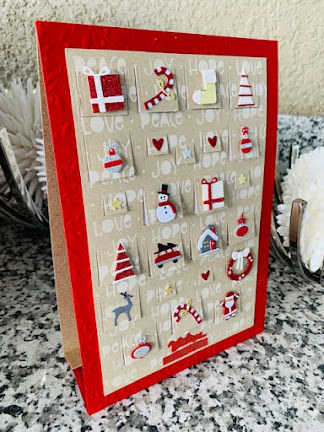
I found some Christmas embossed cardstock and cut it 1/2" larger than my kraft panel all around. I glued the red panel behind the calendar, leaving an extra couple of inches of the red panel on the bottom.
I scored the excess part of the red panel in half to start an easel for my calendar. Then I grabbed some thin cardboard that wouldn't bend easily and cut and scored it at the top and bottom to adhere to my calendar so that it could fold up to be stored away. The finished size is just under 9.5" x 6.5" due to the red background/easel part.
So what is left to make are either decorative envelopes or little pillow boxes with numbers 1-24 on them. Each day the recipient of this advent calendar will open a door, starting with the top left and moving to the right each day. Whichever number is behind the door, is the envelope or box to open and receive a little gift, such as a gift card, candy or other small item.
I think that is it! Hope that made sense! It was fun and kept me busy for a couple of days working off and on on it.
Are you making any fun projects now that we are almost to Halloween?
-Carol
13 comments:
This is just fabulous! I love everything about it. All your work was well worth it. Thanks for joining us at Color Hues!
Thanks Karen!!!! It was fun!!!
Carol, I loved seeing this come to life! The added stenciled background was such a great idea! All your efforts were worth it! Outstanding job and thanks for choosing Color Hues to tackle this project with!
Thanks Nancy! The tiny little pieces got easier somehow after I made more of them!
This is amazing, Carol! I love everything about it! Thanks so much for joining us at Color Hues!
Hi Carol, What a treat to see this delight in our gallery at Color Hues! You've done a great job with designing the calendar and choosing images that work so well with color and balance. Fabulous!
Thank you so much Kristie!
Thank you Cindy!!!
Carol WoW! I can only imagine how much work went into your advent calendar. Beautiful and thoughtful work. I am in love. Thank you so much for sharing whit us at the Color Hues!
This is just one of those very special projects! A little piece of art to treasure ♥
Thanks for joining us at Color Hues Carol !
Thank you Tracey! It was a lot of fun making it!
Thank you Hannelie!
Post a Comment