Thursday, May 22, 2025

Good Times and Tan Lines

It is definitely summer now where I live. Hot temps and getting humid. (Insert sad face) Well, pool party anyone? For our Just Us Girls #776 Stencil week I chose to make a bird's eye view of a pool with bright umbrellas around it! I used two different stencils for my card.


First, I grabbed some dove grey cardstock and ran it through my Big Shot with my Ellen Hutson A2 Piercing Plate 2 for texture on the pool deck.

I die cut the pool edge three times using my Waffle Flower Nesting Rectangle Frames die set. I adhered the three rectangles together to raise the pool edge.

When the nesting rectangle die cuts the frame, you also get a center rectangle. I took one and stenciled pool water with My Favorite Things Perfect Pool Water stencil using a Ranger Tumbled Glass distress Oxide ink pad.

I made a white A2 card base and adhered the pool deck and pool to it.

Next, I die cut and stenciled pool umbrellas using my Waffle Flower Beach Umbrella Die-n-stencil set, using a Ranger Candied Apple distress ink pad. I added Tim Holtz idea-ology red pearls to the umbrellas. Then I popped up the umbrellas around the pool on foam tape and added some Concord and 9th Dew Drops (to look like splashes of water from the pool).

Last, I stamped my Colorado Craft Company Beach Life sentiment with Chipped Sapphire distress ink and adhered it to the pool.

We hope you will grab some stencils and join us this week! Thanks for visiting!

Carol


Time For New Adventures

Time Out Challenges #289 is an Inspired By theme: your favorite winged things. I like flamingos, and I have a lot of flamingo stamps and dies, but I wanted to do something a little different. I decided that ever since our daughter moved out of state, airplanes have become my favorite winged things because we can visit her, and vice versa, in just a little over two hours. So, I got out quite a few products and got to work.


Our generous sponsor for this challenge is Lawn Fawn: A $25 store credit! Also, the challenge winner will be invited to be a guest designer in a future Time Out challenge. 

We are joined by Kathy Asper of My Asperations, and winner of Time Out #284 as Guest Designer. Her cards are wonderful both outside and inside. Treat yourself to a stroll through her blog as well as all of the DT's blogs where you can find out how they made their "Inspired By" cards and what products they used.


I did a lot of die cutting after stenciling a hilly scene with pink clouds. I have had a stamp set with an airplane doing a heart pattern in the sky and now I've finally used it, minus the part of the stamp with the airplane! Airplanes make all the other elements possible: hot air ballooning, traveling the globe, seeing sights like the Eiffel Tower as well as carrying our bags. I chose happy summer colors since vacations do make us smile. The little wooden arrow signs say, "It's time for new adventures." I have always loved the stamped sentiment: "It's never too late to change your view." That's what vacations are all about, right?

Products I used:

Honey Bee - Lovely Layers Globe

My Favorite Things - Cloud stencil

Sizzix - Summer Days die set

Paper Smooches - Get Out of Town stamp set

Stampin' Up! - Sent with Love stamp set

Memento Tuxedo Black ink pad

Distress Oxide ink pads

Concord and 9th - Mini ink pad

Holographic silver cardstock


You can always use butterflies, dragonflies, bees, birds, angels, dragons, fairies or whatever else you come up with to be creative. Remember, it is supposed to be your favorite winged thing, so tell us why!

We look forward to seeing your creations in our gallery!

Carol


Thursday, May 15, 2025

Sending You Smiles

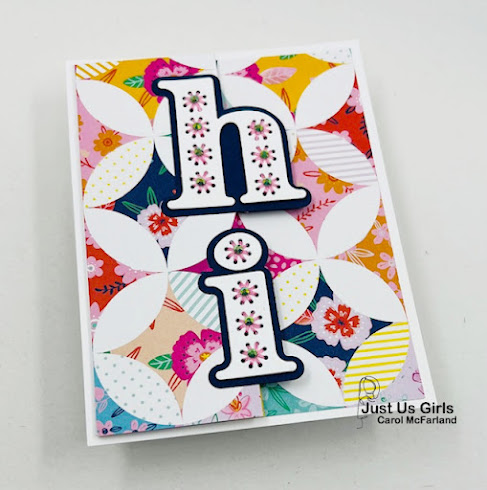
Hello friends! Thanks for stopping by. I have a card today with some patterned paper that I have actually hoarded for quite a while. I recently bought a second piece of it so I could cut into one of them and not feel like I was running out. (Girl Math) It is so colorful and pretty! For our Just Us Girls Moodboard Week #775 hosted by the lovely Carol Mayne, we have a bright cheerful palette of colors to use as a jumping off point. 


I wanted to make sure that the patterned paper took a front row seat on my card, so I CASEd a recent Kelly Schirmer fun fold card here from Instagram. She used the fun fold instructions here and made it her own with her beautiful patterned papers. My paper reminds me of a quilt, so I thought that a little embroidery would work with a sewing-esque card.

Here are the products I used for my card:

Patterned paper - JoAnn Fabrics

Spellbinders - Stitched alphabet dies

Pretty Pink Posh - Gems, Encouraging Greetings stamp set

Stampin' Up! - Classic ink pad

White and navy cardstock scraps

DMC - embroidery floss

This card was not difficult at all and it sure is a good way to showcase a pretty piece of paper! A note can be written on the back of the card. 

We hope you will join us for this fun moodboard challenge. See you in our gallery and thanks for visiting!

Carol


Sunday, May 11, 2025

A "Quilted" Card

Well, we are flying through the year and Mother's Day is almost over. Next up is Memorial Day, Father's Day, then the 4th of July. Is it too early to start patriotic cards?

The Color Throwdown #832 is asking cardmakers to use dark blue, light blue and red for their current challenge. So I jumped at the chance to make a summer holiday card.


When I bought this Concord and 9th Poinsettia Quilt Top die set I had no idea how many ways there would be to use it to get different looks. I have made Christmas cards, fall and and now summer versions. The "quilt" part of this card opens on top of a red 5" x 7" card. 

Well, I guess I'll be breaking out all things summer for m next makes! Thanks for stopping by!

Carol


Saturday, May 10, 2025

S'up Dog?

Happy Saturday! I hope you are relaxing and that you will have some crafting time this weekend. I am taking part in a fun blog hop once a month called CASE IT. The idea is to look back a week on Instagram and CASE a card you like, then share your card and the one you CASEd. I am a big Alli Frazier fan and that is where the idea for my card came from. CASE= Copy and Selectively Edit, meaning make it your own. Here is my card, and then  a screenshot of Alli's.


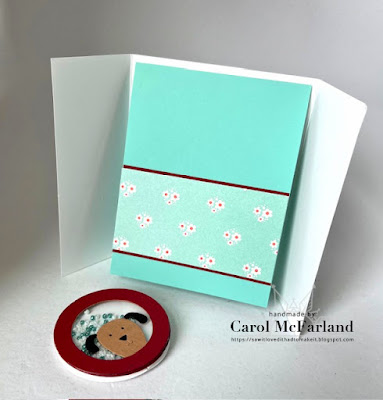
The cards look somewhat similar on the outside, but she called hers an interlocking card and mine has a sliding shaker mechanism. Isn't her card pretty and fun? The inside of my card has another "card" that opens to the sentiment.


Basically, you make a shaker of your choice, then back it with two folded-in-half circles of the same size (they look like tacos), then another whole unfolded circle. The outside card base is a gate fold, and the inside "card" is top folding and slightly smaller than an A2 size. (Outside card: 8 1/2" x 5 1/2" cardstock scored at 2 1/8" from each end on the long side. The inside "card" is 4" x 10 1/2" scored at 5 1/4") 

I found this tutorial a few years ago on Xeniacrafts.com in Spanish (I was a Spanish teacher so I understand, but her video is very visual and I gave you the measurements above.) Use lightweight cardstock for the slider mechanism on the back of your shaker. You don't have to use a circle....most shapes will work. It also doesn't have to be a shaker. One more hint: With your paper cutter, slice off a hair off each of the two "gates" of your gate fold card base so there is space for the mechanism to slide up and down. You will notice that there is space between my gates and that is why.

Products I used on my doggy card:

Simon Says Stamp - Peeking Pup die, Circles dies

Ellen Hutson - Clever Sausage stamp set (sentiment)

Stampin' Up! - Patterned paper (older)

Acetate

Seed beads

Altenew - Obsidian black ink pad


Here is one of the first cards of this style that I ever made, for your reference.


We hope you enjoy this month's CASE IT Instagram Hop! The hop details and links to all the cards are on my 4/10/25 @sawithadtomakeit Instagram post.

Thanks for stopping by!
Carol


Thursday, May 8, 2025

Zesty Wishes

I love lemons and especially limes...that yummy flavor and smell. There are many amazing lemon cards out there but I decided on limes for our Just Us Girls Challenge #774 Word Week: Fruit.


Products I used:

Simoln Says Stamp - Citrus Slice Background die

Lawn Fawn - Zesty Lemon dies, Henry's ABCs dies

Concord and 9th - Mini ink pads


I ink blended the edges of a kelly green cardstock panel with a darker green that fades toward the middle. Then I die cut the Citrus Slice panel on white cardstock. After die cutting my letters, lime, leaves and flowers, I ink blended them in the colors of my choice. After arranging them on a strip of vellum, I adhered them and added yellow gems to the center of the little white flowers.

Think about joining us with fruit-inspired cards this week! It will definitely get you in the mood for summer!

Thanks for stopping by!

Carol

Relax

Relaxing under the big sky full of stars when you are far from the city lights is such a special treat. I used Holographic Silver Cosmo Swirl cardstock from Your Paper Insider to accentuate the celestial nature of our Time Out Challenge #288: May the 4th Be with You. We are looking for takeoffs on the movie series, or celestial, sky, northern lights themes, etc. This is also going into my masculine card stash...you know we never have enough of those kind of cards.


Products I used:

Sizzix - Christmas Cutouts dies (trees), Vacation Words: Block (Relax)

Waffle Flower - A2 Nested Domes die

Your Paper Insider - Holographic Silver Cosmo Swirl cardstock

Stampin' Up! - Star border punch

Blue-grey sparkle cardstock

Versamark - Watermark ink pad

Memento - Tuxedo black ink pad


First, I freehanded the mountains and made two rows of them. The back row of mountains has Versamark and Memento black ink sponged onto the edges. I also popped up the two rows of mountains on foam tape. 

At first I die cut three trees beside each other on green cardstock, not die cutting all the way to the trunks. I was trying to make a row of trees that were connected to the ground. It became problematic, so my second row is individually cut trees in a darker green.

I discovered the sparkly dark cardstock when I was searching for a dark blue for the night sky. I almost left the sky piece as is, but I decided to add stars with the holographic cardstock. The sentiment is cut from both of these cardstocks as well.

Last, I thought I would make a dome shaped card to mimic the earth's sky.

We hope you will join us for this fun challenge. The team has made a variety of inspiring cards for you. Our guest designer is Jaydee of Stampin!withJaydee and she has jumped right in with a fun card. Our generous sponsor this challenge is TopFlight Stamps and they are giving our challenge winner $25.00 store credit. That winner will also be invited to be a future guest designer at Time Out, so we hope you join us!

See you in the gallery...

Carol


Friday, May 2, 2025

Happy Father's Day

I saw The Paper Players Challenge #PP735 and immediately knew what I could use for their sketch. Here is what I came up with for it. Do you like the "punny" sentiment?


Products I used:

The Stamp Market - It's Time kit

Photoplay - Campfire & Lakeside 6 X 6 Paper Pad

Spellbinders - Rose gold metallic cardstock

Altenew Obsidian black ink pad

Hero Arts - Hero Hues Espressso mini ink pad

This watch die set is always fun to play with and making a masculine card was no different. The DAD is brown ink and the circular sentiment is black...I wish that had turned out to be more obvious. I do like the metallic watch frame though.

That's it for today! Happy Weekend!

Carol


Thursday, May 1, 2025

Make Today Count

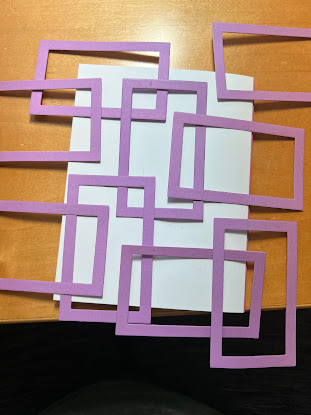
I have wanted to try to make this card for a very long time after seeing this by @muddyong on Instagram. She cut her background with her Silhouette Machine (which I don't have) so I made mine with rectangles. This card is for our Just Us Girls #773 Die Week: Use a flower die. Check out all of the team members' cards as well as that of our guest for the month of May, Rosemary Dennis.


Working on placement of the rectangles. I would have framed the edge of the card front 
but I used my last sheet of cardstock in this color!


Products I used:

Papertrey Ink - Into the Blooms II dies

Waffle Flower - Nesting Rectangle Frames die set

Tim Holtz Idea-ology - Small Talk Sentiments

Rhinestones

I die cut a lot of rectangle frames and arranged them until I was happy with their placement. I adhered them to the card front, then die cut the flower and leaves. Using a Versamark watermark ink pad I dragged each of the layers of flower petals to darken the edges. I assembled them then adhered the flower and leaves to the card front. I chose a sentiment and added rhinestones for some bling.

We hope you will die cut a flower "or two" and make a card for our gallery this week! Can't wait to see the entries there....all flowers!!!

See you soon,

Carol